REST API
A public API for driving EasyUC from your own scripts and systems.
Software, updates and licence files are available in the customer portal. Go to downloads
EasyUC for CUCM
Manage users, phones, numbers and voicemail in one interface. Templates and provisioning workflows handle recurring changes in Cisco Unified Communications Manager.
A new employee needs a user, a phone, an extension, a voicemail box and perhaps a mobile number for Single Number Reach. In CUCM administration that is a lot of pages. In EasyUC it is one step, from a template if you like.
create, change and set up new users automatically
personal and shared phones
video endpoints on CUCM
extensions and number ranges
ports for fax, door intercoms and other analogue devices
picking up calls within a team
hunt groups and their members
mailboxes in Unity Connection via CUPI
consistent settings for users and devices
for the ACD, for example
calls ringing on the mobile in parallel
a user's mobile devices on CUCM
settings per location in EasyUC, no reference device in CUCM
lines, speed dials and BLF on a view of the phone model
per number with a weekly schedule, also as an XML service on the phone
busy trigger for all lines of a user, with preview
save objects via AXL, restore deleted ones
watch and operate up to 10 phones
remove devices, lines and mailbox of deleted users, with a daily limit
define rights, clusters and locations once and link accounts
Template 2.0 in detail
Which defaults does a new user, phone or group need? This guide explains the Template 2.0 areas and their use in the wizard, illustrated with the original interface.
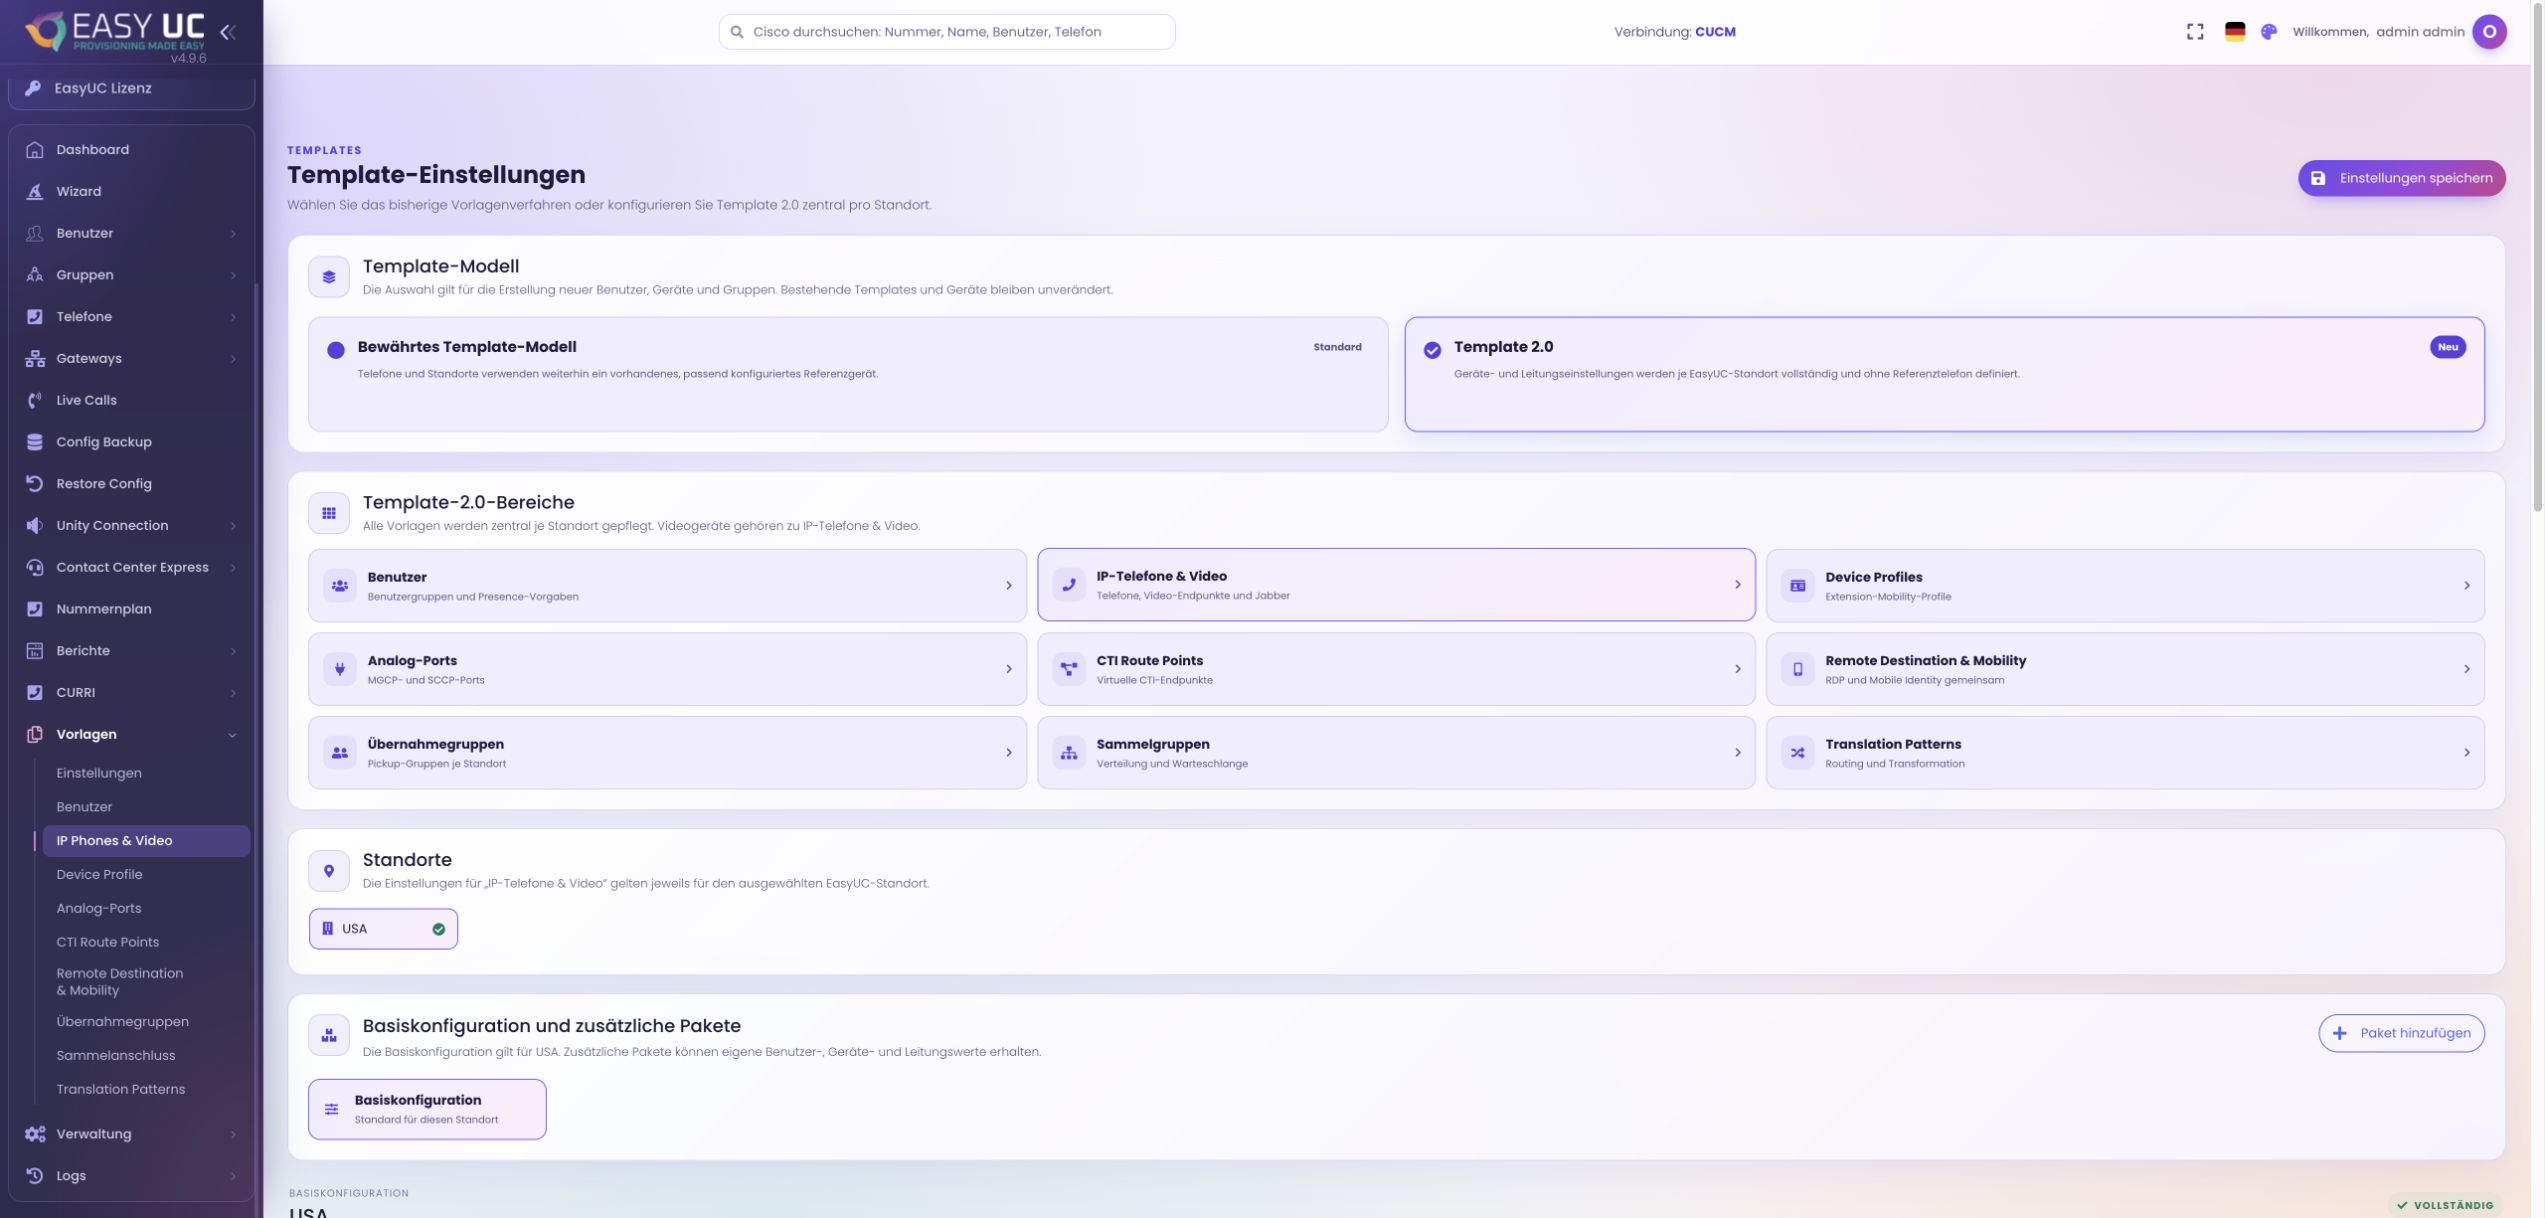
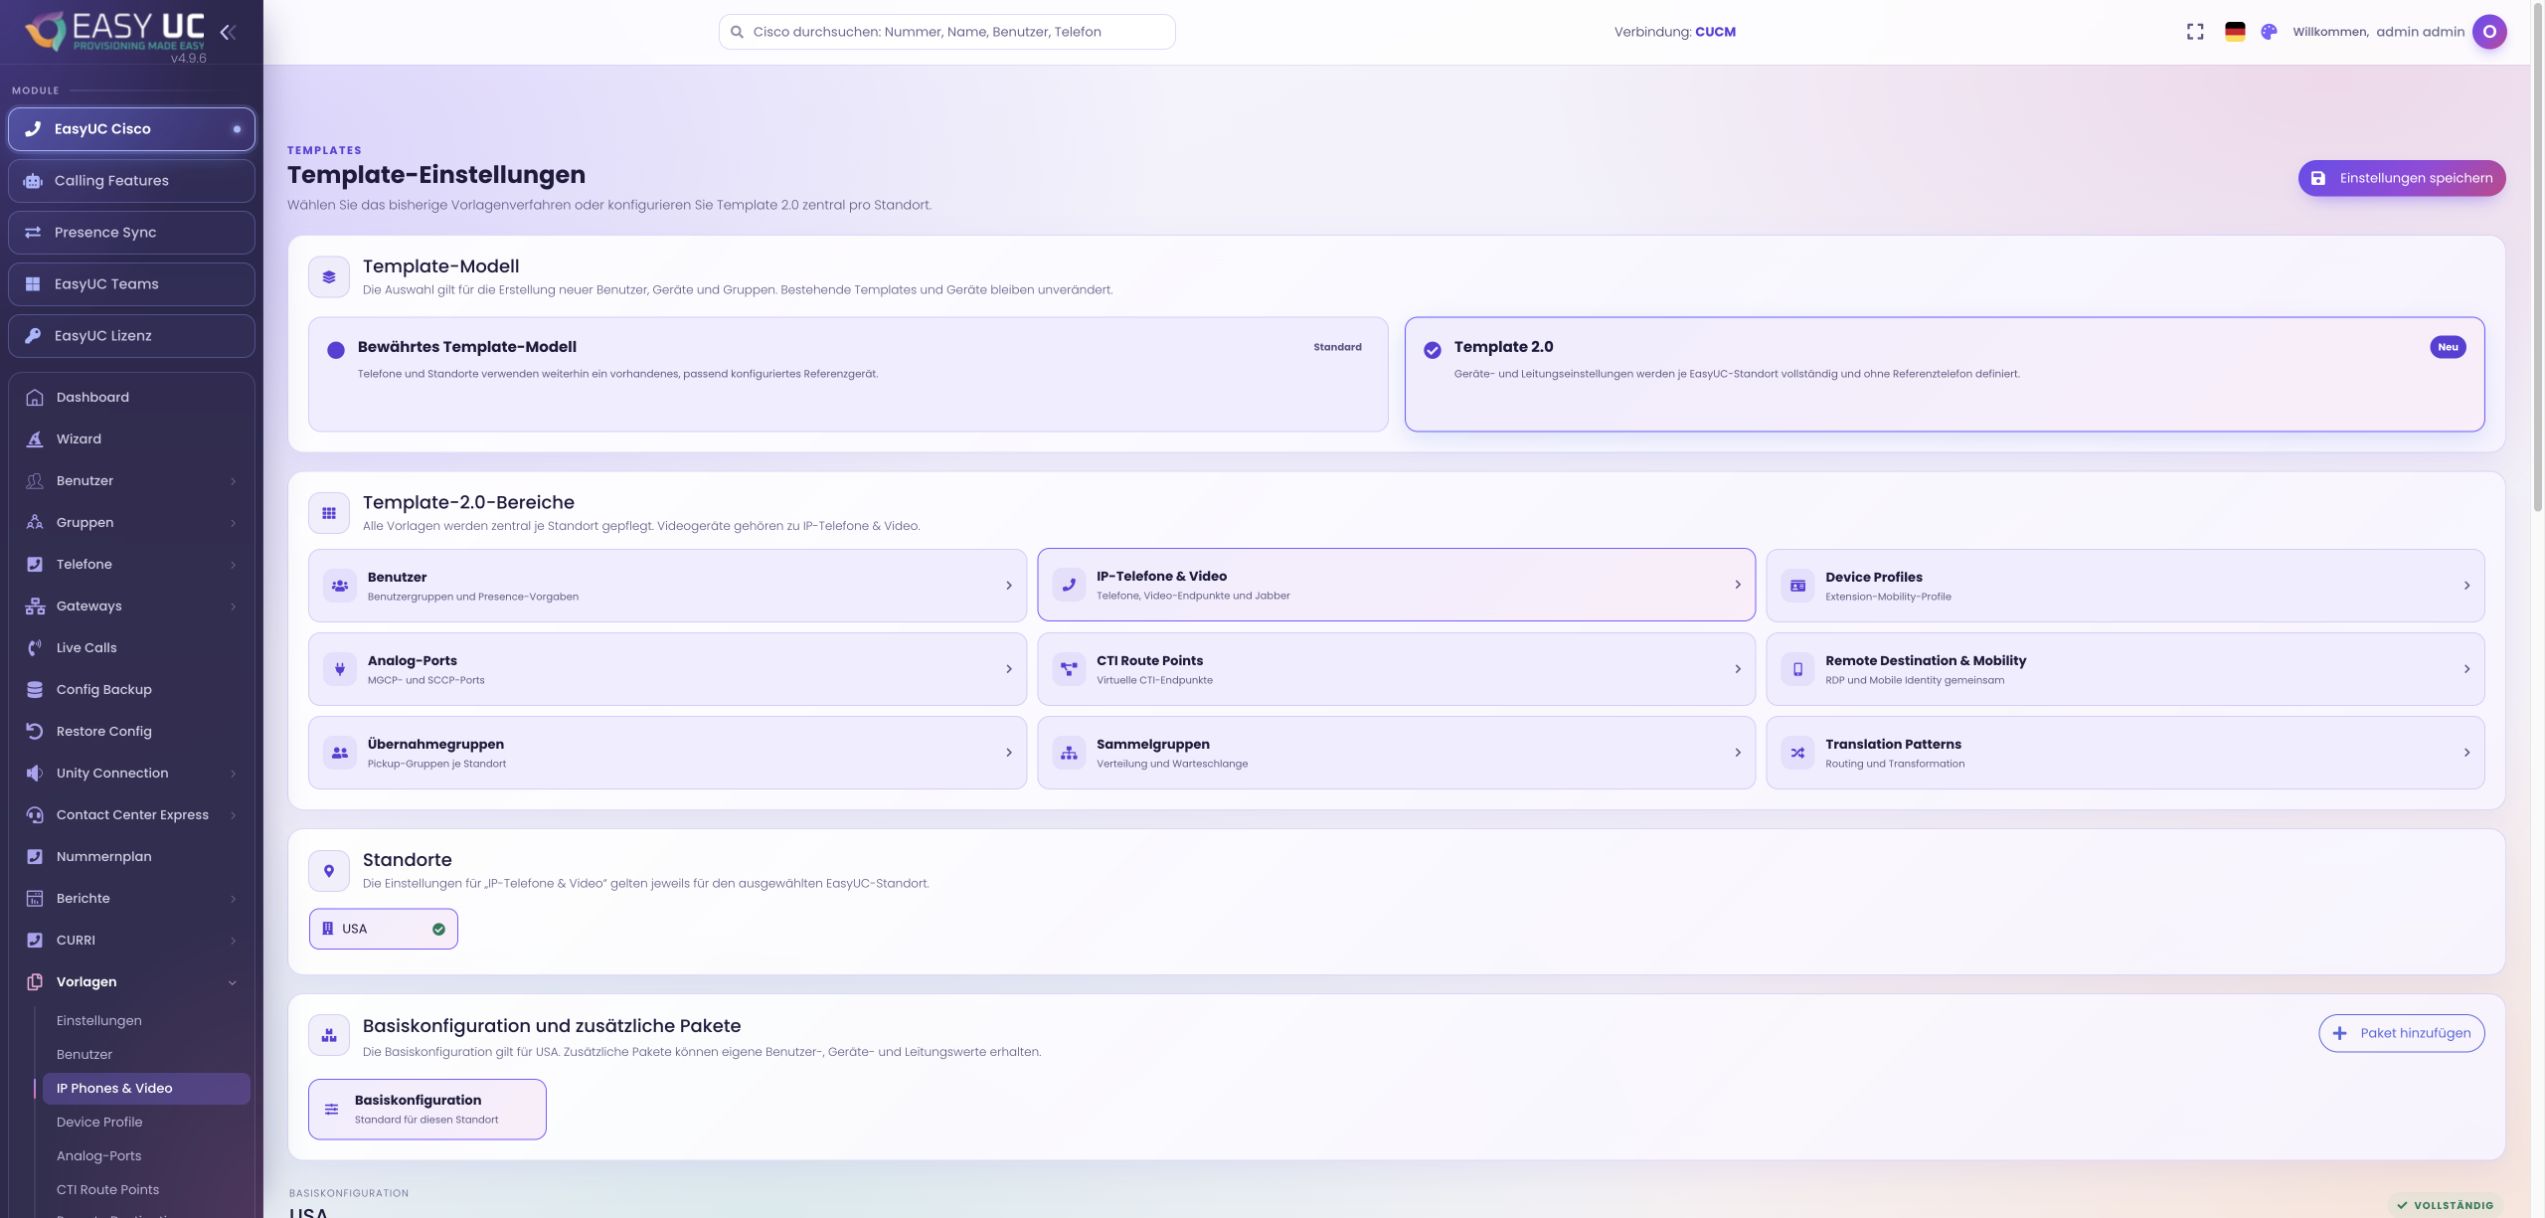
Template 2.0 builds device and line models from the location defaults stored in EasyUC. Unlike the reference-device model, it does not need a sample phone in CUCM. The base holds the location defaults; an assigned package can have its own configuration.
A new package configuration copies the current base once and is then maintained independently. Without a separate package block, the location base is used. Saving checks required values and CUCM references. It saves the EasyUC configuration; it does not change existing CUCM devices or create new devices.
This lets different groups of users at a location be provisioned with suitable defaults. Actual creation happens later in the relevant dialog or wizard.
Select the CUCM connection, create an EasyUC location and choose the Template 2.0 model.
Choose the area and location. A package must be assigned to this location in package management before configuring it.
Enable the required areas and complete mandatory values for all locations of the active connection.
Save the settings. Choose the matching location and, where applicable, package when creating an object later.
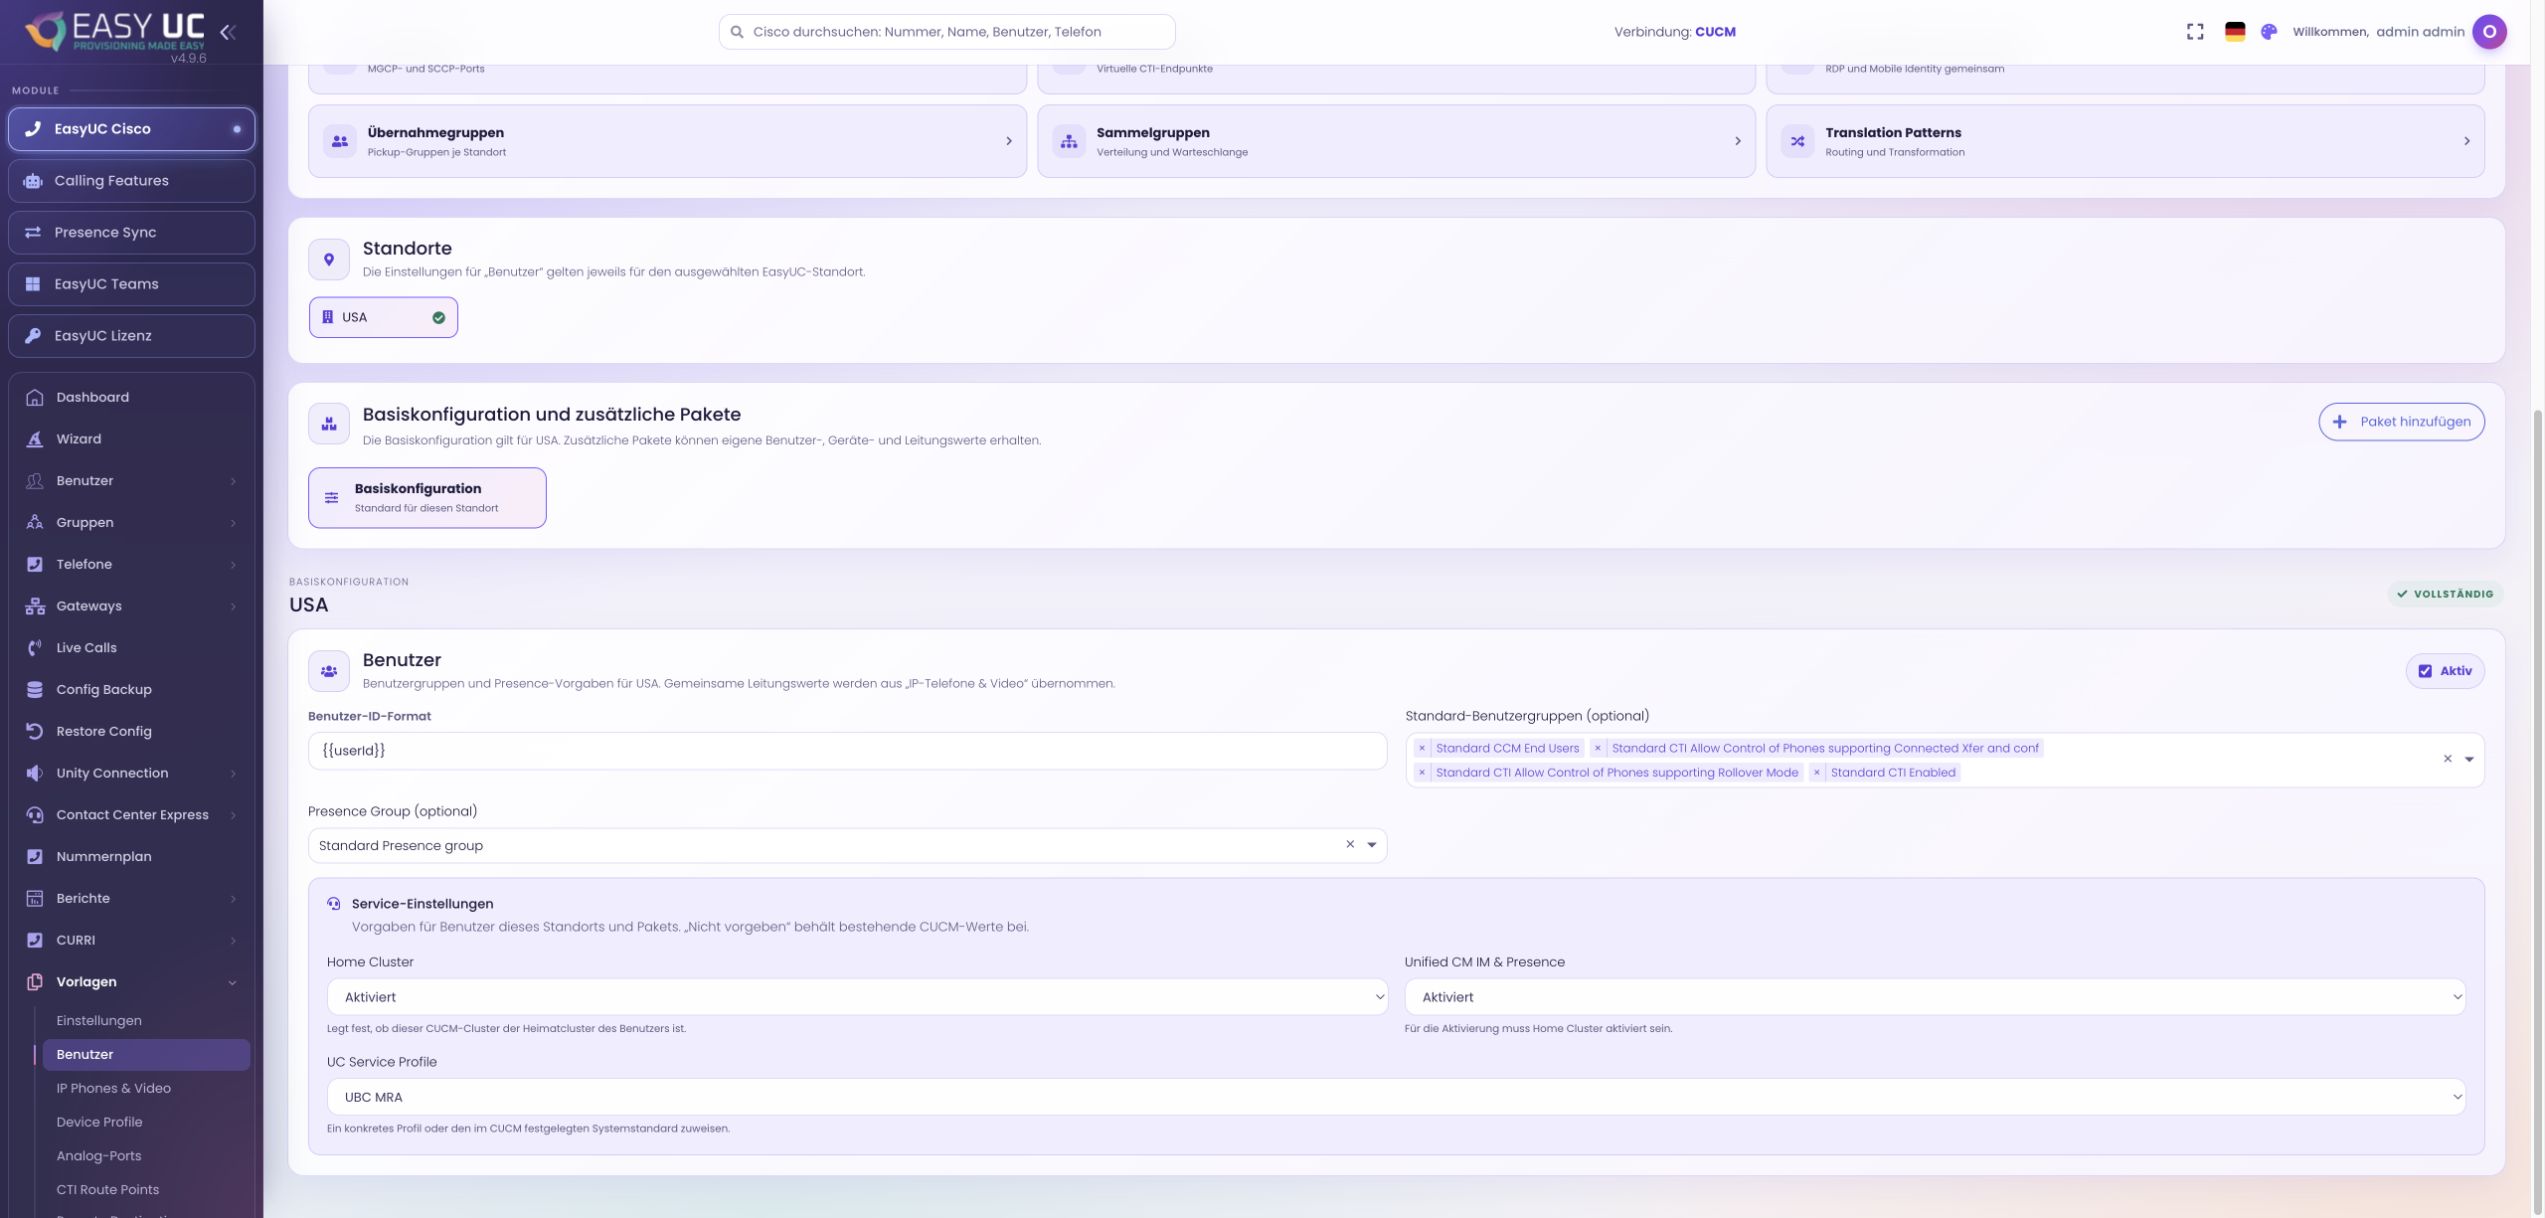
The Users area defines default user groups, the presence group, Home Cluster, IM & Presence and the service profile. IM & Presence requires Home Cluster. For the service profile, leaving it unspecified preserves existing values; System default uses the CUCM default profile.
Defaults are applied when creating a user or explicitly updating one from a template. User groups are added without removing existing memberships. The user ID comes from the input; LDAP display names remain managed in the directory.
Consistent defaults make onboarding easier without selecting every group and presence setting again.
Enable Users for the selected location or package block.
Choose groups and presence values; align Home Cluster, IM & Presence and the service profile.
Save, then create users or explicitly trigger the update-from-template action for a user.
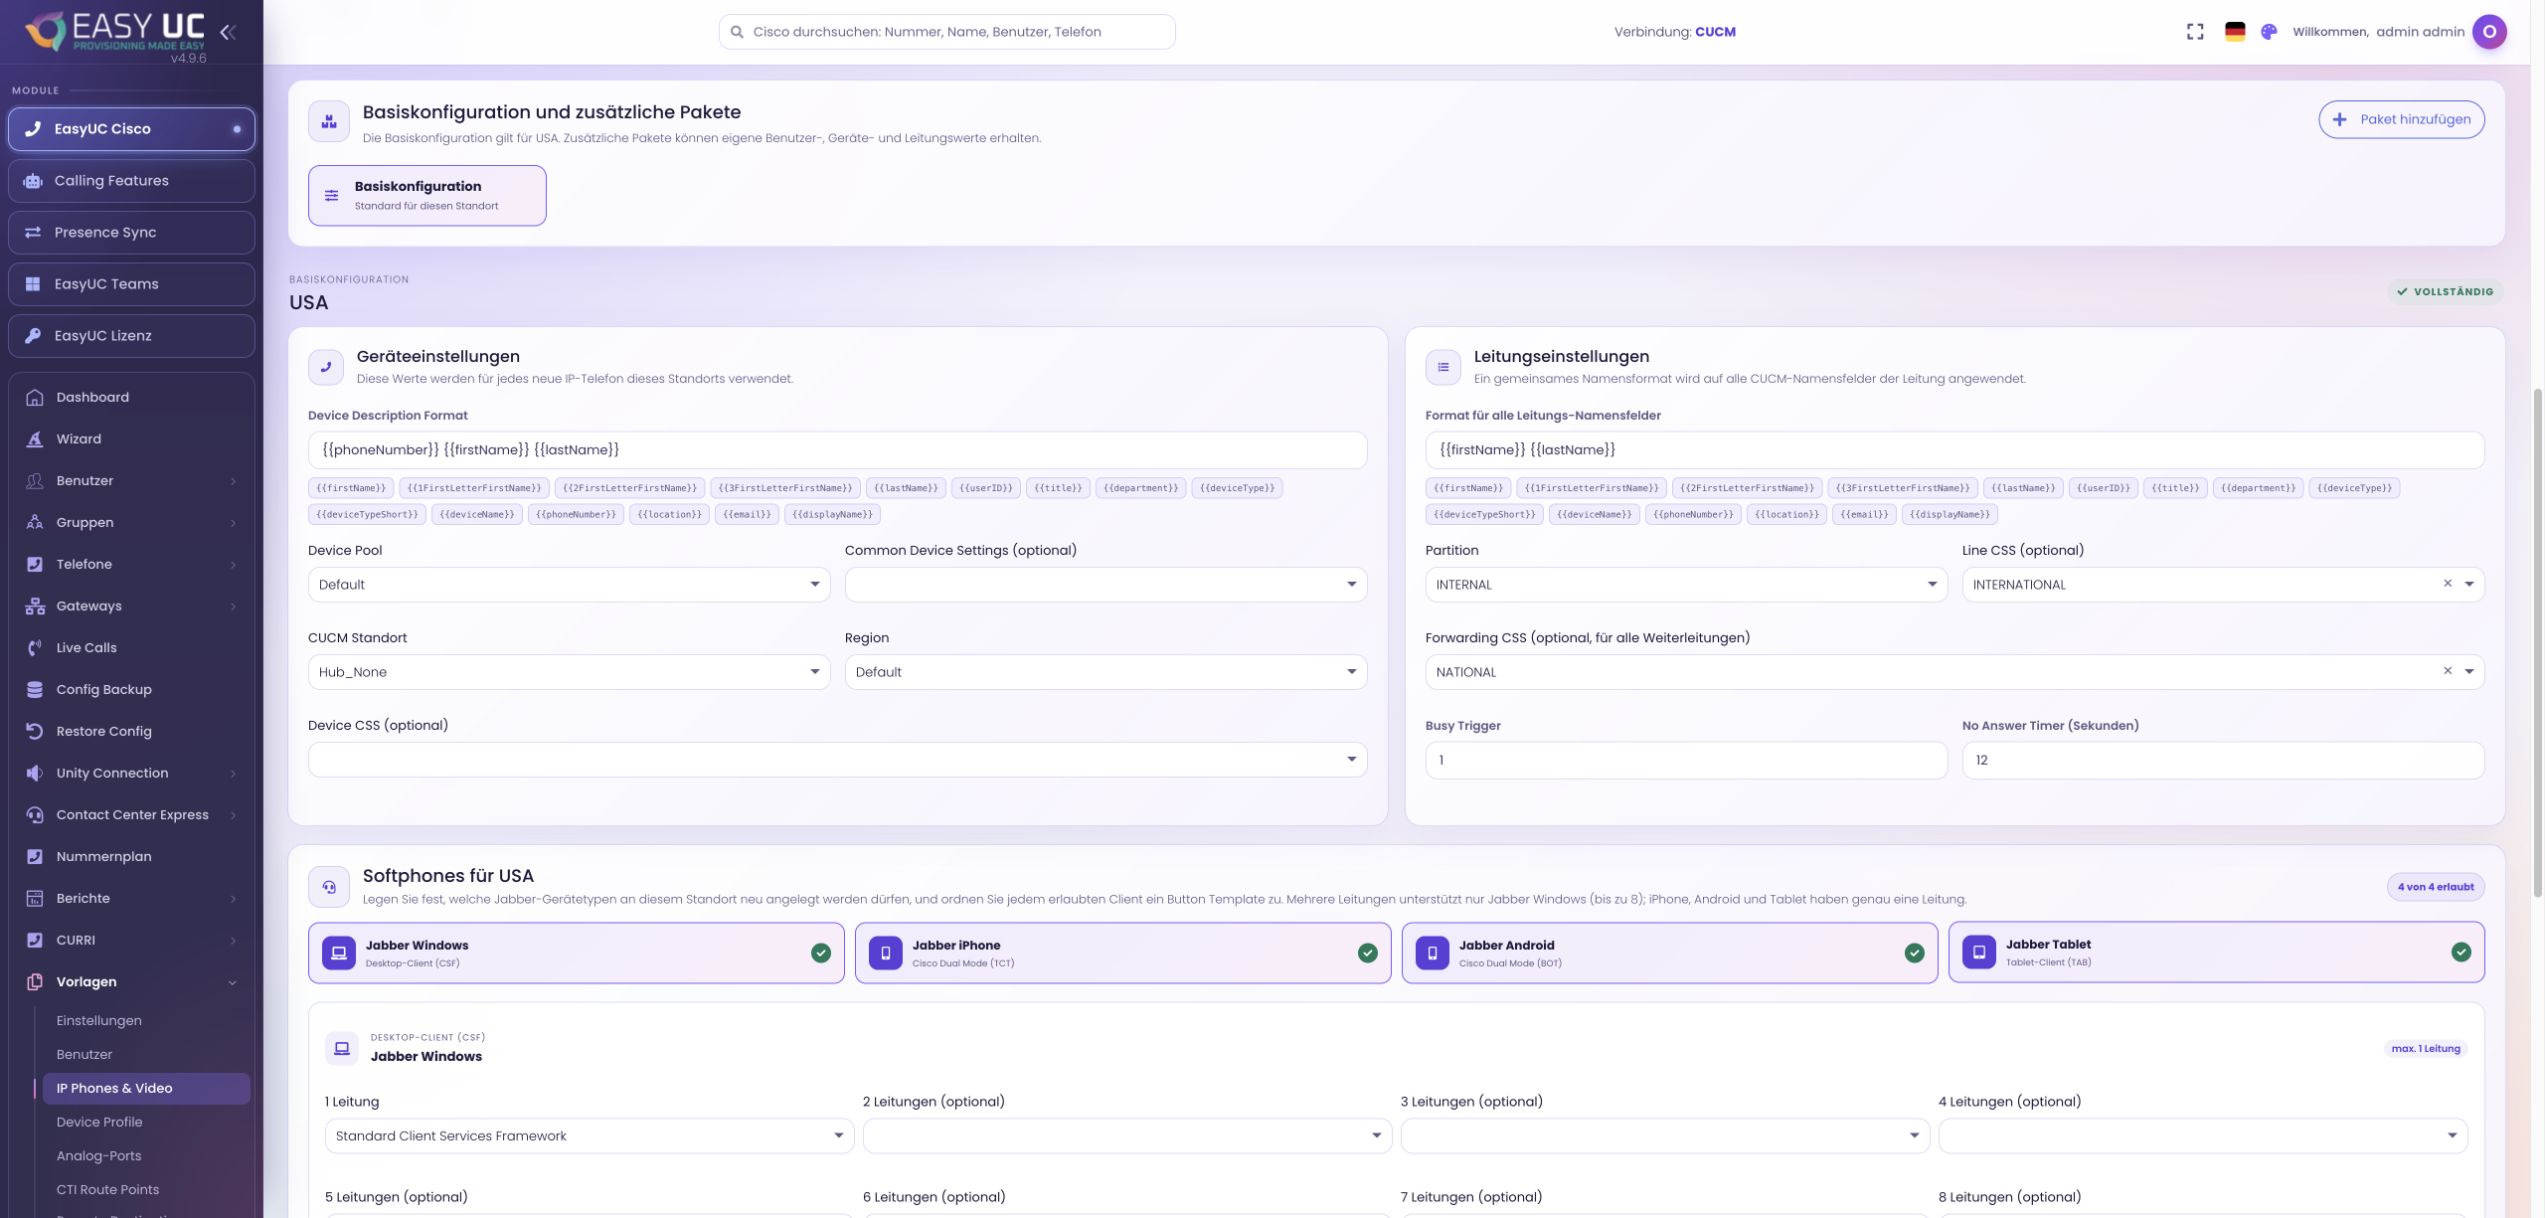
IP Phones & Video contains the device description, device pool and CUCM location, among other settings. Optional common device settings and device CSS extend the base configuration. The EasyUC location selects the template block; the CUCM location is a separate device property.
A selected region is checked against the device pool. EasyUC does not rewrite the shared pool to achieve this. Permitted device types and their matching button templates are configured in the following sections.
New devices receive the intended location defaults, avoiding repeated selection of pool, location and description for each creation.
Open IP Phones & Video and choose the base or package for the desired location.
Set the description, device pool, CUCM location and optional device values to match the CUCM configuration.
Complete line values and permitted Jabber clients or IP models, then save.
Shared line defaults are also under IP Phones & Video. They include line names, partition and optional line and forwarding CSS. Busy Trigger determines when a line is treated as busy; the No Answer timer sets the time before an unanswered call is handled.
The interface accepts Busy Trigger from 1 to 200 and No Answer from 1 to 300 seconds. These values must suit the intended call handling and the CUCM line model. Other template areas can use these shared line defaults as a basis.
Partition and CSS define the number’s routing context and permissions. Consistent timers and labels make new lines predictable and easier to administer.
Go to shared line settings in the selected location/package block.
Choose partition, line and forwarding CSS; set suitable Busy Trigger and No Answer values.
Save and check the number, partition and line label when creating the object later.
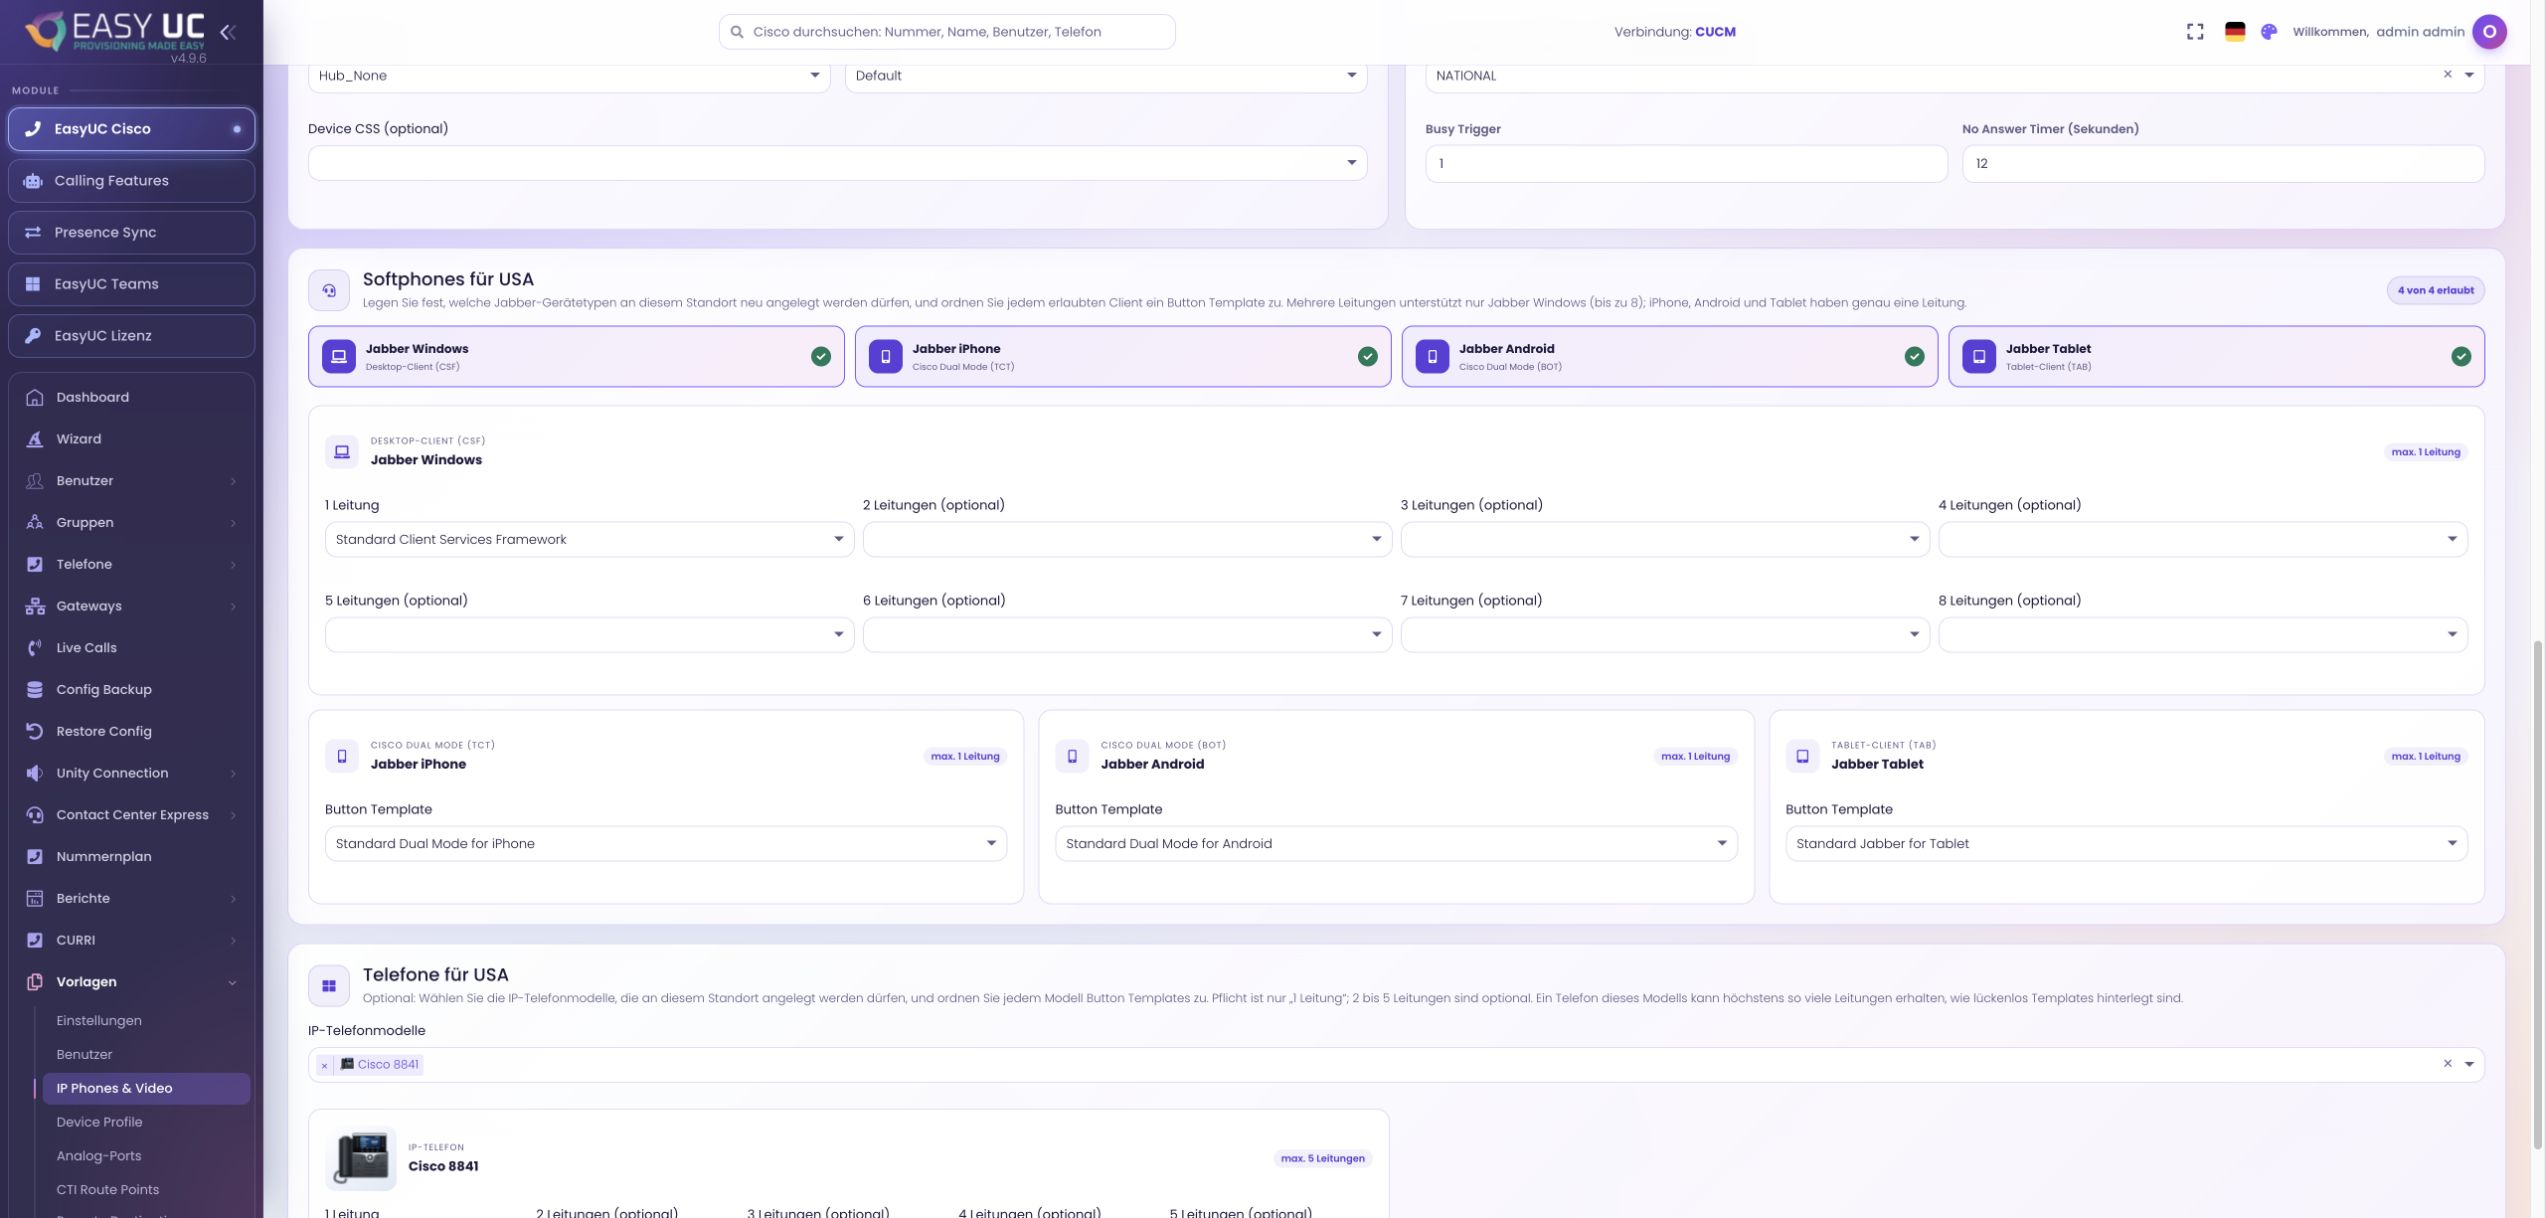
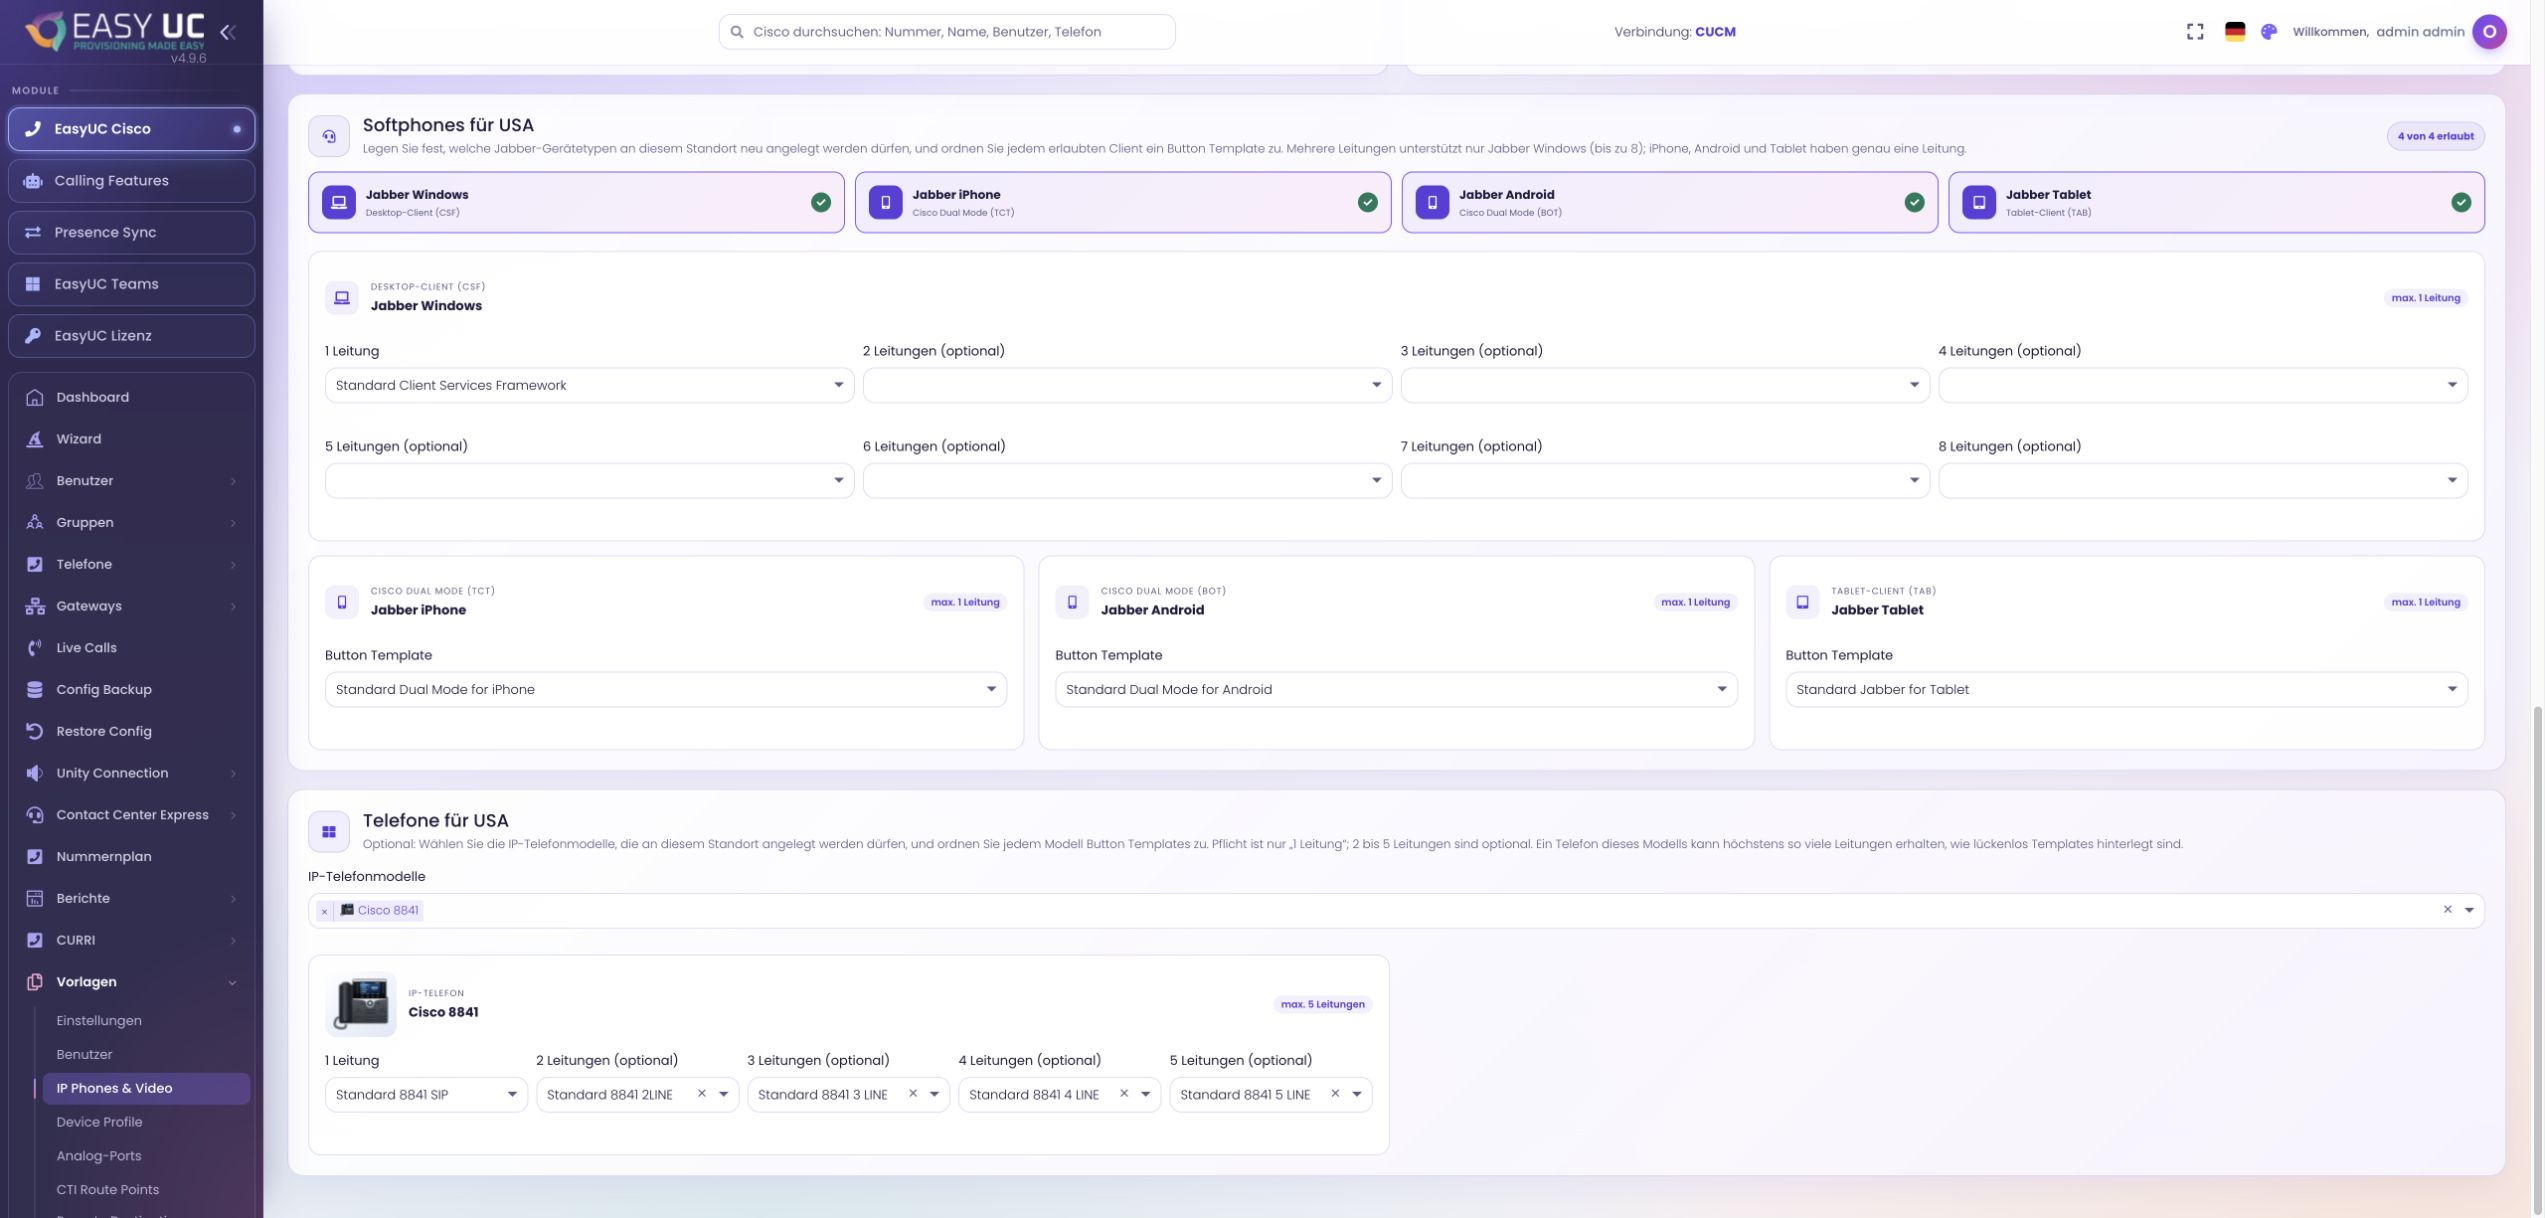
Choose which Jabber families the location or package permits: Windows/Mac, iPhone, Android or tablet. Each enabled client needs a button template matching its family. Enabling a family does not yet create a client for any user.
Windows/Mac (CSF) supports a consecutive set of button templates for one to eight lines. iPhone, Android and tablet each use one line. The configured templates limit the selectable line count; they do not automatically create every possible line.
Subsequent provisioning offers only the prepared clients and suitable line capacities. A location can also be configured for Jabber only.
Enable the desired Jabber clients in the location/package block.
Choose matching templates for each family; add CSF line counts without gaps.
Save, then choose the clients and numbers in the wizard or device dialog.
The model list determines which IP phones are offered during subsequent creation. Every selected model requires a one-line button template. Templates for two to five lines are optional and must form a consecutive sequence.
The button template must match the phone model and required capacity. The consecutively configured count is the provisioning limit, not a number of automatically created lines. When no IP models are chosen, the enabled Jabber clients can still be used.
This offers the models actually used by the organisation and avoids unsuitable key layouts during preparation.
Select the models permitted for the location or package under IP phone models.
Select the one-line template per model and add further line counts consecutively if needed.
Save; later select the model, MAC address and lines actually required when creating the device.
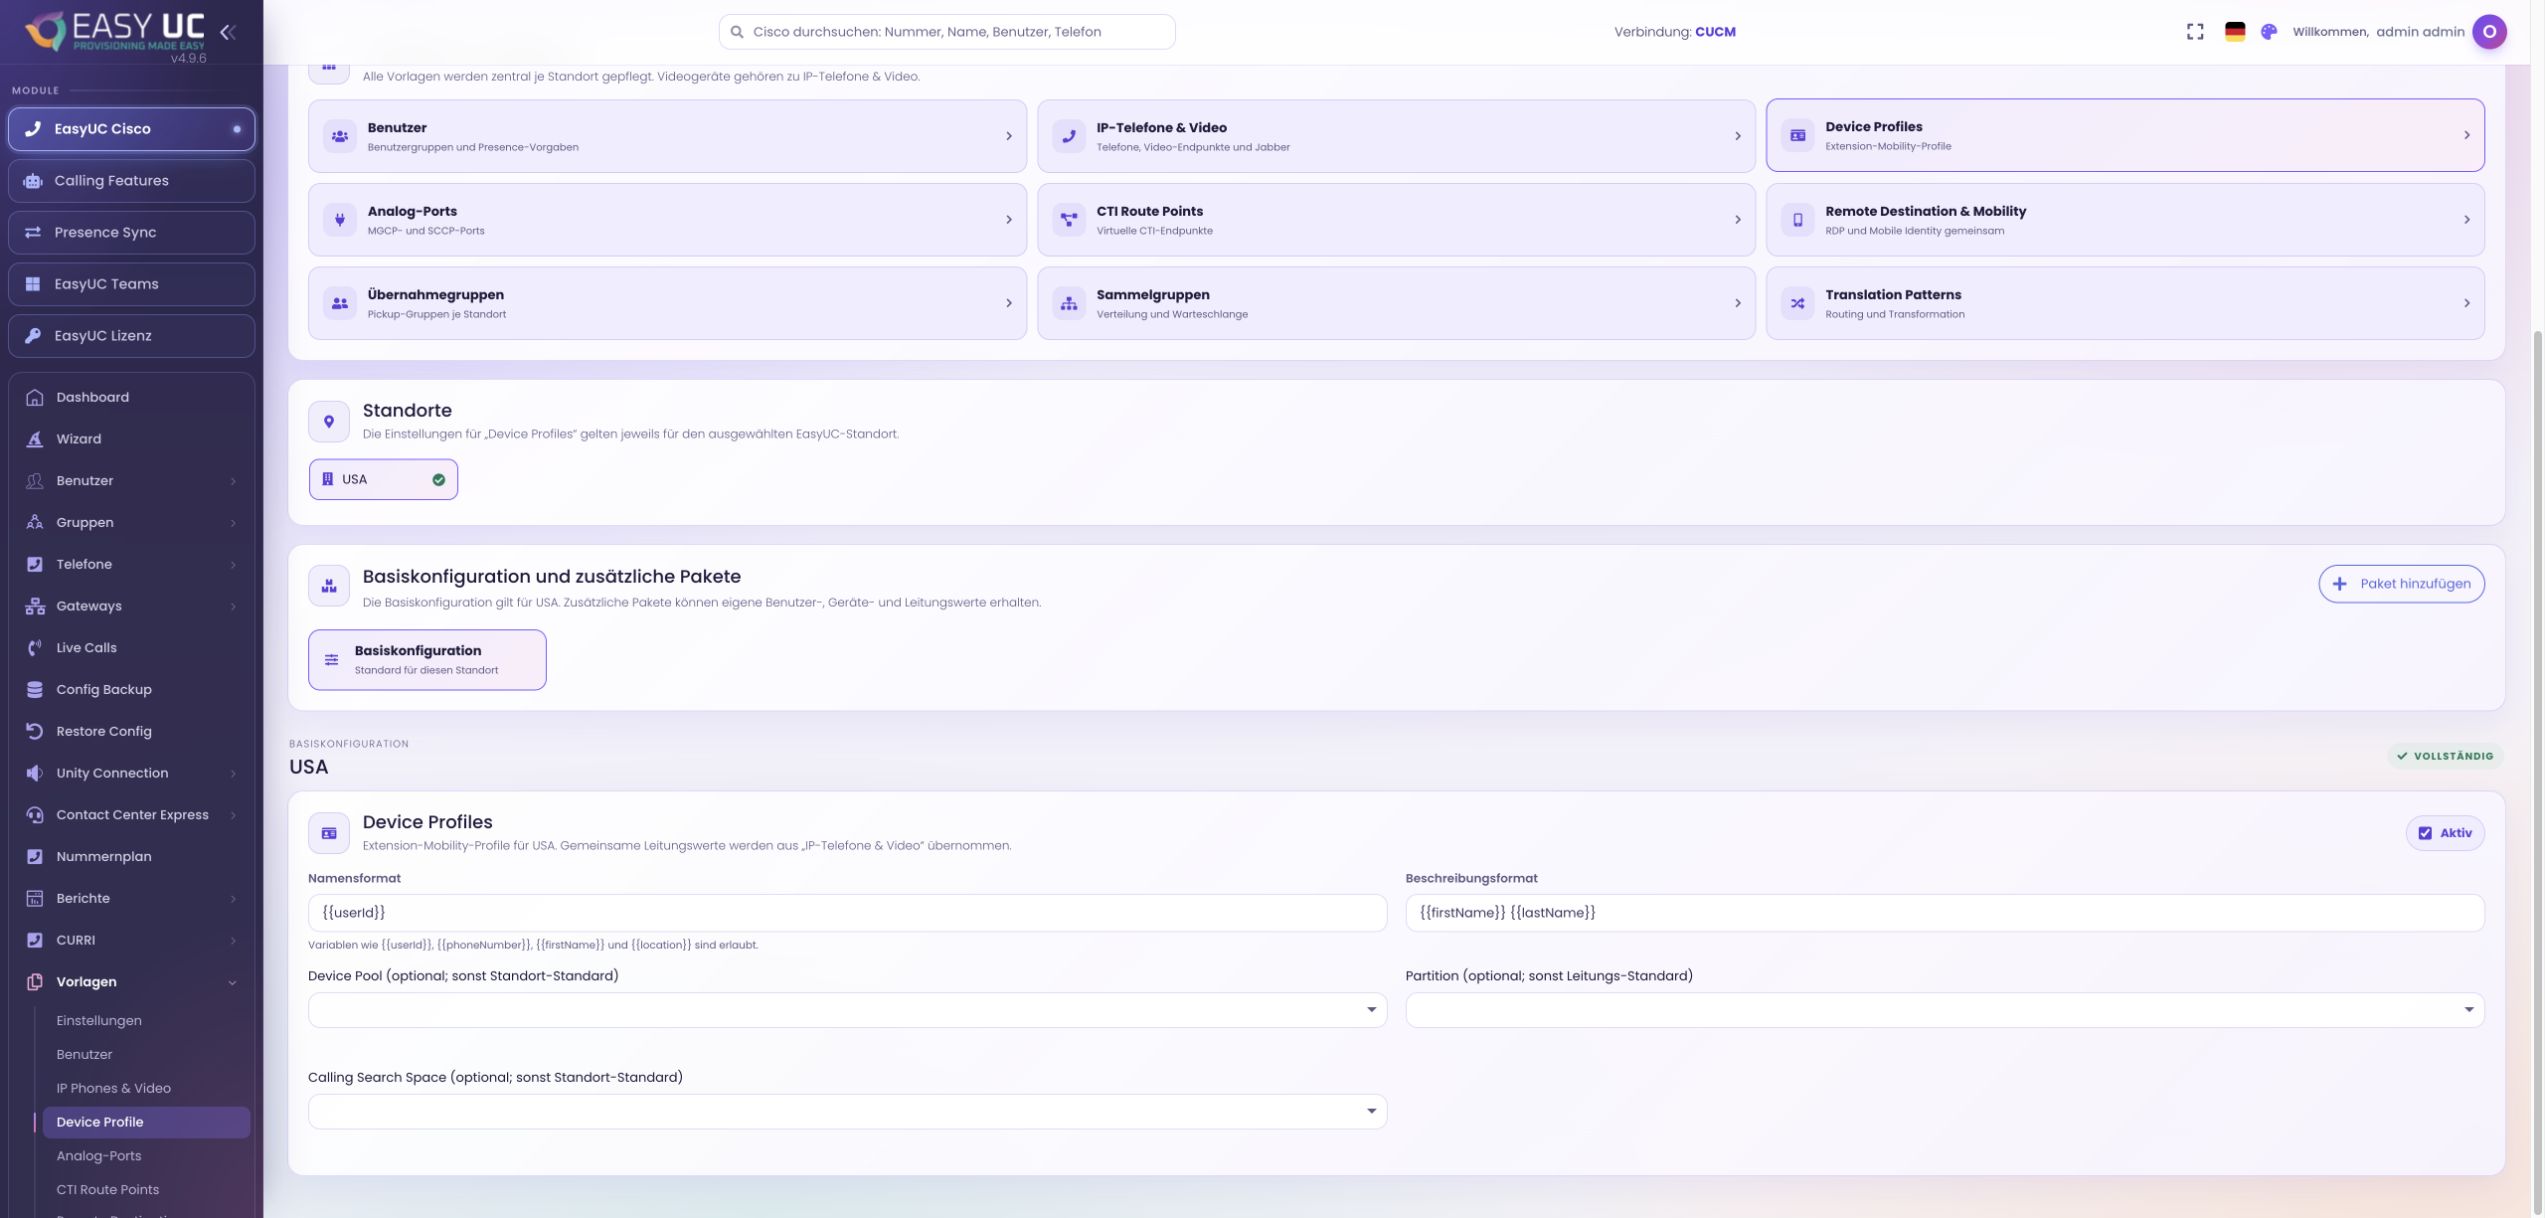
Device profiles describe a user’s phone configuration for Extension Mobility. Template 2.0 supplies name and description formats and, where configured, separate partition and CSS values. The model, button template and line presentation come from the configured phone model.
A profile is distinct from the physical phone: its device pool, CUCM location and security profile are not properties transferred as such to the device profile. The profile is linked to a user and number during subsequent creation.
This prepares a personal line layout for login on suitable phones while keeping physical-device settings separate from the user profile.
Enable Device Profiles for the location or package and check the name and description formats.
Configure the required phone model and button template; override partition and CSS in profiles if needed.
Save, then choose the user, number and model in the wizard or profile dialog.
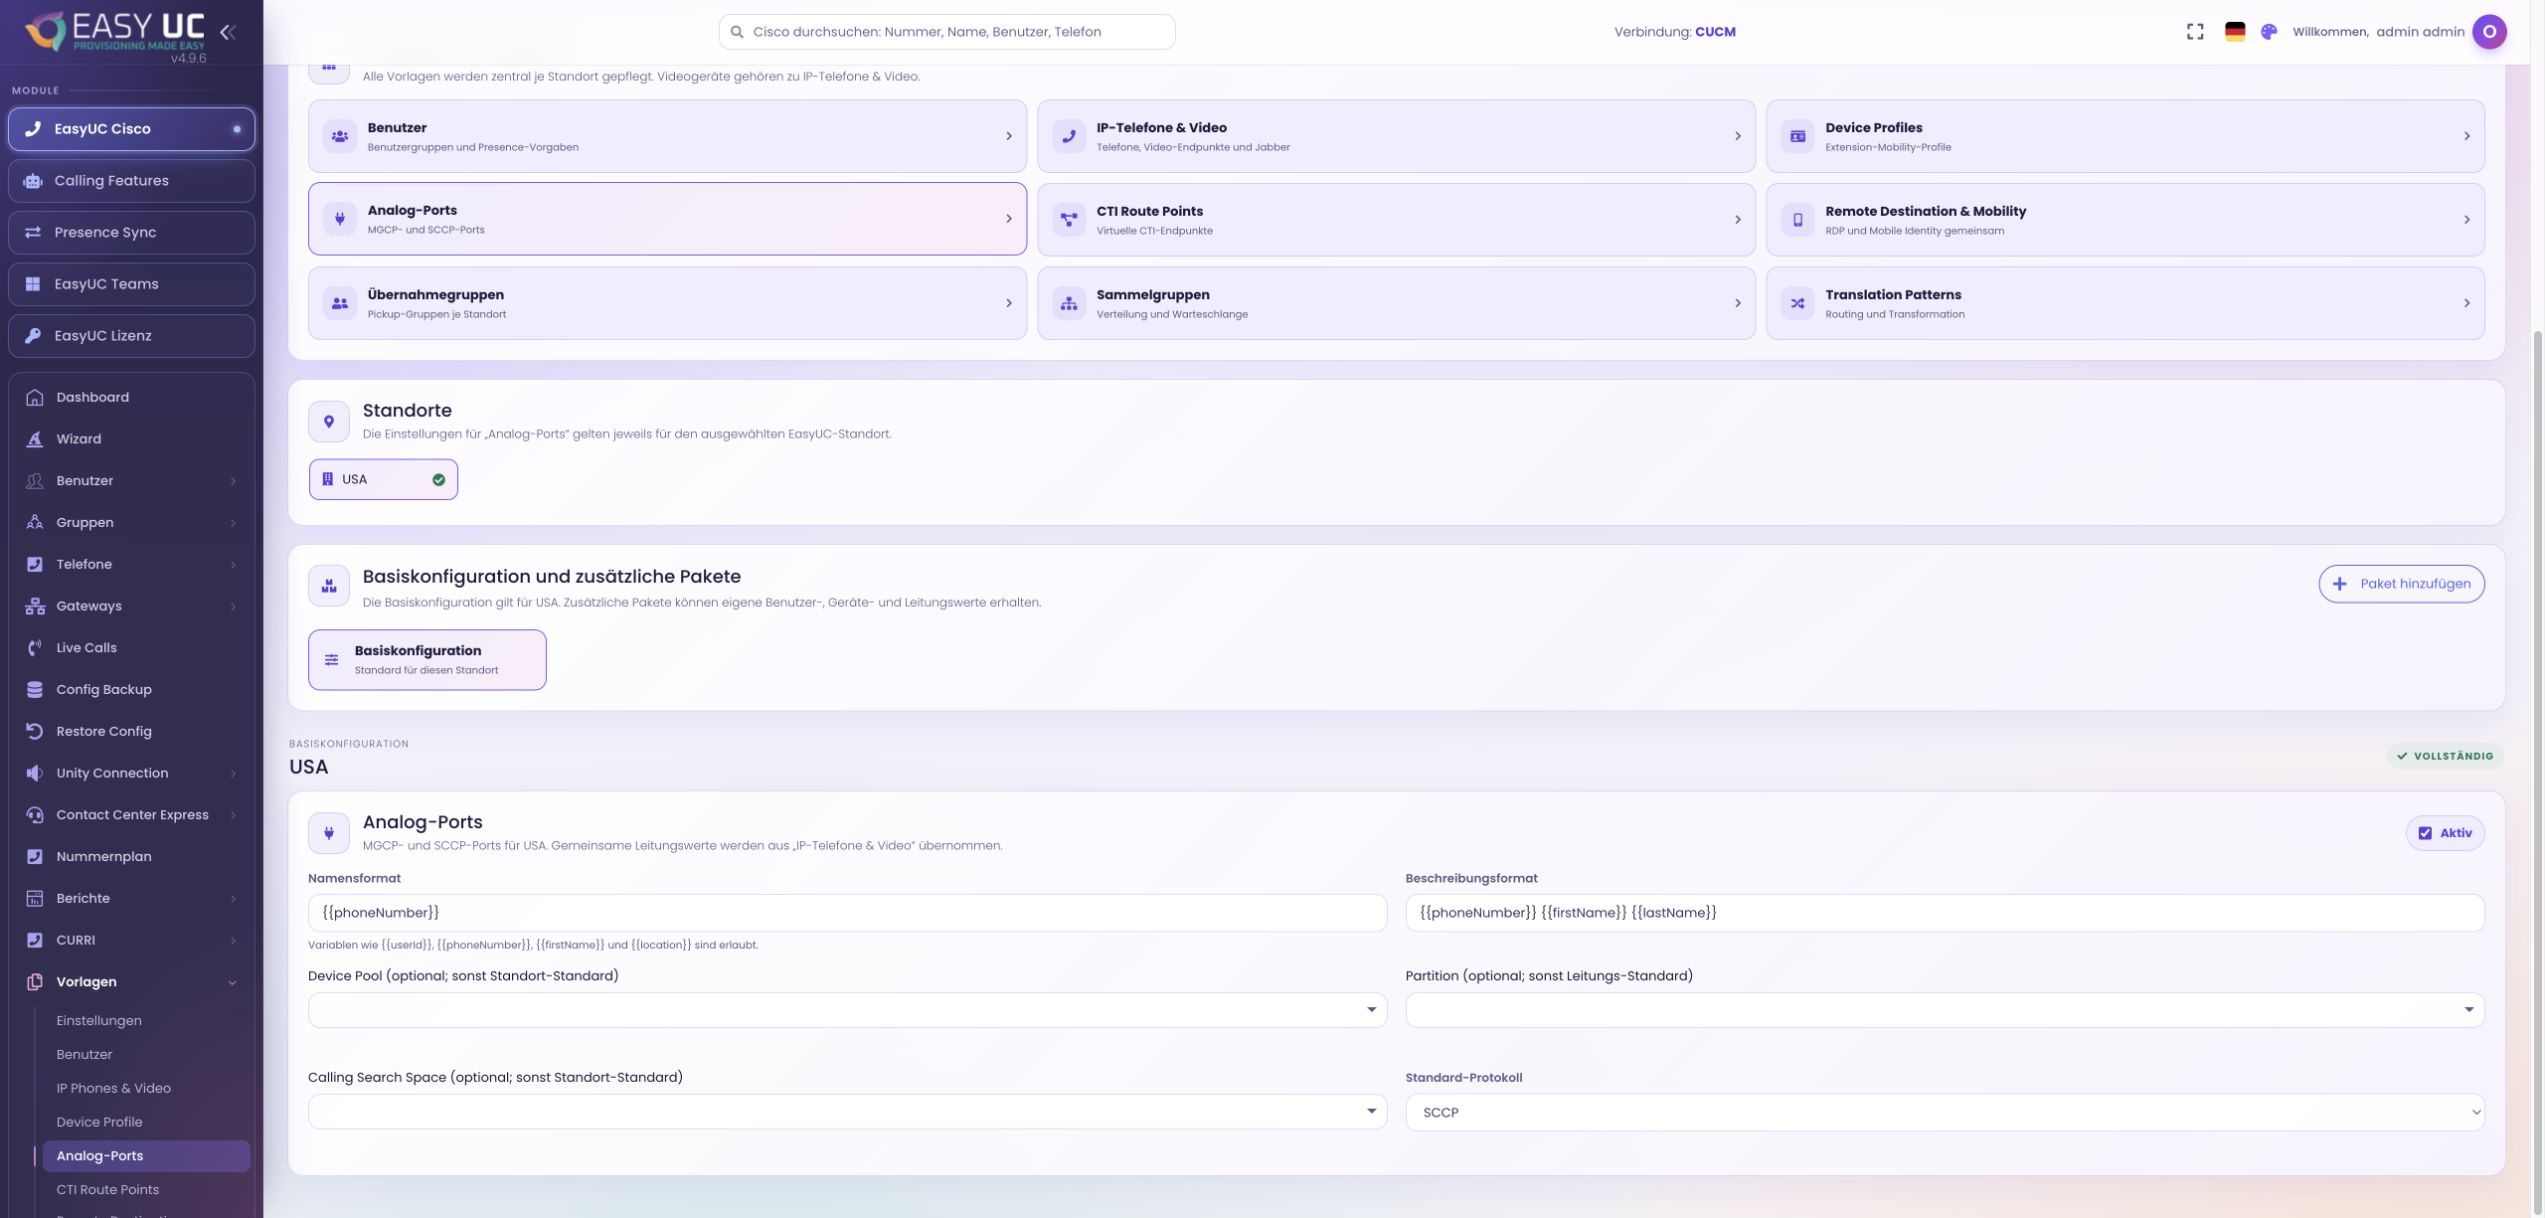
The analogue area supplies a description and optional device pool, partition and CSS. The actual endpoint comes from the selected gateway port during creation. Its name, port index and protocol follow that gateway’s data; a template setting does not convert a gateway between SCCP and MGCP.
Fax machines, intercoms and other analogue endpoints receive suitable defaults while retaining the correct physical gateway and port assignment.
Enable analogue ports; configure the description and any required pool, partition and CSS values.
After saving, select the actual interface or port on the gateway for creation.
Check location, package, number and port/line labels in the dialog, then create the endpoint.
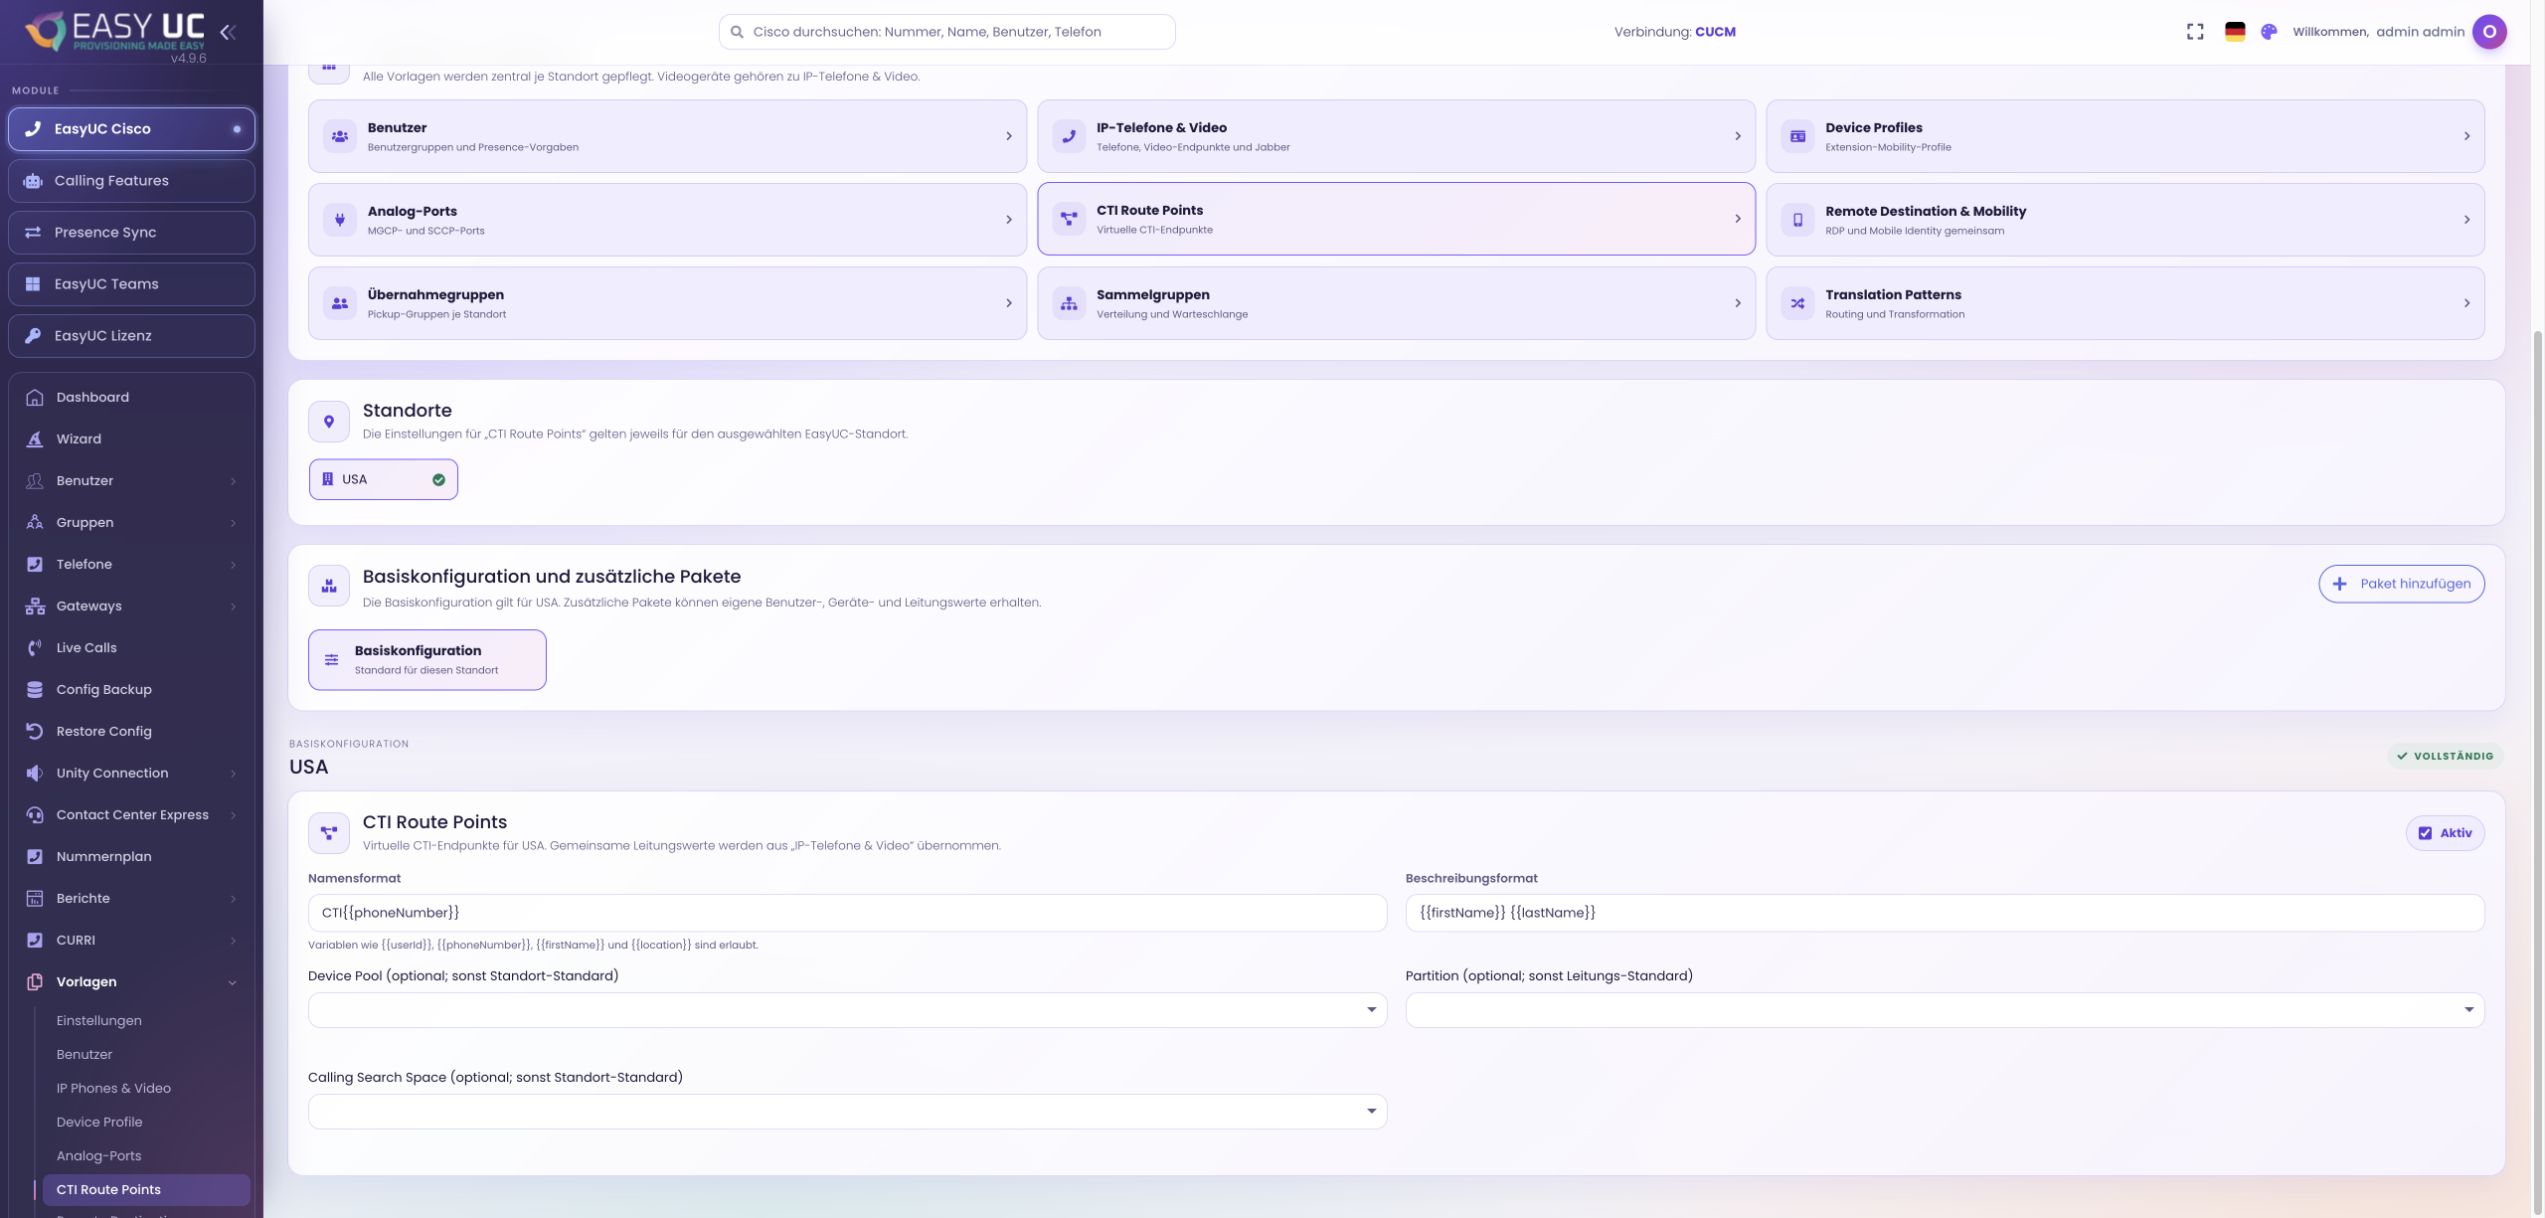
CTI route points are virtual endpoints for applications such as an ACD. This area supplies name and description formats and optional device pool, partition and CSS. Creation produces a CTI route point using SCCP with one line.
The name is built and cleaned from the configured format and creation data. The default CTI{{phoneNumber}} format uses the entered number. If the format produces no valid name, correct the configuration before creating the endpoint.
Naming conventions and line defaults are prepared before creating a new application entry point with a specific number.
Enable the area and configure name/description formats and optional CUCM values.
Save, then choose number, location, package and, if required, an existing or new user.
Check the resulting name and line, then create the CTI route point.
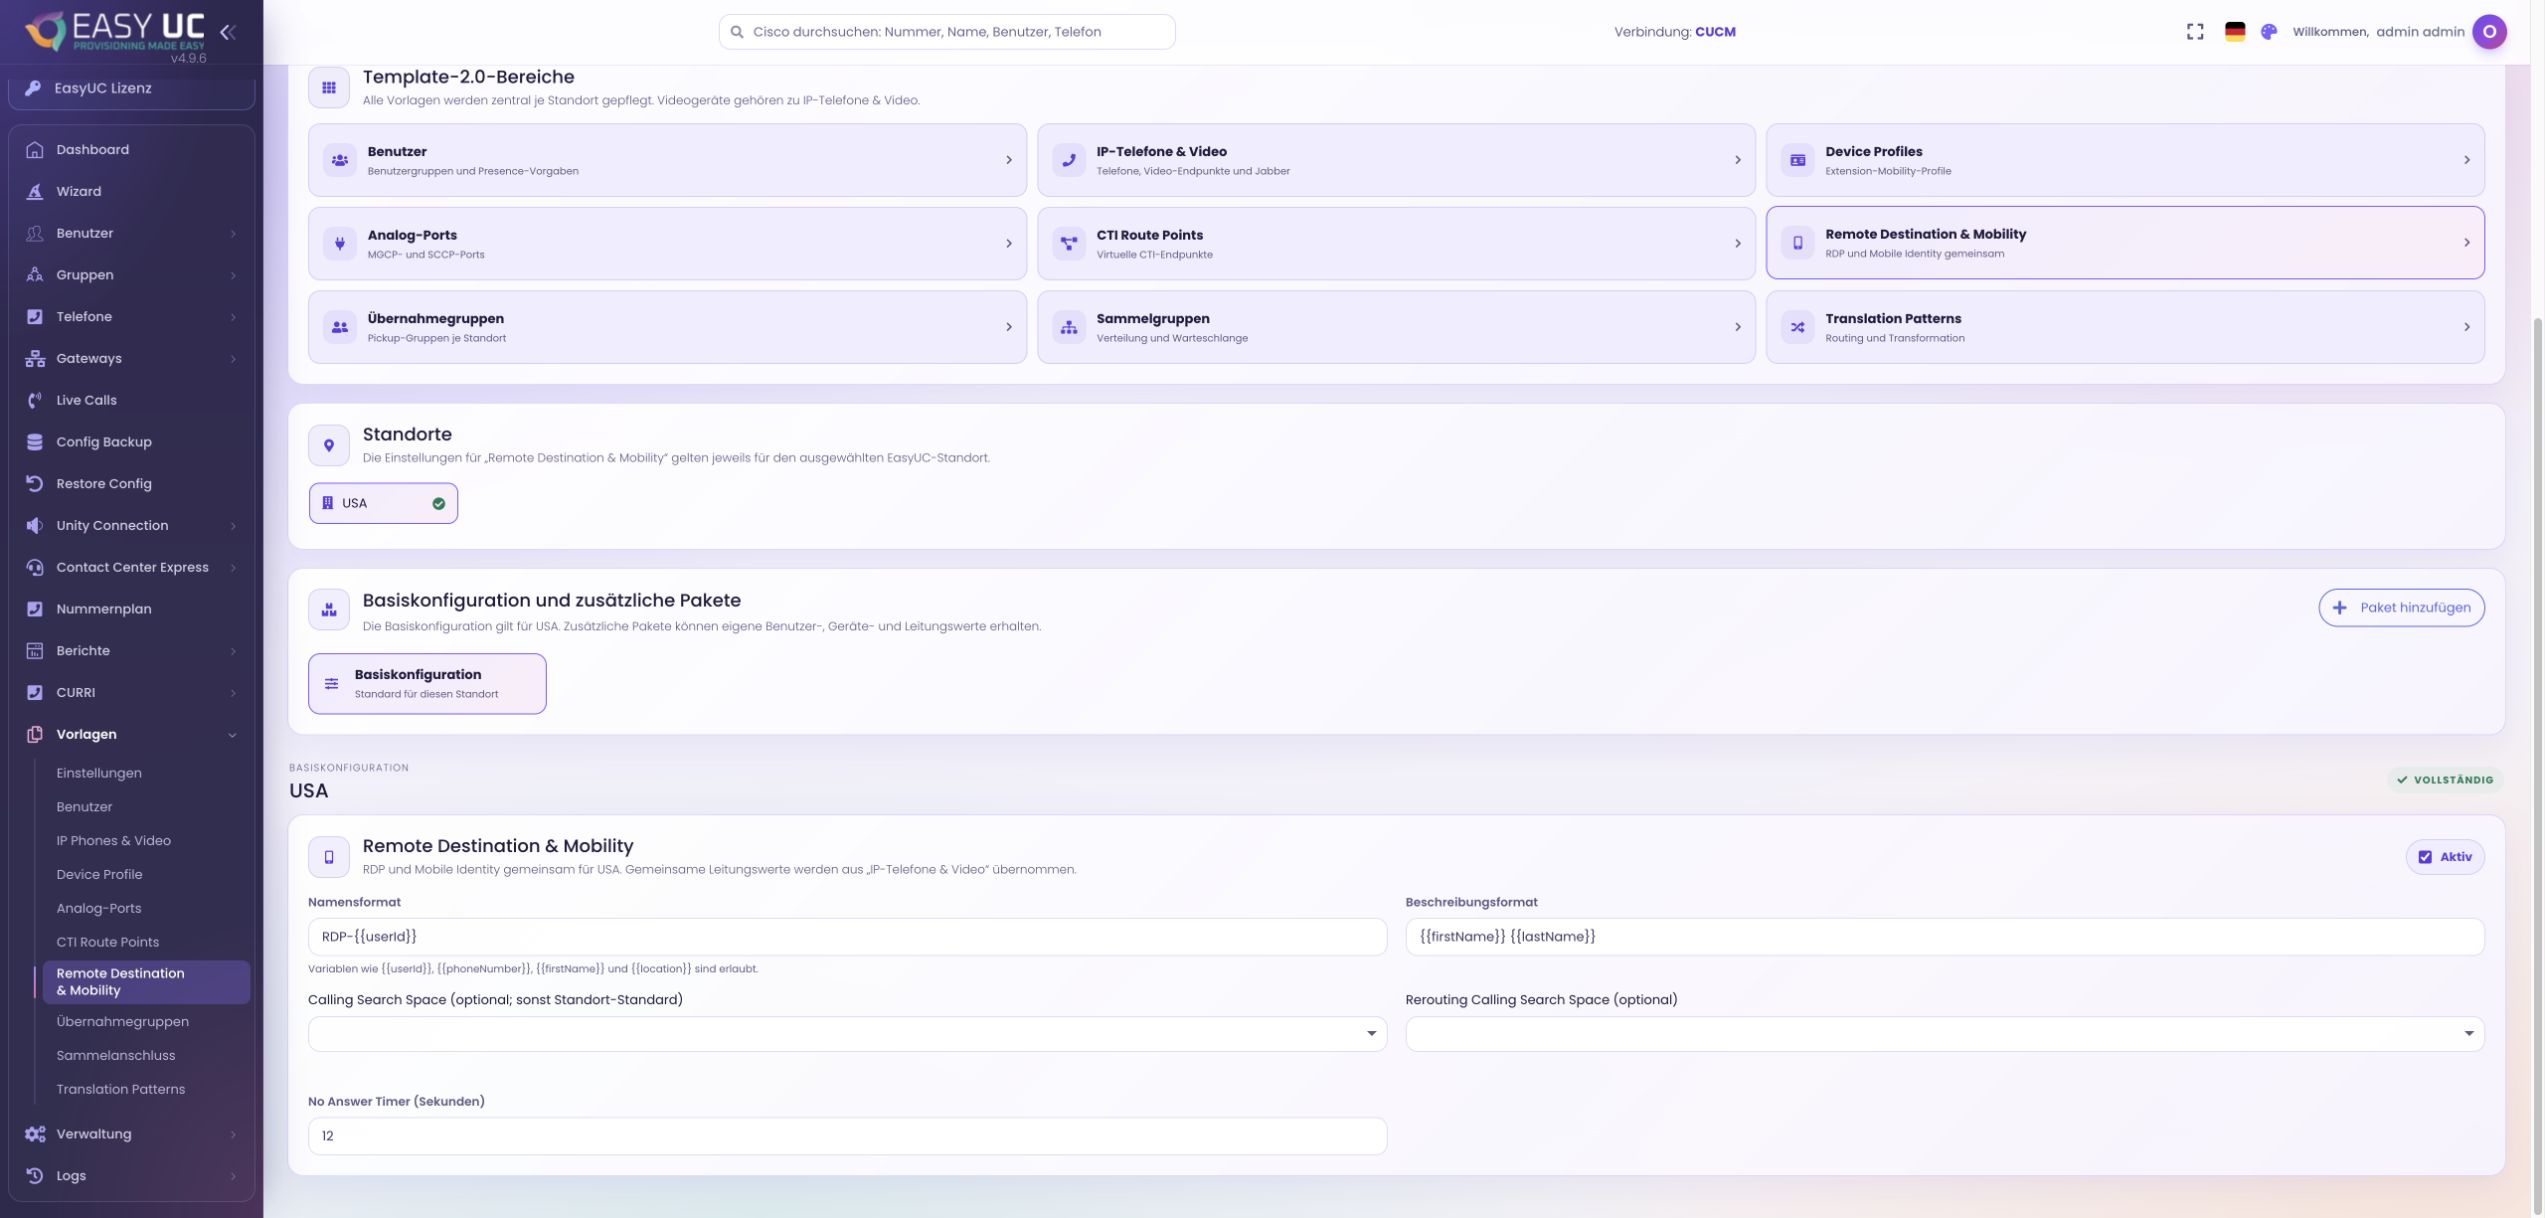
Remote Destination & Mobility supplies defaults for remote destination profiles and mobile identity: names, description, optional calling CSS, rerouting CSS and No Answer. An RDP can fall back to location device-pool and CSS settings. Saving the template does not yet create additional reachability.
The later user dialog adds the mobile number, associated lines and ringing schedule. Defaults are a four-second delay and 1.5 seconds for Answer Too Soon. Answer Too Late uses a valid No Answer value from 10 to 300 seconds, otherwise 19 seconds.
Business calls can subsequently reach additional destinations. Templates, calling permissions and number routing must suit the intended reachability.
Configure names, description and required CSS/timer values for the location or package.
Save and add a remote destination or mobile identity for the user.
Check location/package, mobile number, lines, delays and schedule, then save reachability.
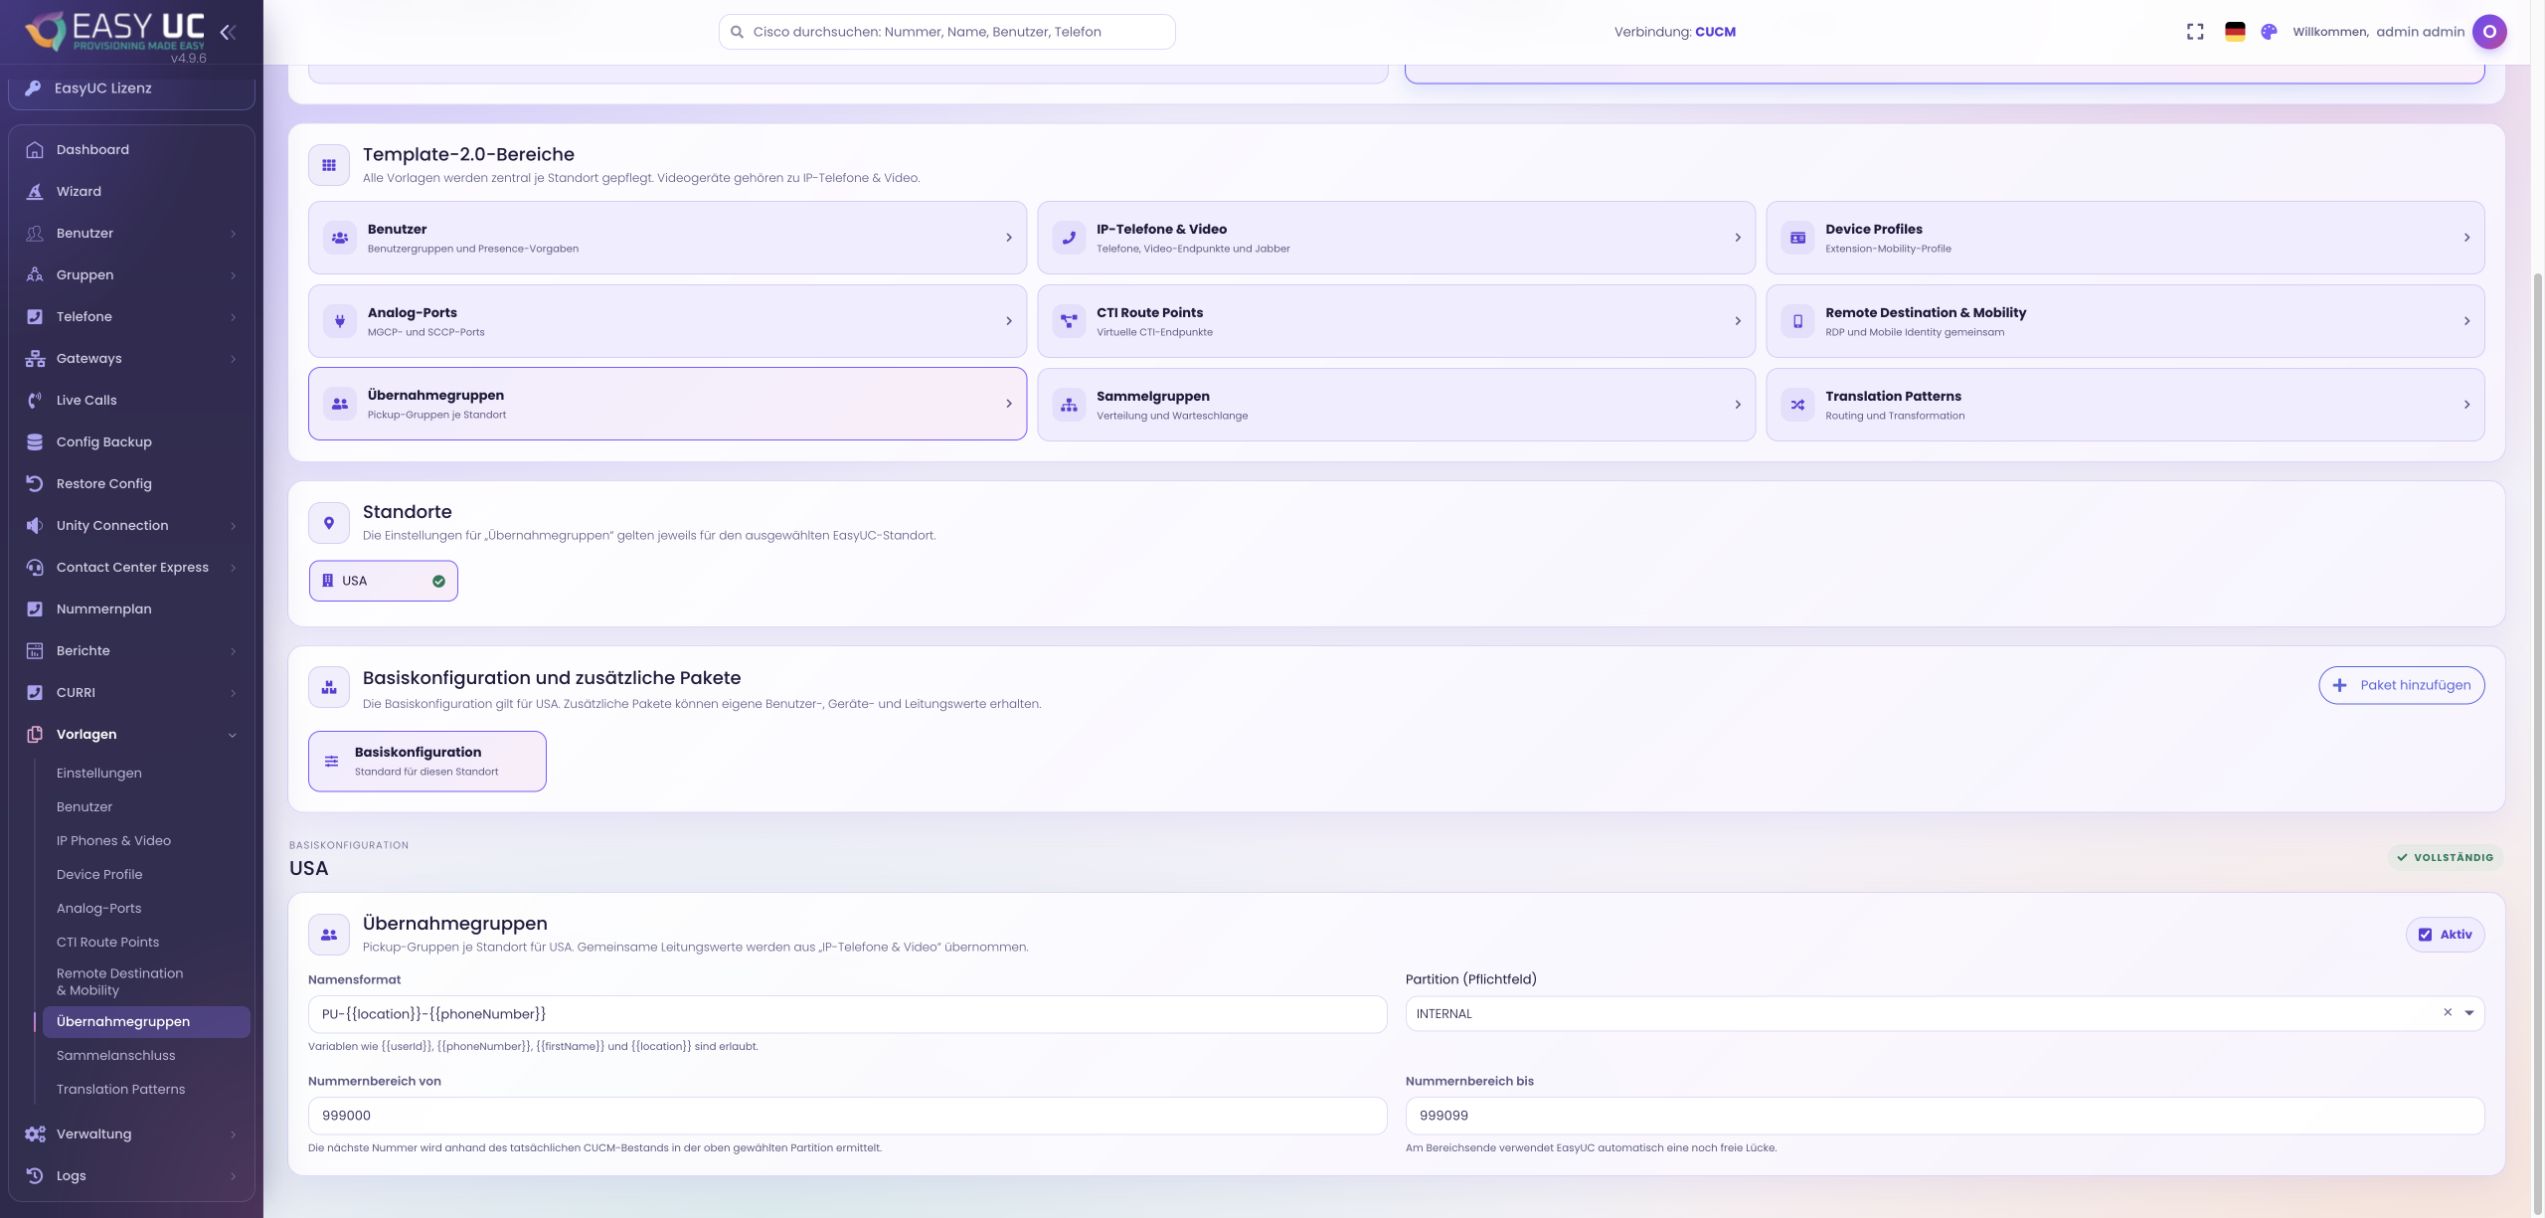
Pickup groups let a team answer each other’s calls. Template 2.0 requires a partition and a complete number range. Creating a group selects a genuinely free CUCM number from that range. An exhausted range cannot supply another number.
Range boundaries need the same digit count and a matching prefix; a leading plus is permitted. The start must not exceed the end. The group name and description are entered during creation; membership is assigned separately afterwards.
Prepared number allocation keeps groups within the intended range and prevents assigning an already occupied group number again.
Enable pickup groups and select the CUCM partition.
Enter complete start and end values and save the template settings.
Create a group with location/package, name and description, then add the desired member lines.
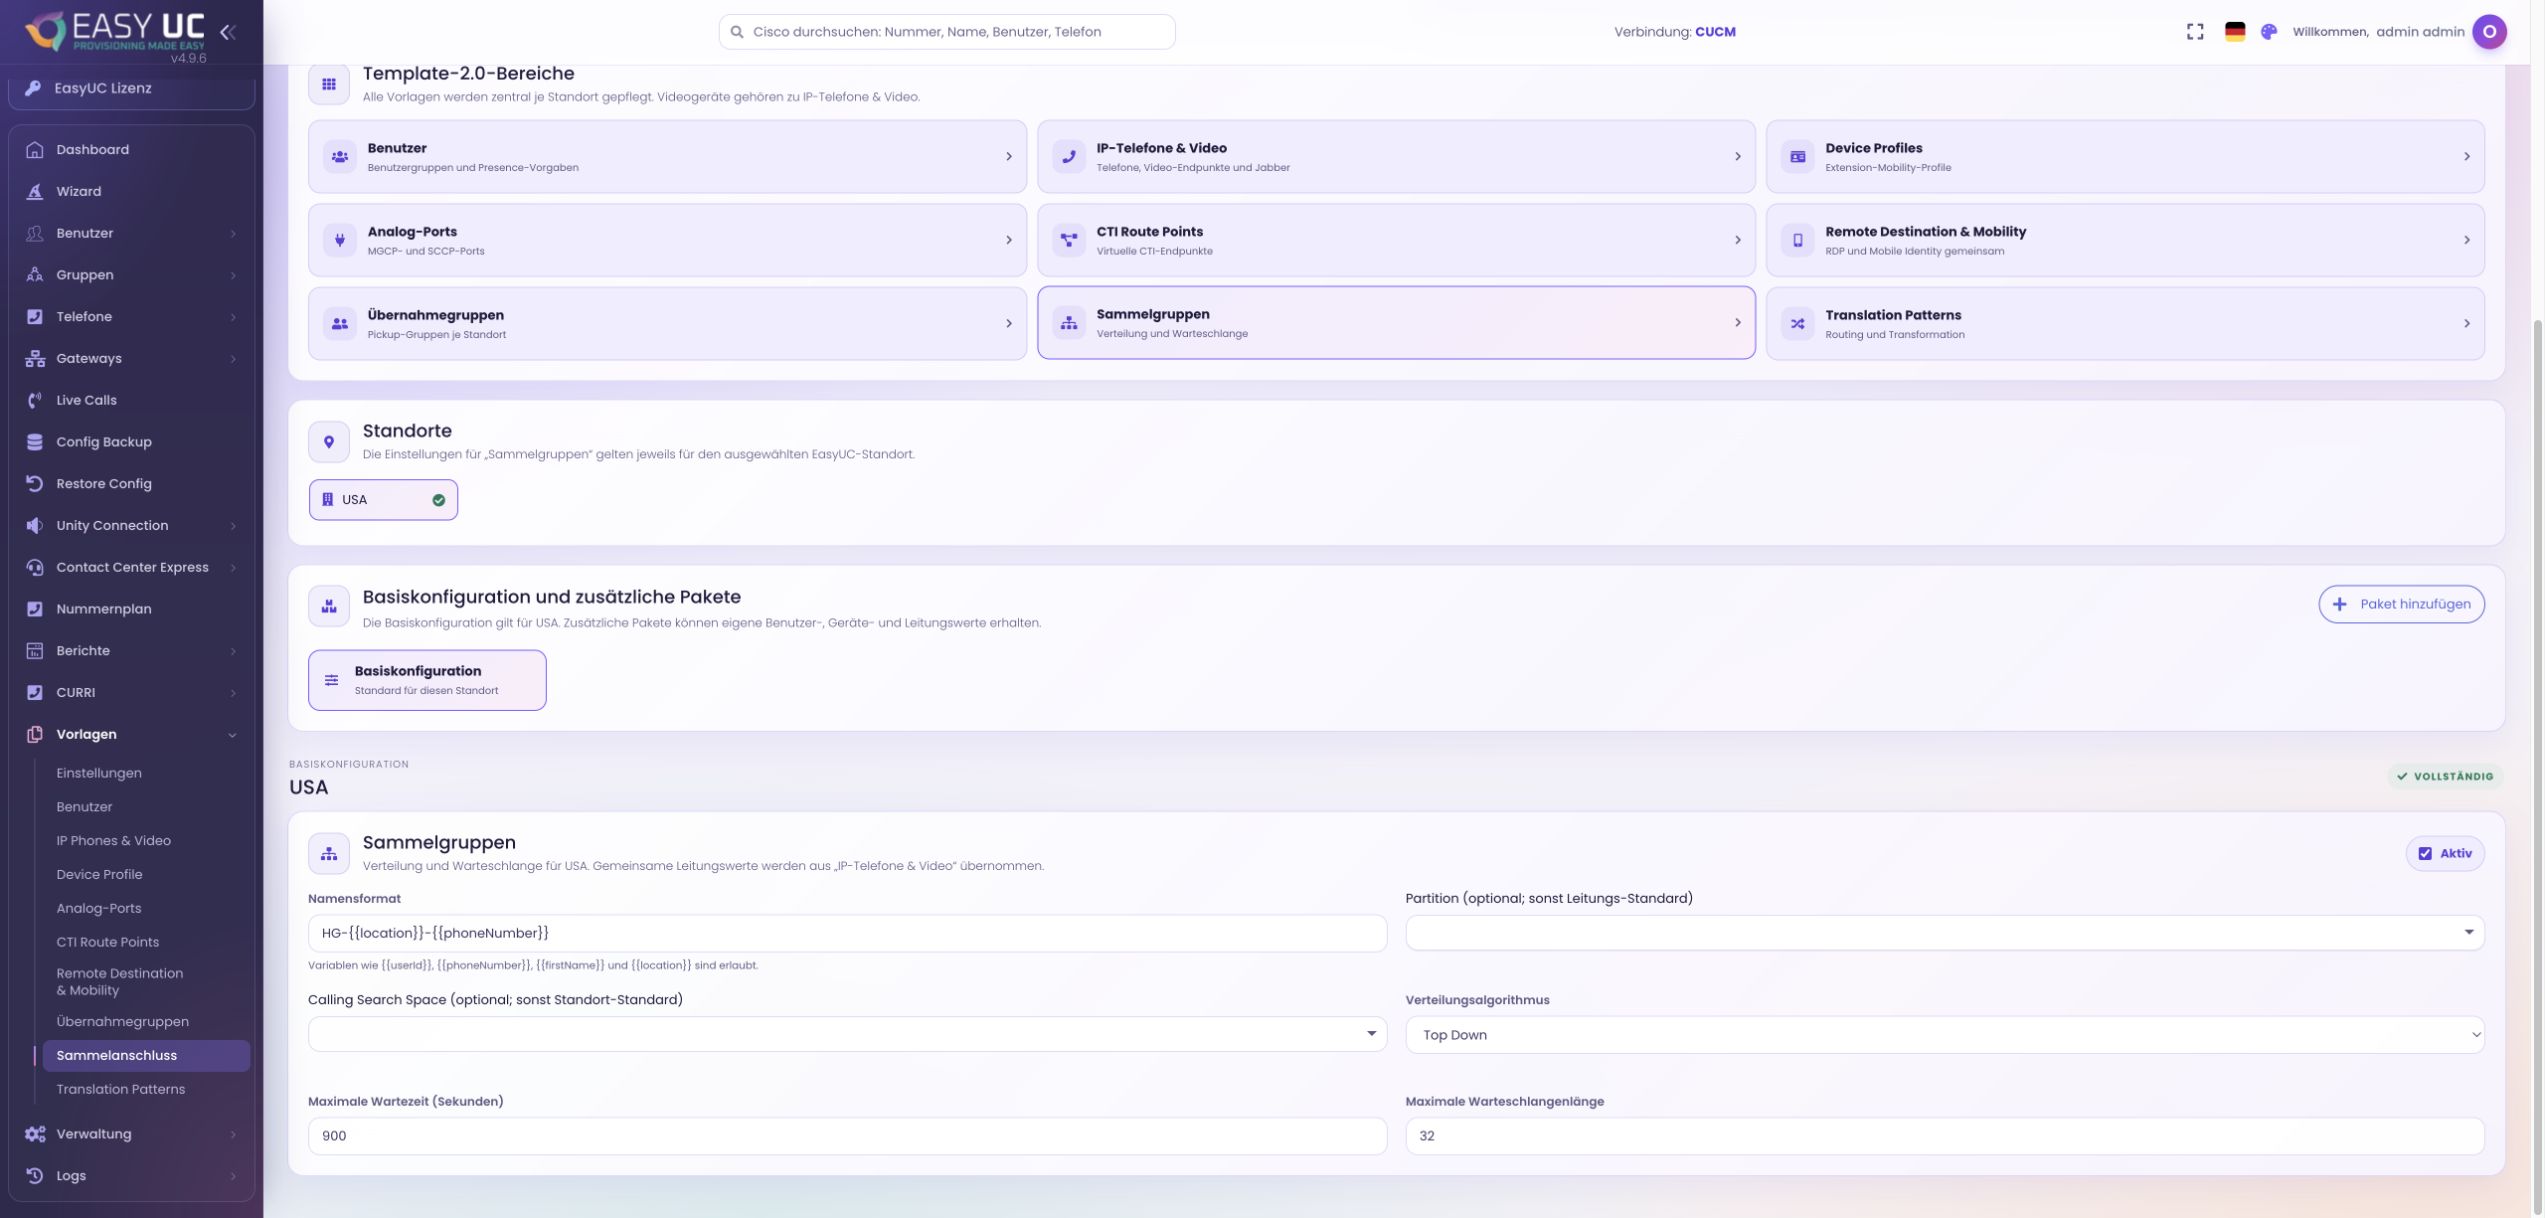
The hunt-group area defines the suggested distribution algorithm and partition. Options are Top Down, Circular, Longest Idle and Broadcast. The algorithm is preselected during subsequent group creation; the name, hunt-pilot number and members are specified there.
The interface also displays waiting-time and queue fields. Check the queue settings actually required in the group editor during or after creation. A template does not replace member selection or verification of the intended call distribution.
A suitable algorithm expresses how the team should ring: sequentially, circularly, by longest idle time or simultaneously.
Enable the area for the location/package block and choose partition and algorithm.
After saving, check location/package, group name, hunt pilot, number and alerting name in the creation dialog.
Assign members, check order and queue settings and assign a pickup group if required.
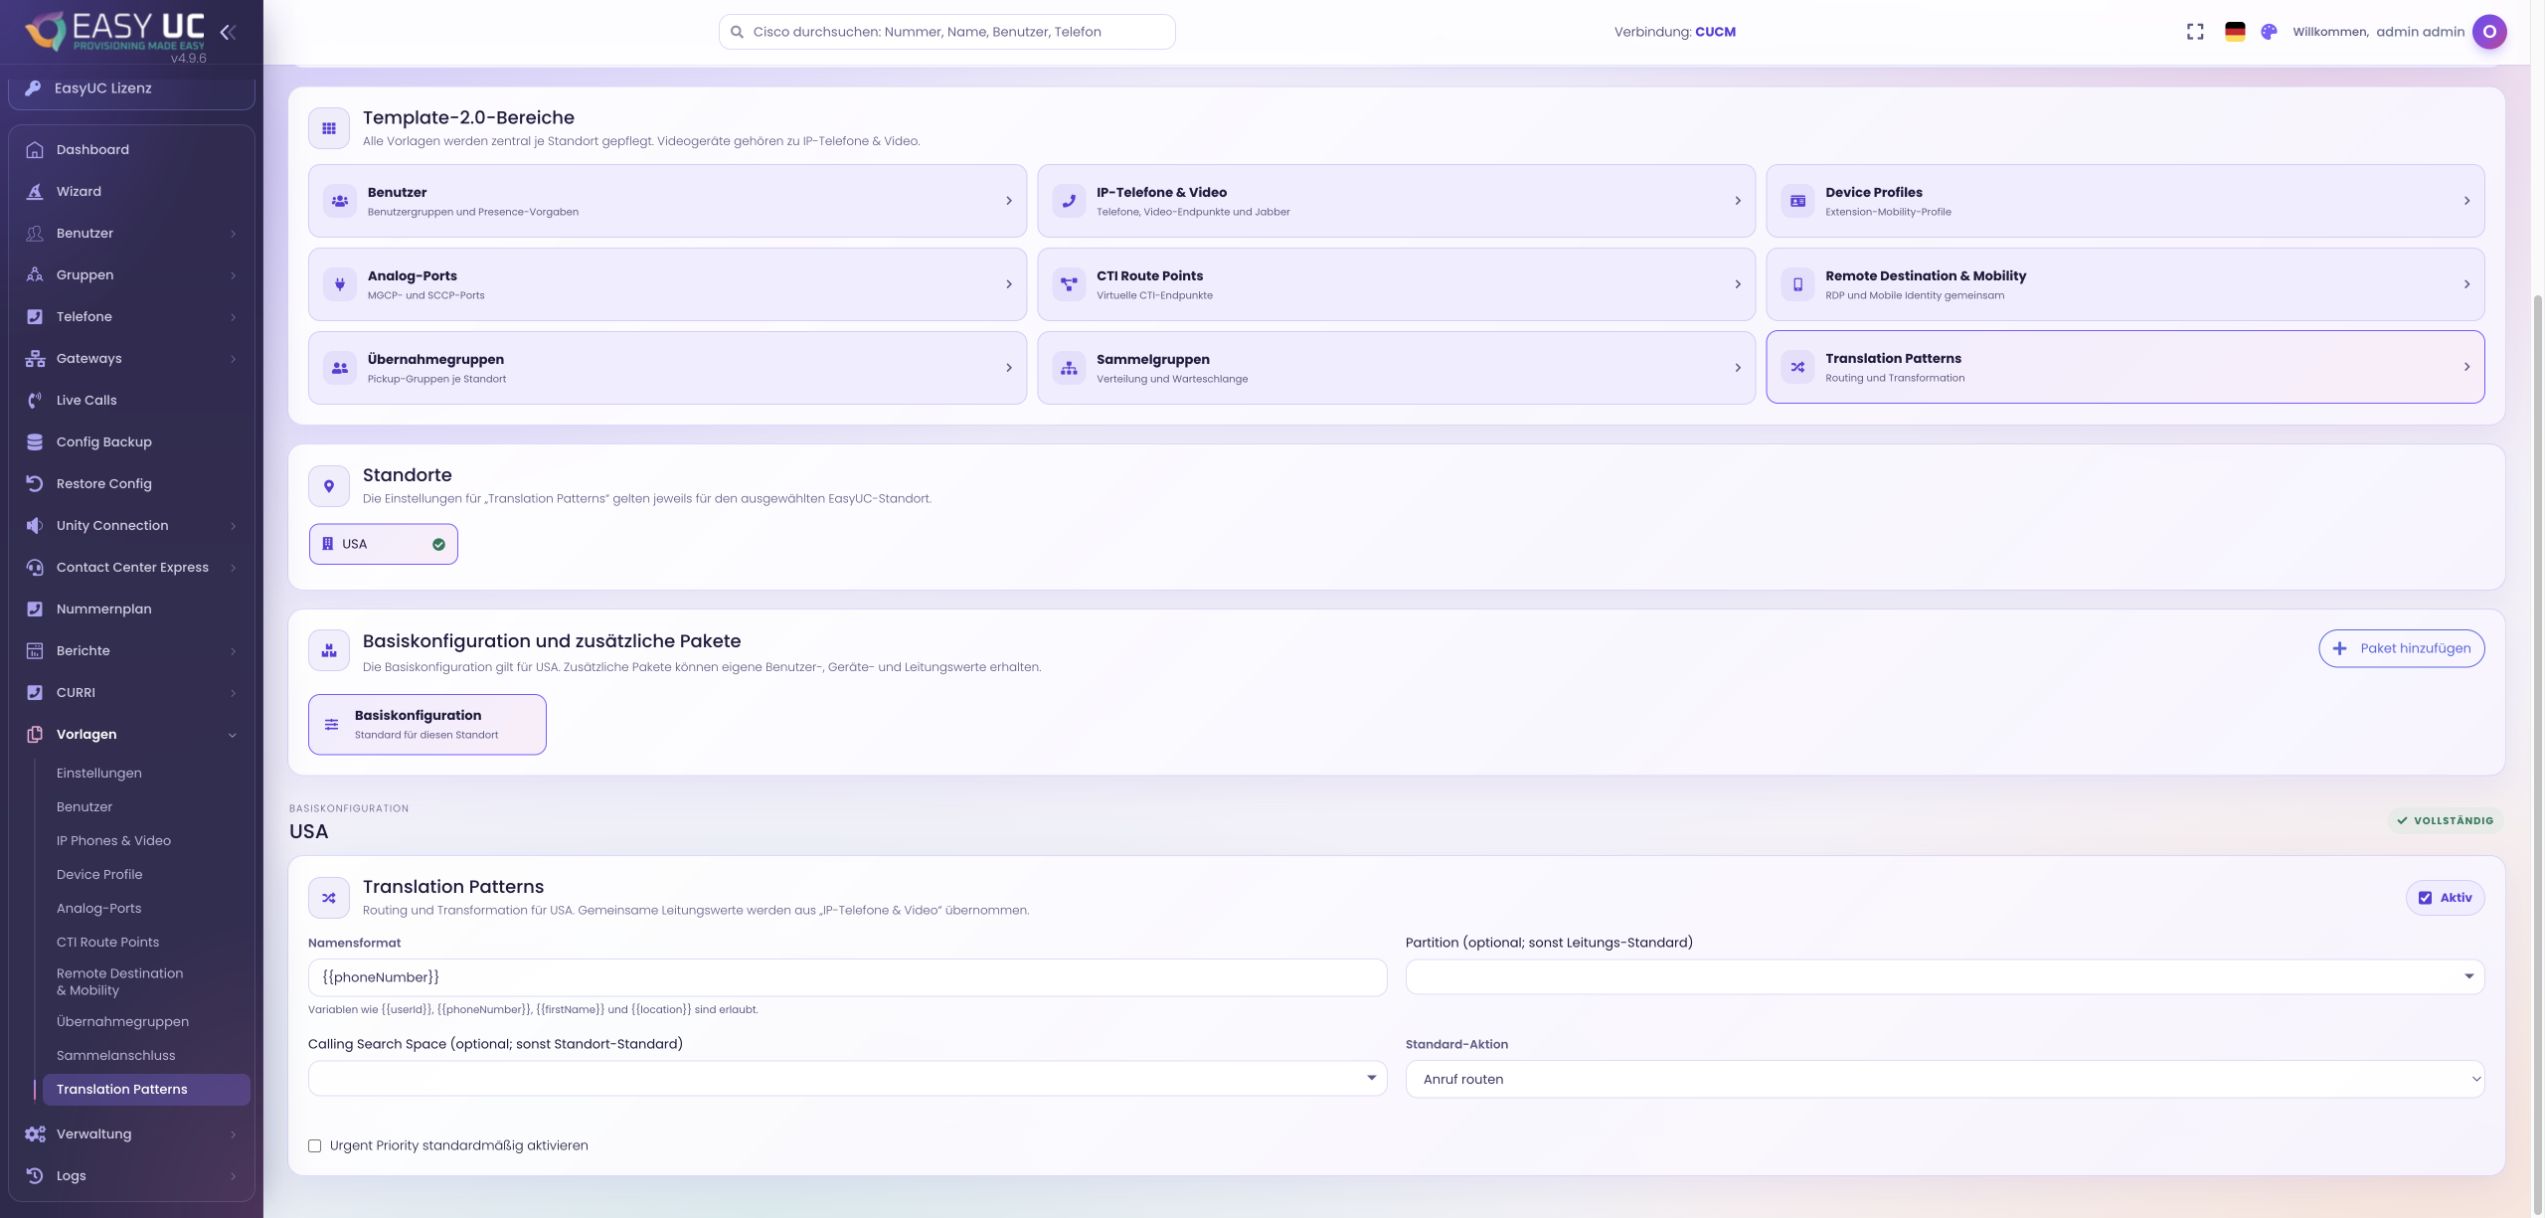
Translation patterns classify and transform numbers. Template 2.0 supplies partition, CSS, the route-or-block decision and Urgent Priority. Partition and CSS can fall back to the shared line defaults.
The actual pattern and calling-party and called-party masks are entered during subsequent creation. A displayed name format does not replace these inputs. Check the rule against the intended source and destination numbers.
Repeated routing defaults do not need selecting for every rule, while the actual number transformation remains an explicit creation input.
Enable translation patterns and configure partition and CSS.
Select route or block and the desired Urgent Priority, then save the template.
Enter the pattern and required calling/called-party masks in the creation dialog and check the result.
The user wizard connects prepared templates with actual users and numbers. First check the location and package for each selected user. Then complete the appropriate steps for desk phones, device profiles, softphones, remote destination/mobile identity and groups.
Each step performs its own changes when Create or Deploy is selected. Next navigates to the following step; there is no final combined job for all preceding steps. Already associated softphone clients are detected. Missing, permitted clients with a matching template can be created.
This keeps each user’s devices and group assignments visible. Location and package select the defaults without manually repeating every setting.
Select users and check number, location and package for each one.
Choose devices or assignments, account for existing softphones and explicitly create the current step.
Check this step’s result, then move to the next required area.
CURRI is the interface CUCM uses to ask an external service about a call before delivering it. EasyUC answers that request: the phone shows the name from the phonebook, and numbers on the blocklist are rejected.
Caller name via CURRI and a blocklist with hit counts. Demo data.
You enable the portal functions individually per CUCM connection. The server also rejects functions that are switched off.
EasyUC fits into the processes you already have, such as user management or a ticketing system.
A public API for driving EasyUC from your own scripts and systems.
EasyUC notifies your systems about events.
Your company's logo and colours in the interfaces.
Sign-in with a second factor.
A CUCM usually comes with further Cisco systems. EasyUC connects to them through their own interfaces and shows them in the same interface. Credentials are stored encrypted on your appliance.
Maintain agents, skills, teams and applications in UCCX. Every change shows the old and new value first. Scripts appear as a flow diagram.
Create mailboxes from the user profile, listen to and replace greetings, view call handlers as a flow.
A call on the Cisco phone sets the Teams user to “In a call”. With Jabber and IM and Presence in both directions.
Zone status, calls, registrations, alarms and certificate expiry of Expressway-C and Expressway-E, read-only.
With Presence Sync, calls on the Cisco phone are shown in Microsoft Teams. More about Presence Sync
Reports are built from the call detail records that CUCM delivers to EasyUC via SFTP, and from the inventory of the cluster.
up to 200 numbers and 366 days, as PDF, CSV or Excel, with your own layout
call reports by e-mail daily, weekly or monthly
record the CUCM inventory, compare two states field by field, export as PDF or Word
every change with before and after, including changes made directly in CUCM
| CUCM | version 11.5 or later, tested with 12.5 to 15 |
|---|---|
| Interfaces | AXL, JTAPI/CTI, RISPort, CURRI; CUPI for Unity Connection |
| Operation | virtual appliance (OVA) with K3s for VMware or Proxmox |
| Internet access | not required, installation and updates work offline |
| Licence | per installation, as a signed licence file |
Describe a typical administration task, such as setting up a new employee. We will show you how to use templates and location settings for that task in EasyUC.
Licences, updates, invoices and support tickets are in the customer portal.
Go to the customer portalInside EasyUC
A look at managing Cisco telephony with EasyUC.
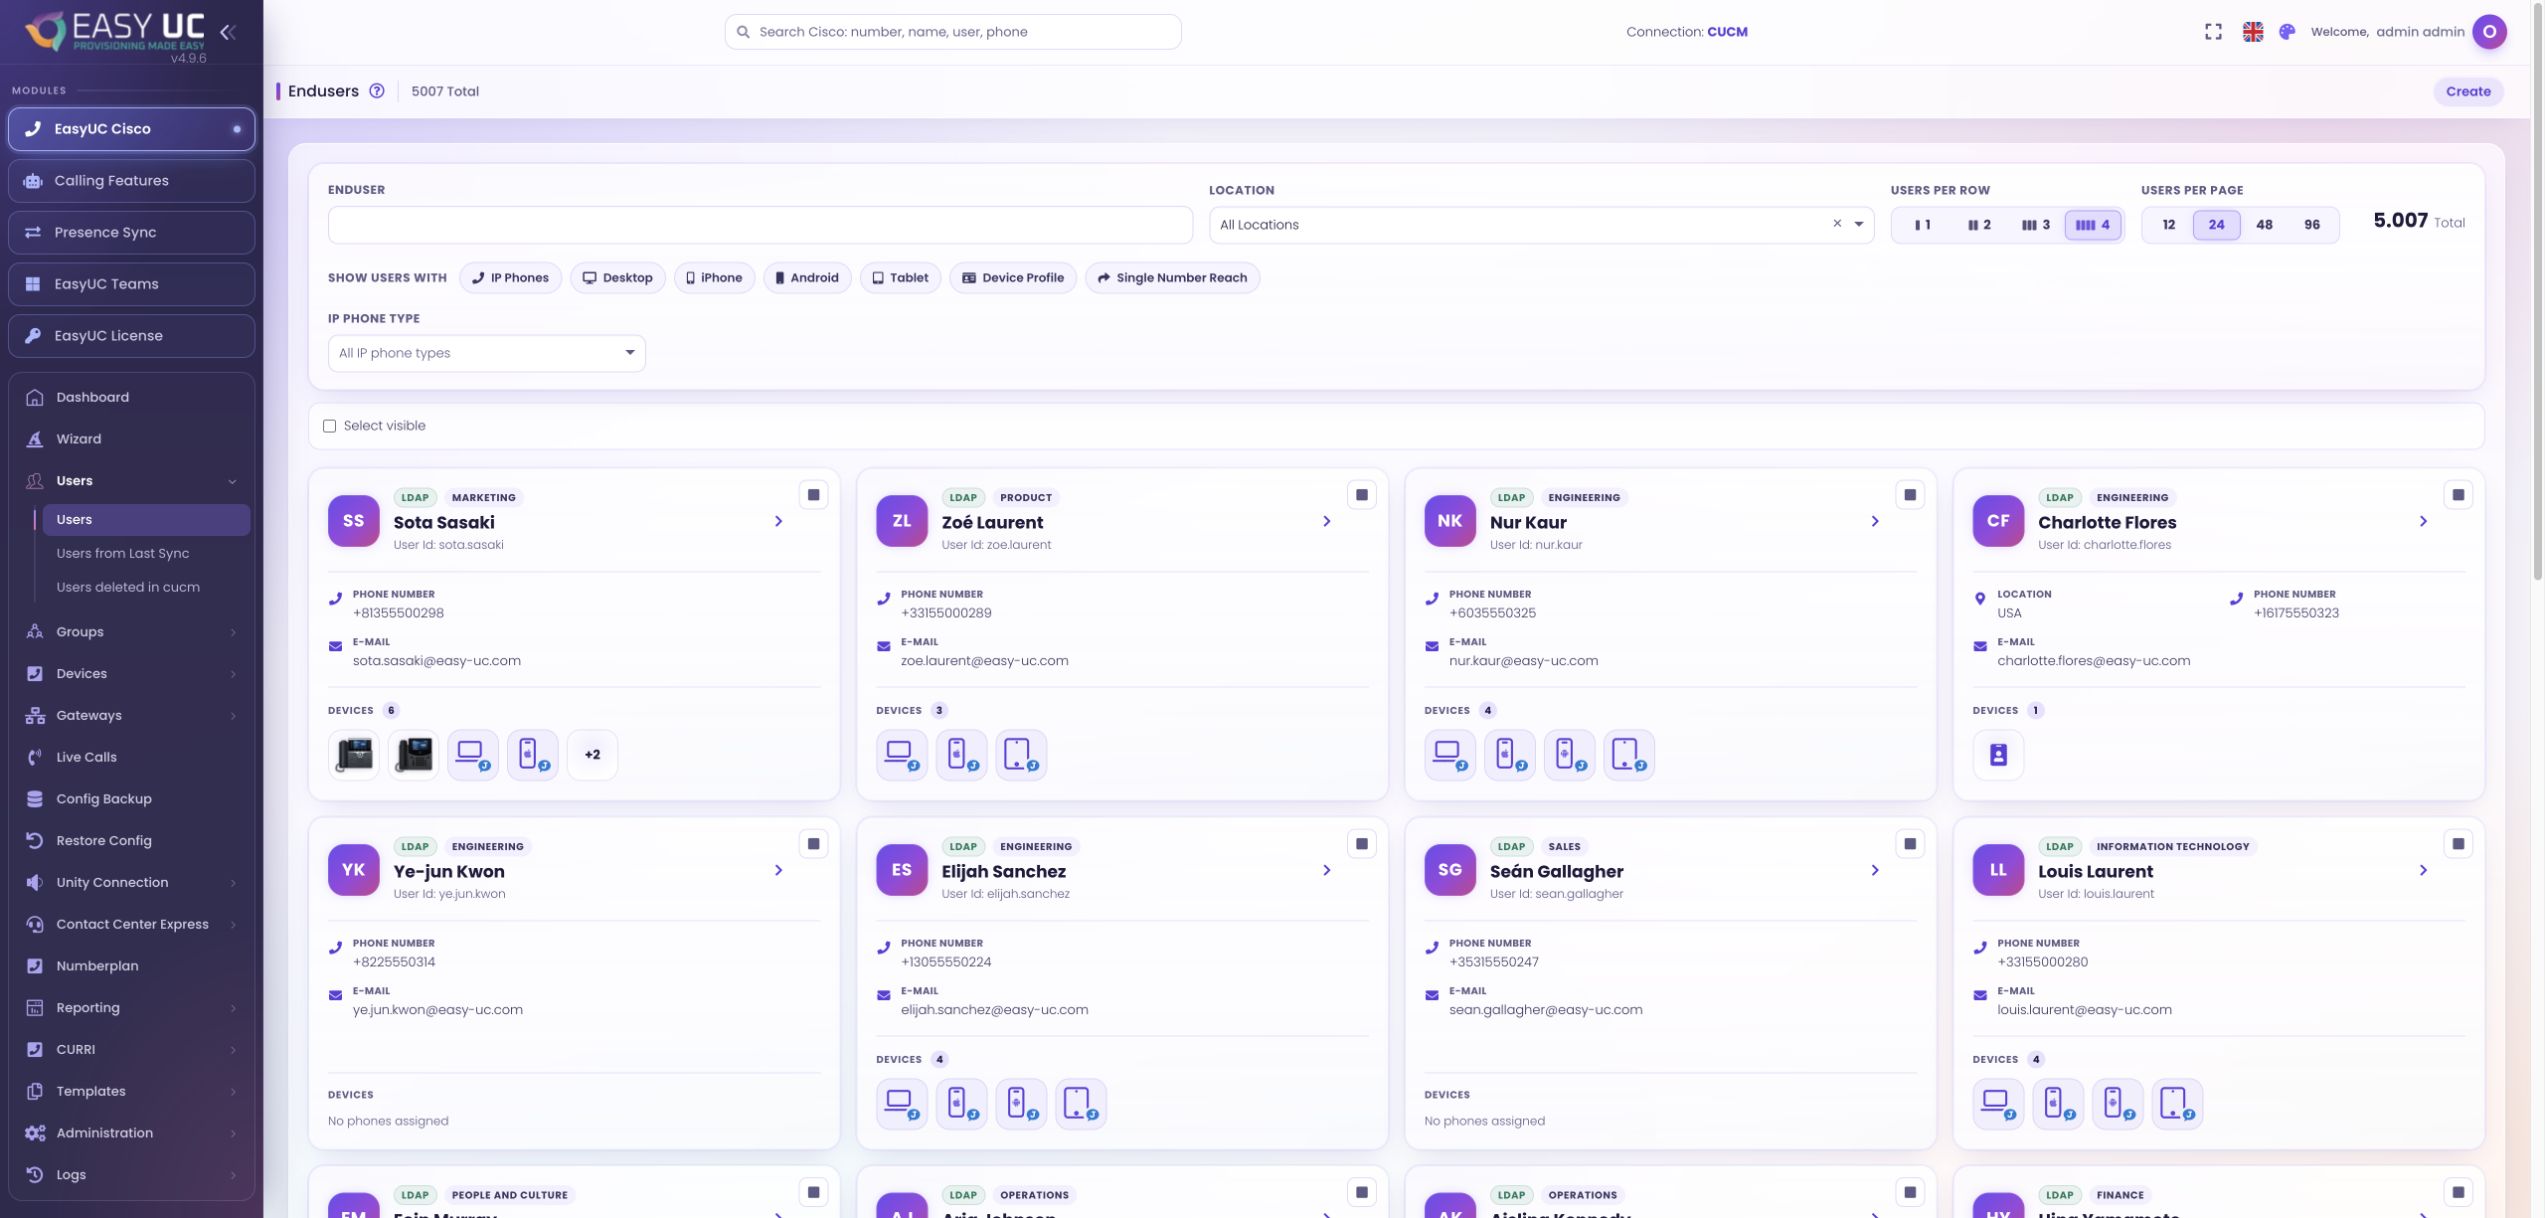
User management with location and device filters, contact details, and assigned phones and softphones.
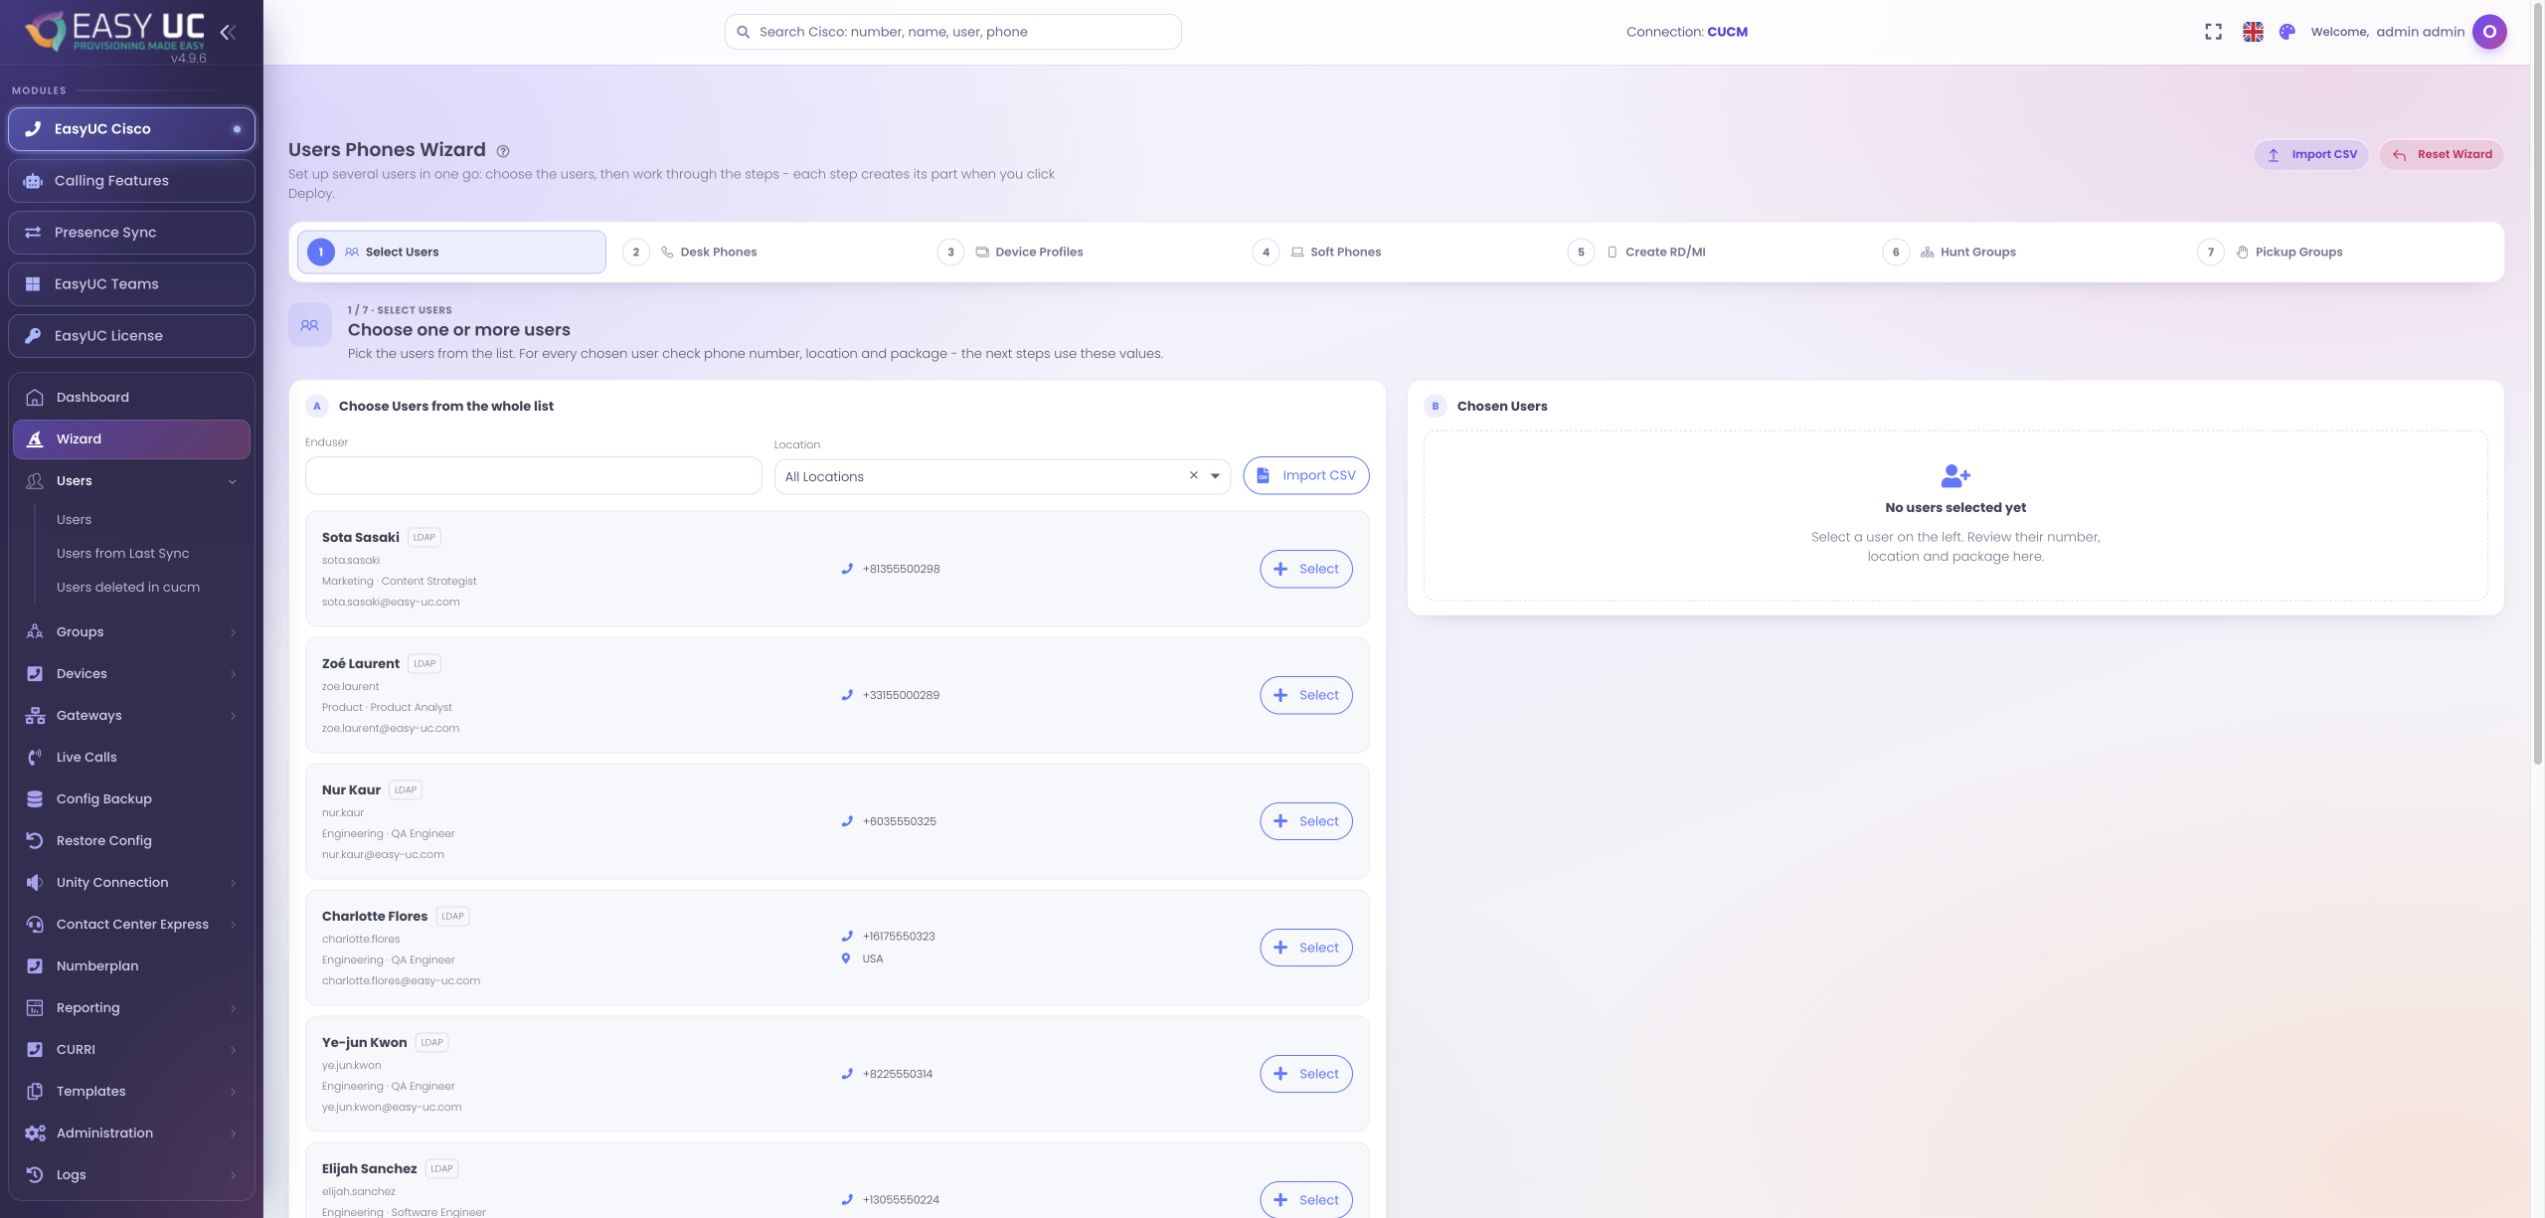
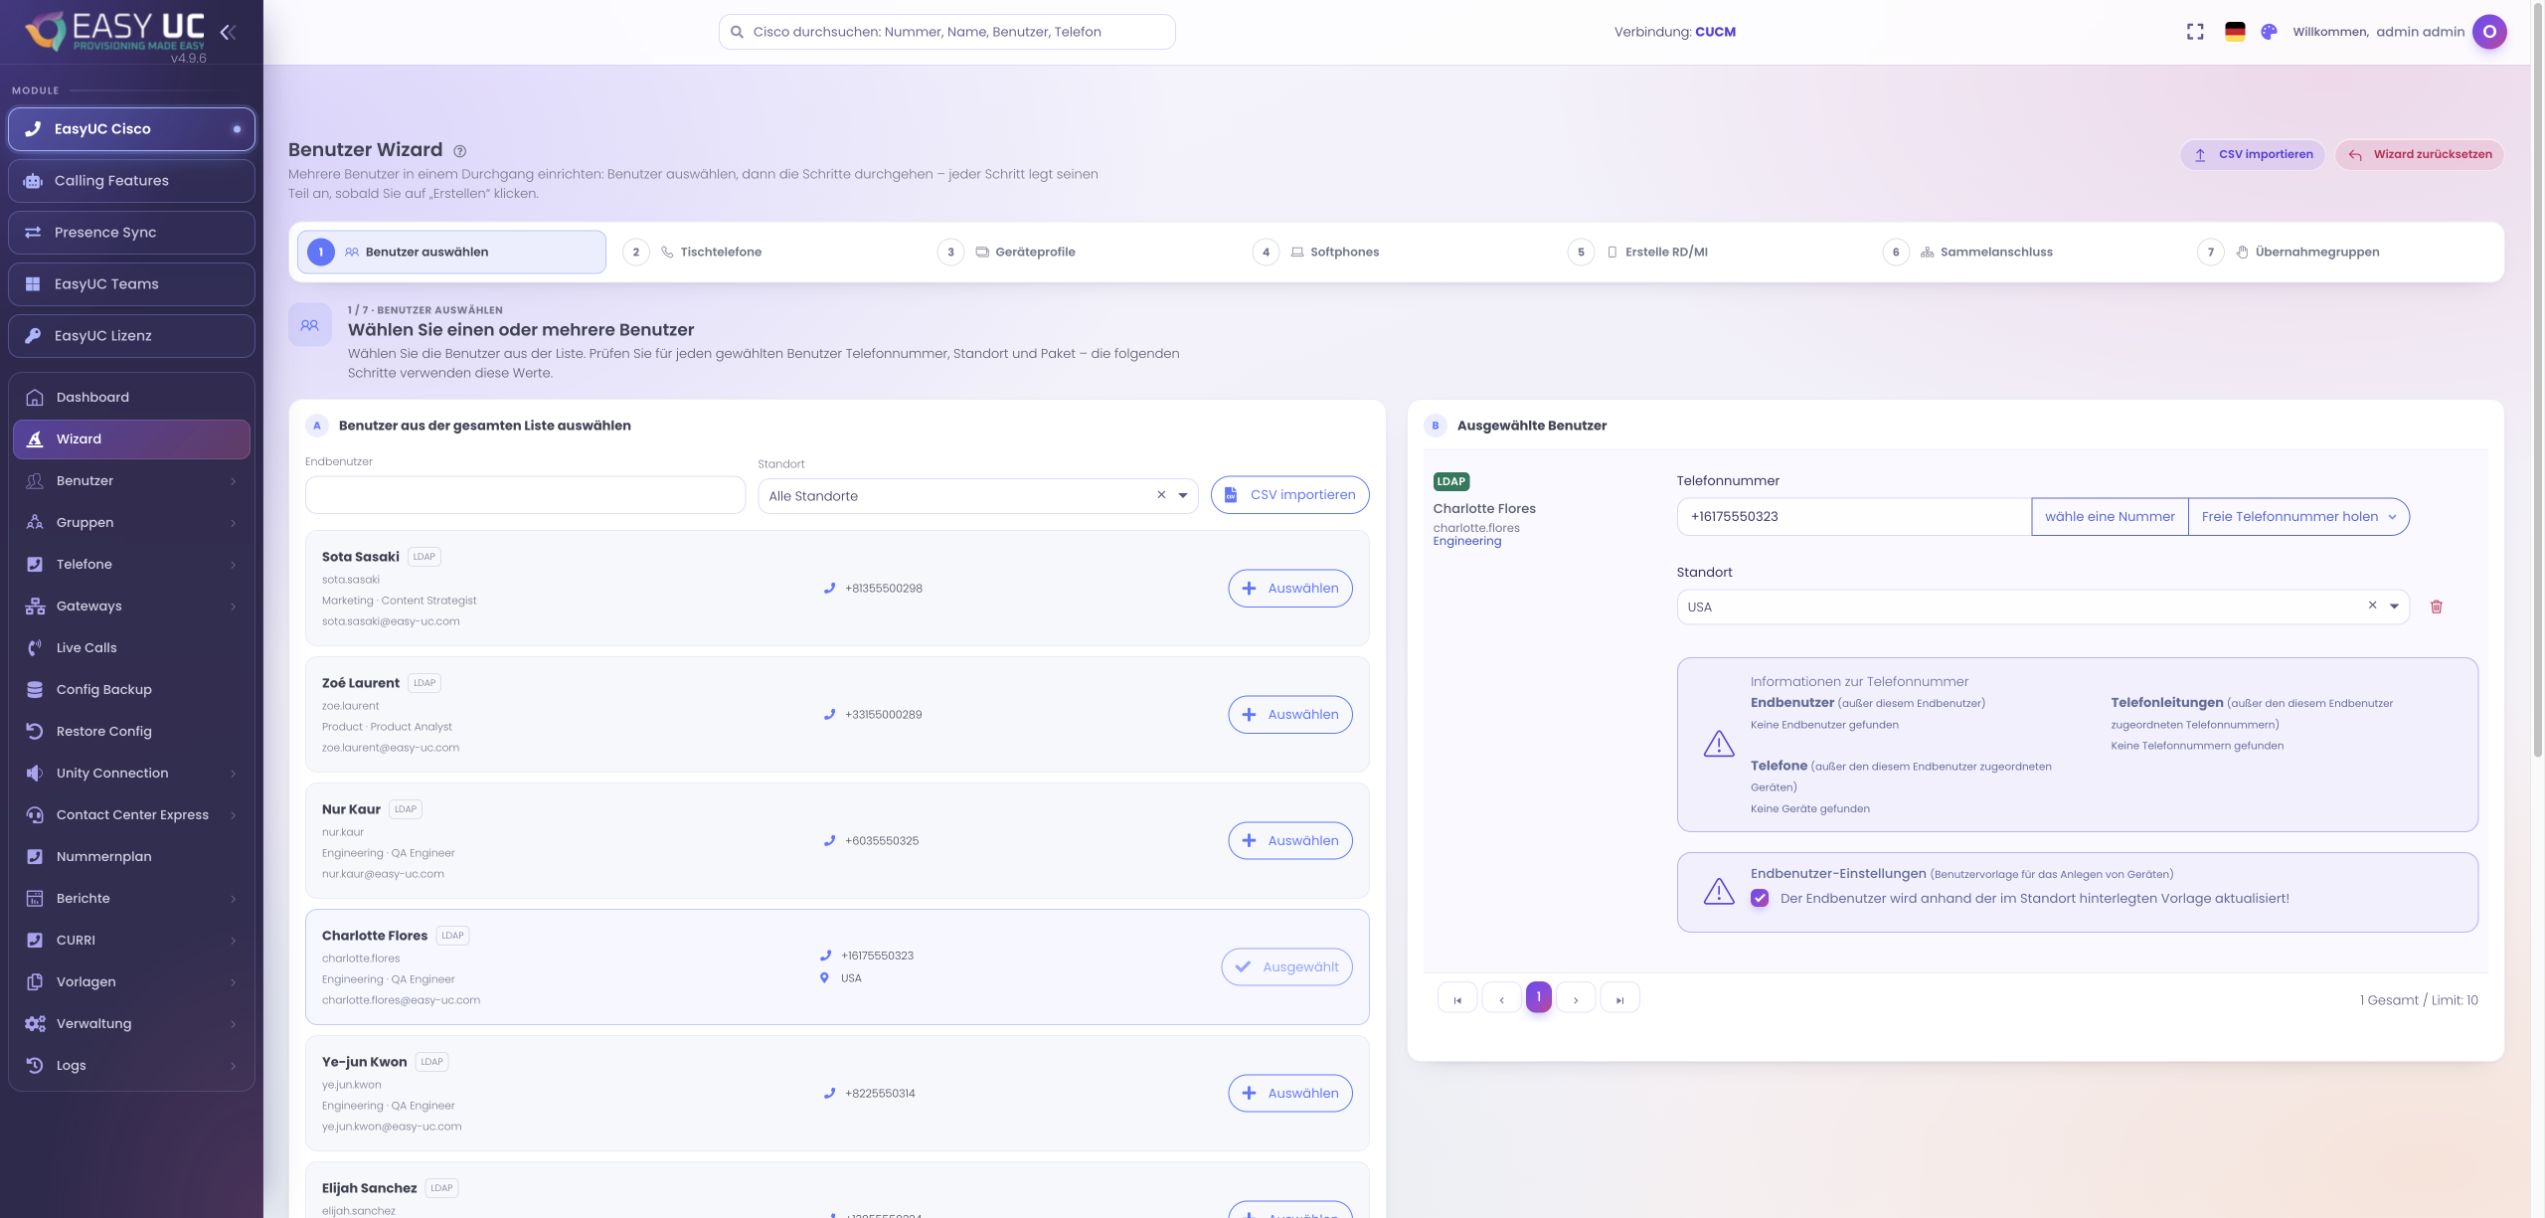
The seven-step wizard starts with user selection and guides you through phones, device profiles, softphones and group assignments.
These captures show the actual EasyUC interface in a lab/demo environment. Open an image to see it in more detail. Parts of the lab interface are not yet fully translated. When a matching language version is unavailable, the different screenshot language is labelled.
Features in practice
From finding an individual user to setting up several employees, these views show EasyUC’s actual CUCM workflows.
The user overview combines search with location and device-type filters. Cards bring together the user ID, contact details and assigned devices. This helps you check, for example, whether an employee already has a desktop client or a mobile device.
Open a user card to reach the profile. Separate sections cover user details, phones and lines, groups, Single Number Reach and history. Selecting several users supports shared actions without having to find each person again.
Open Users and search for the person or user ID you need.
Choose a location and device type if needed. Adjust the number of cards per row or page to suit your overview.
Open the relevant user card for its details. For a shared action, select the required users with their selection boxes.
The wizard starts with the available user list and a separate selection panel. Check the phone number, location and package for each selected person. These values form the basis for the following setup steps.
Next, move through the available sections for desk phones, device profiles, softphones, reachability and groups. Equipment is selected per user; the softphone step also provides shared selection of the required Jabber clients. Each setup operation is performed in its respective step.
Open the wizard, filter by location if needed and add the required users to the selection.
Check each user’s phone number, location and package in the selection panel. Correct these values before continuing.
In the following steps, select the devices or clients each user needs. Complete the relevant device details and group assignments.
Run the setup for the current step and review the displayed results before moving to the next section.
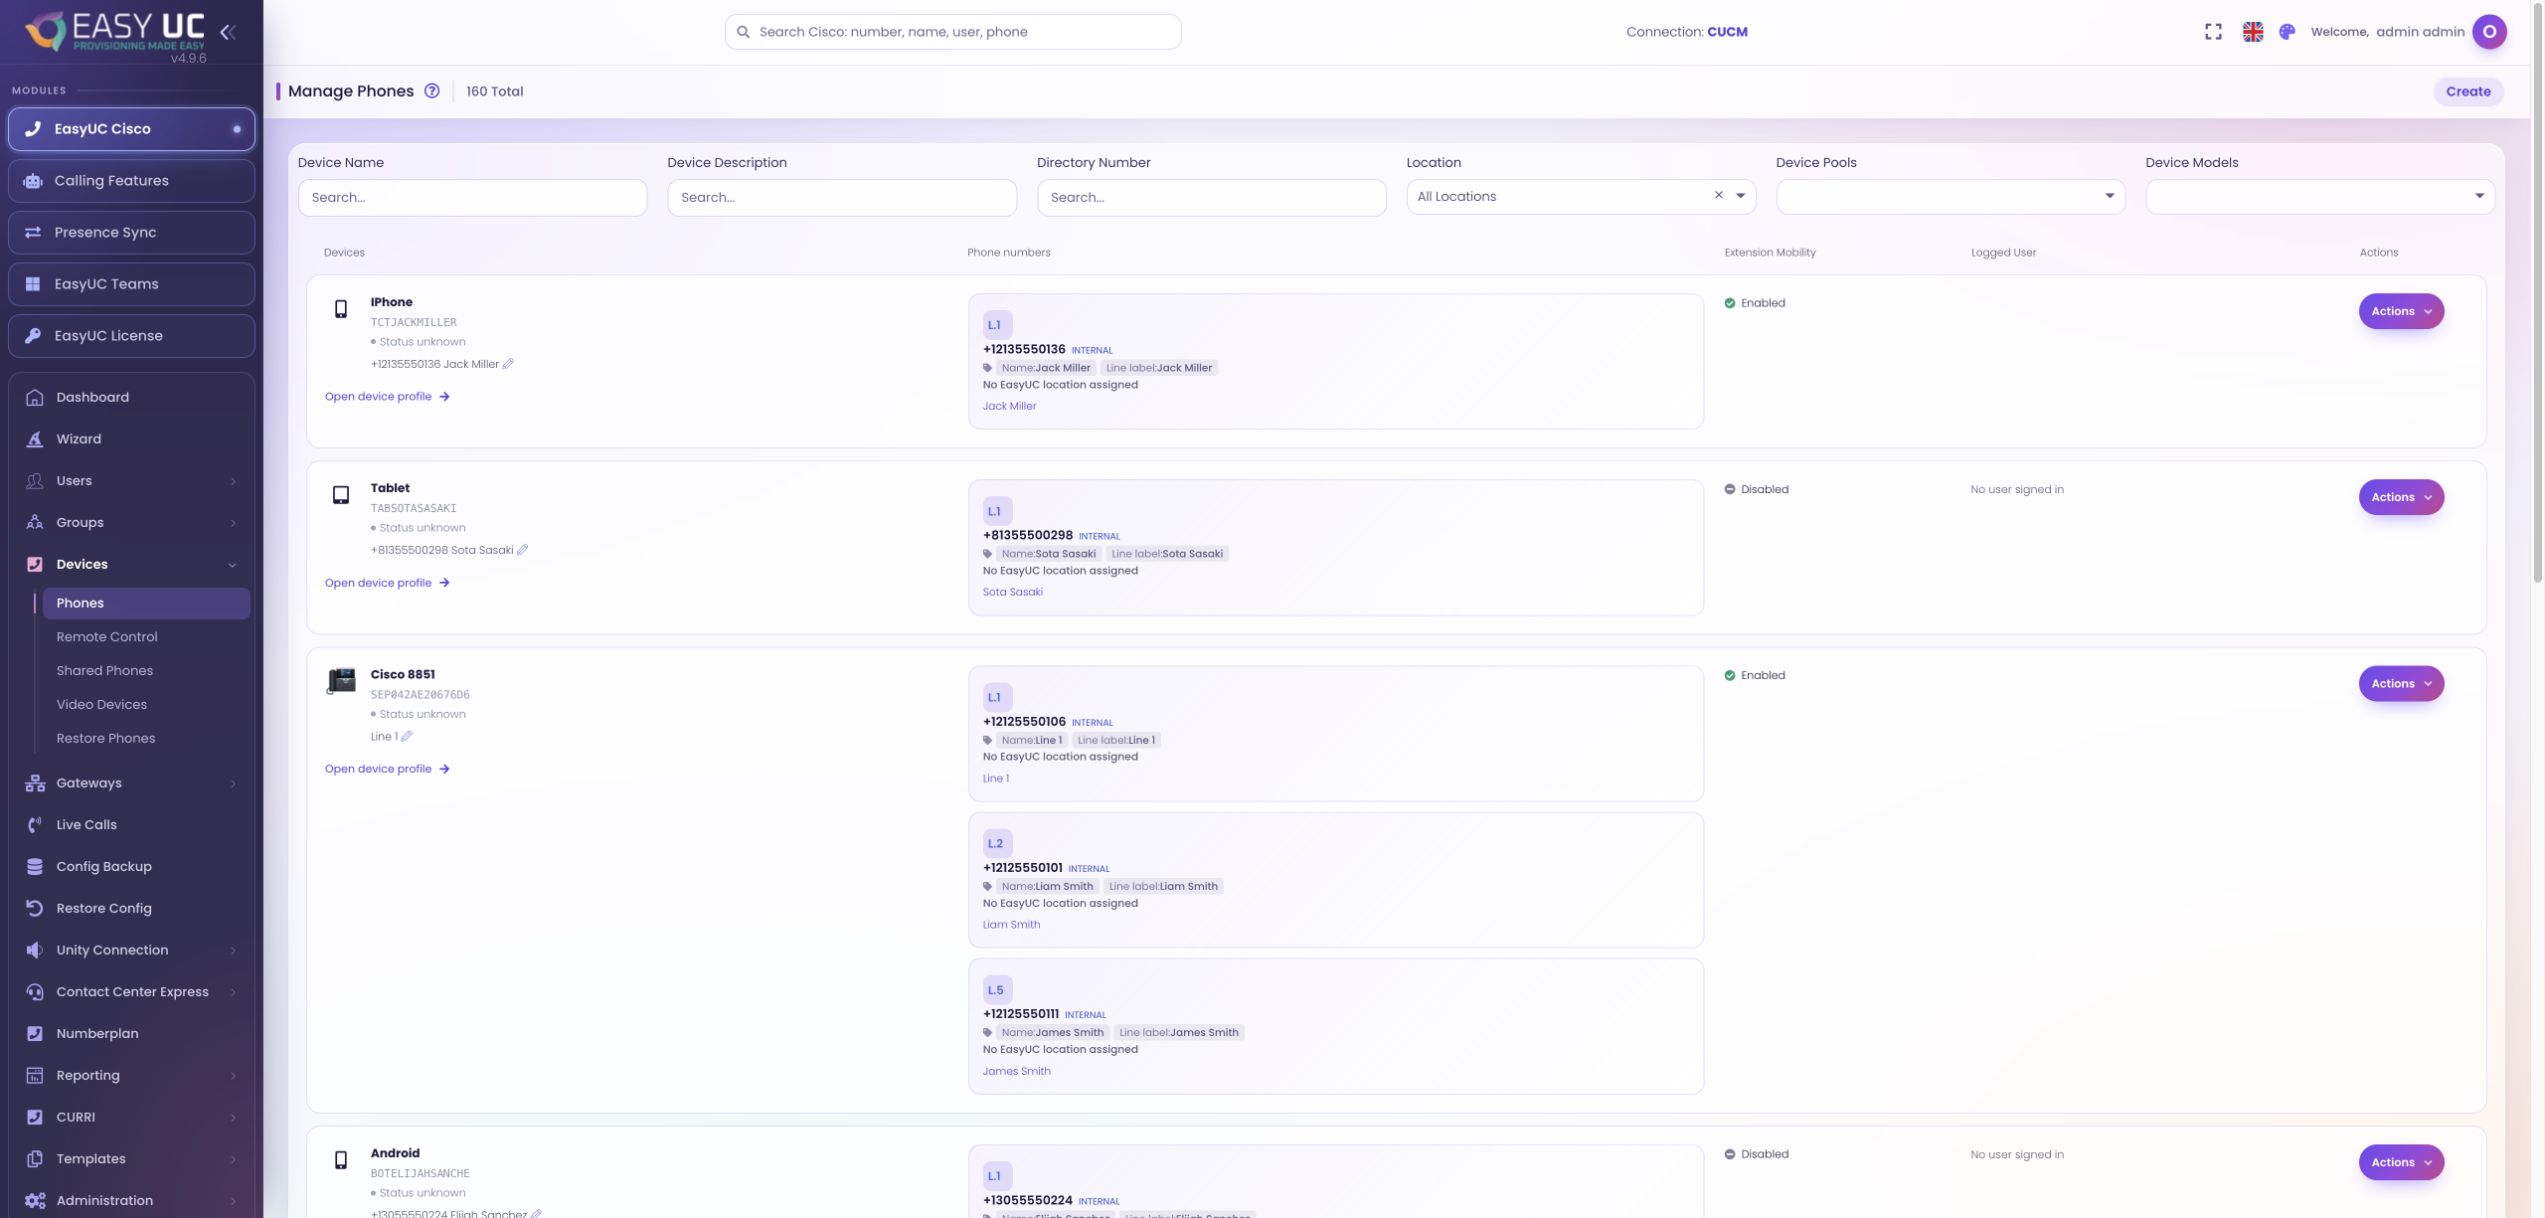
The phone overview combines device information with directory numbers, Extension Mobility and logged-in users. Filters for name, description, directory number, location, device pool and model narrow the list. This keeps phone-to-line assignments visible even in a large inventory.
Click a phone entry to open its profile. The action menu offers functions available for the device and your permissions, such as editing phone buttons, converting the phone type, changing location or package, updating the MAC address and viewing registrations. Use “Create” to start adding a new phone.
Search by device name, description or directory number. Combine location, device pool and model filters as needed to display the relevant phones.
Review the phone’s lines, Extension Mobility status and logged-in user. Then click the phone entry to open its profile.
Select the required function in the action menu and complete its dialog. To add another phone, start with “Create” in the overview.
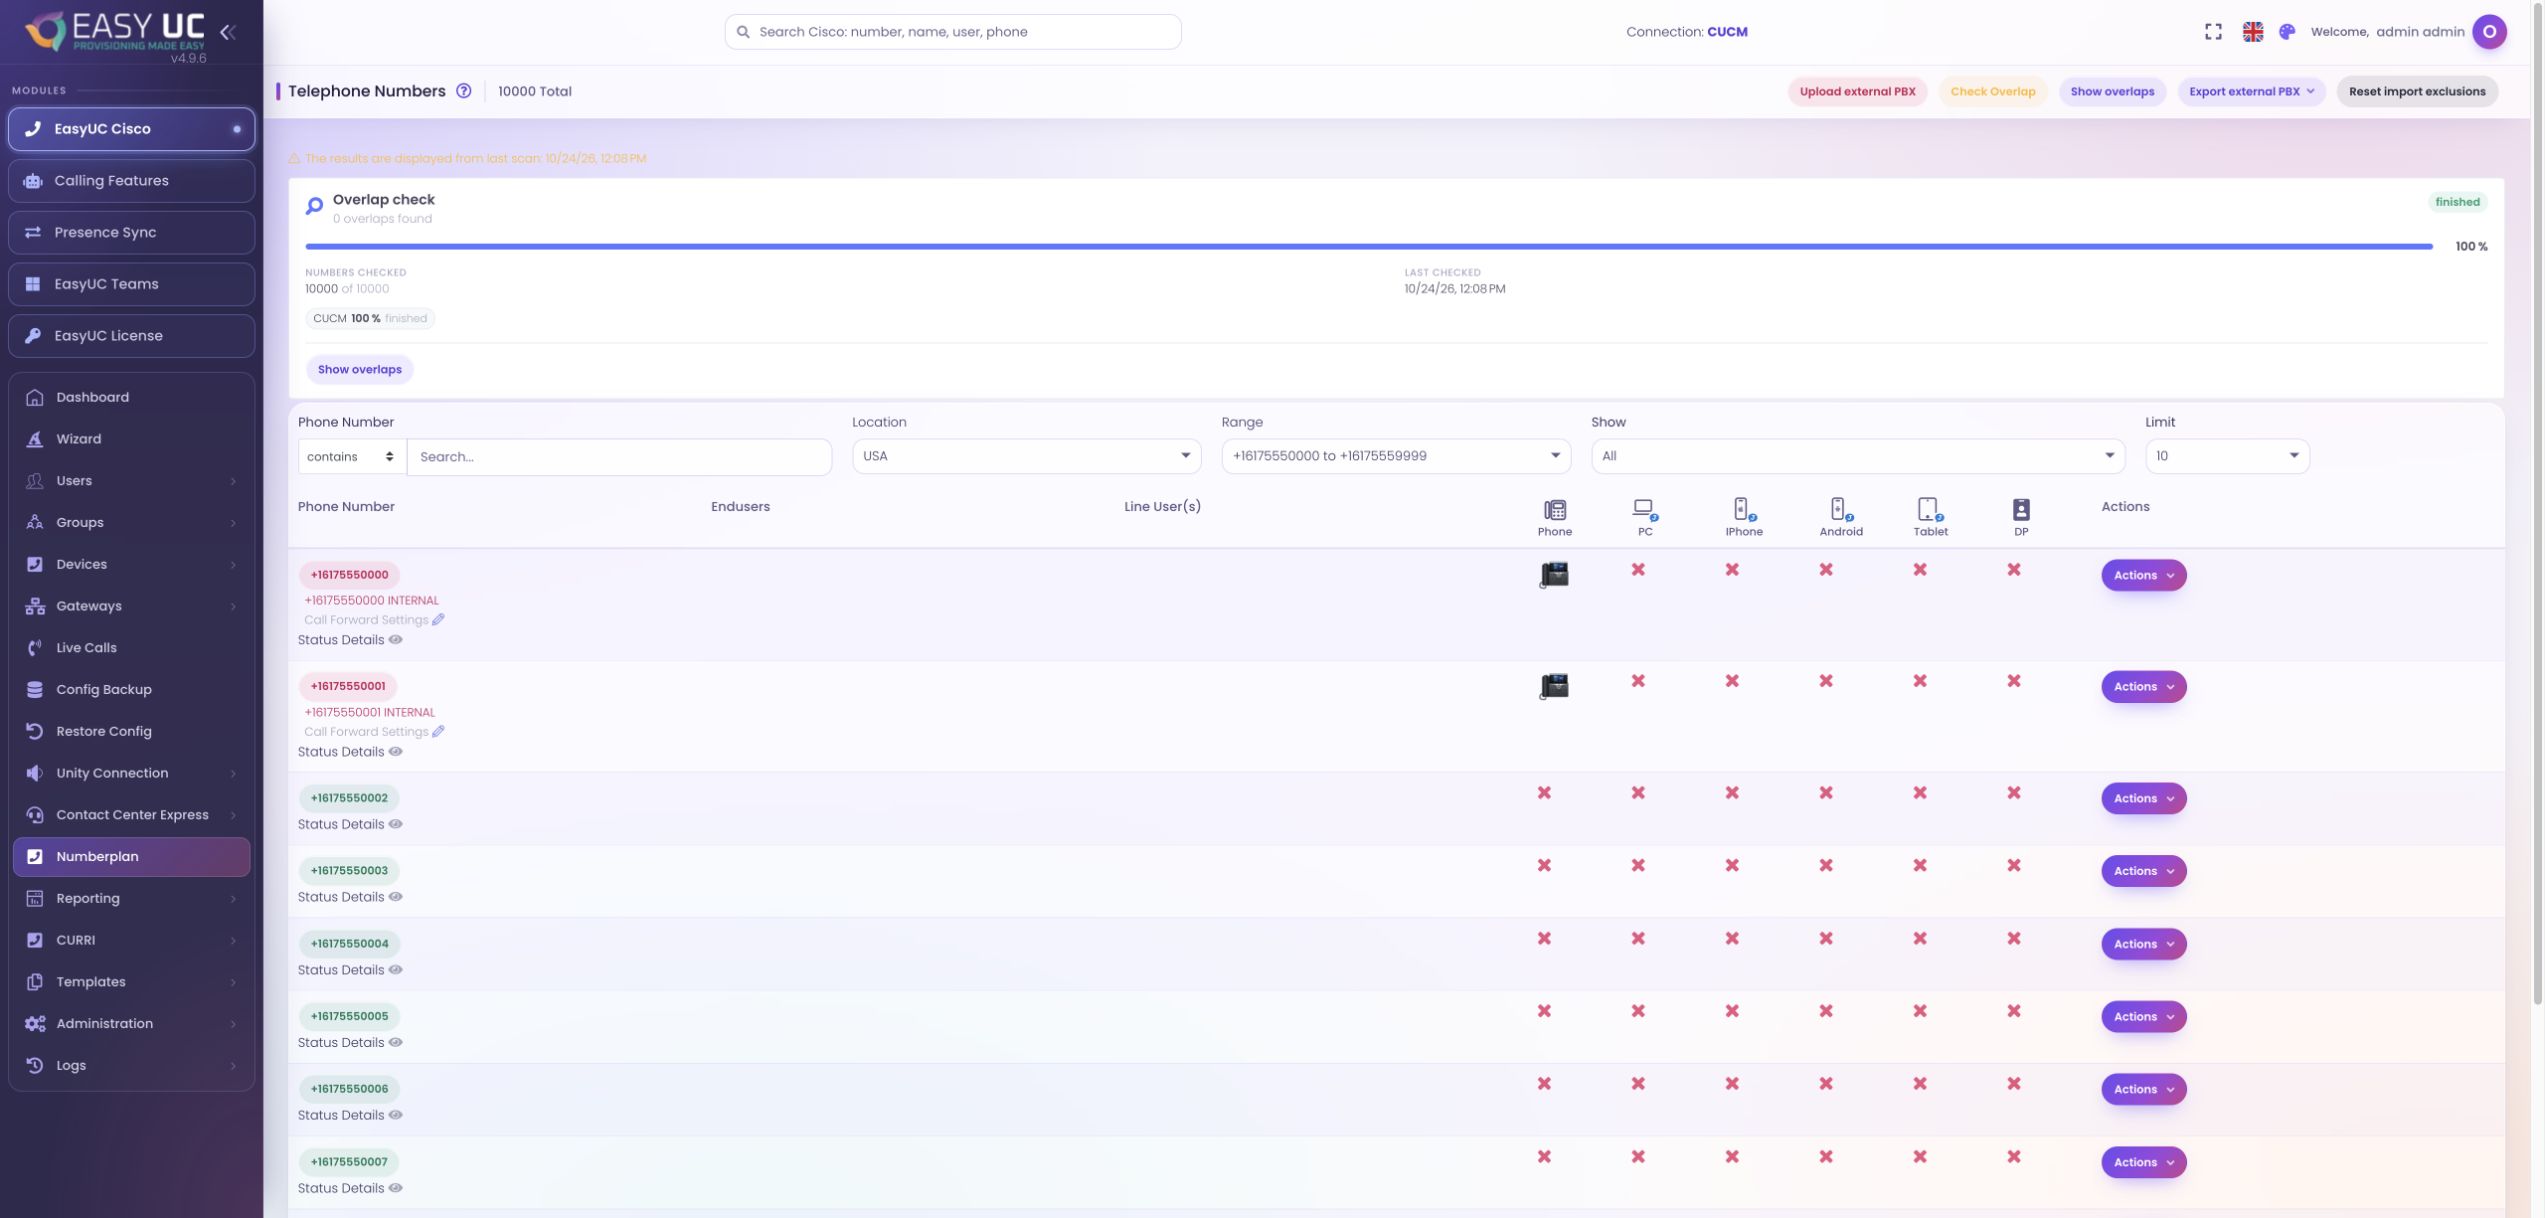
The number plan shows each number’s status, assigned users and use on phones, desktop and mobile clients, and device profiles. Location, number range, display options and search fields help you find the relevant entries. Status details add context to each number’s colour indicator.
Administrators can run an overlap check and open the conflicts it finds. Progress and the last-check timestamp show the state of the analysis. Numbers from an external PBX can be imported from CSV, and the recorded external inventory can be exported as CSV.
Choose the location and number range. Narrow the list further with the display options, page size or a number search.
Review the number’s status, users and device types. Open its status details to inspect the recorded usage.
As an administrator, start the overlap check. Follow its progress and open the detected overlaps; the check timestamp remains visible.
Upload an external PBX number plan as CSV when needed. For export, choose all external numbers, imported entries only or manually marked entries only.
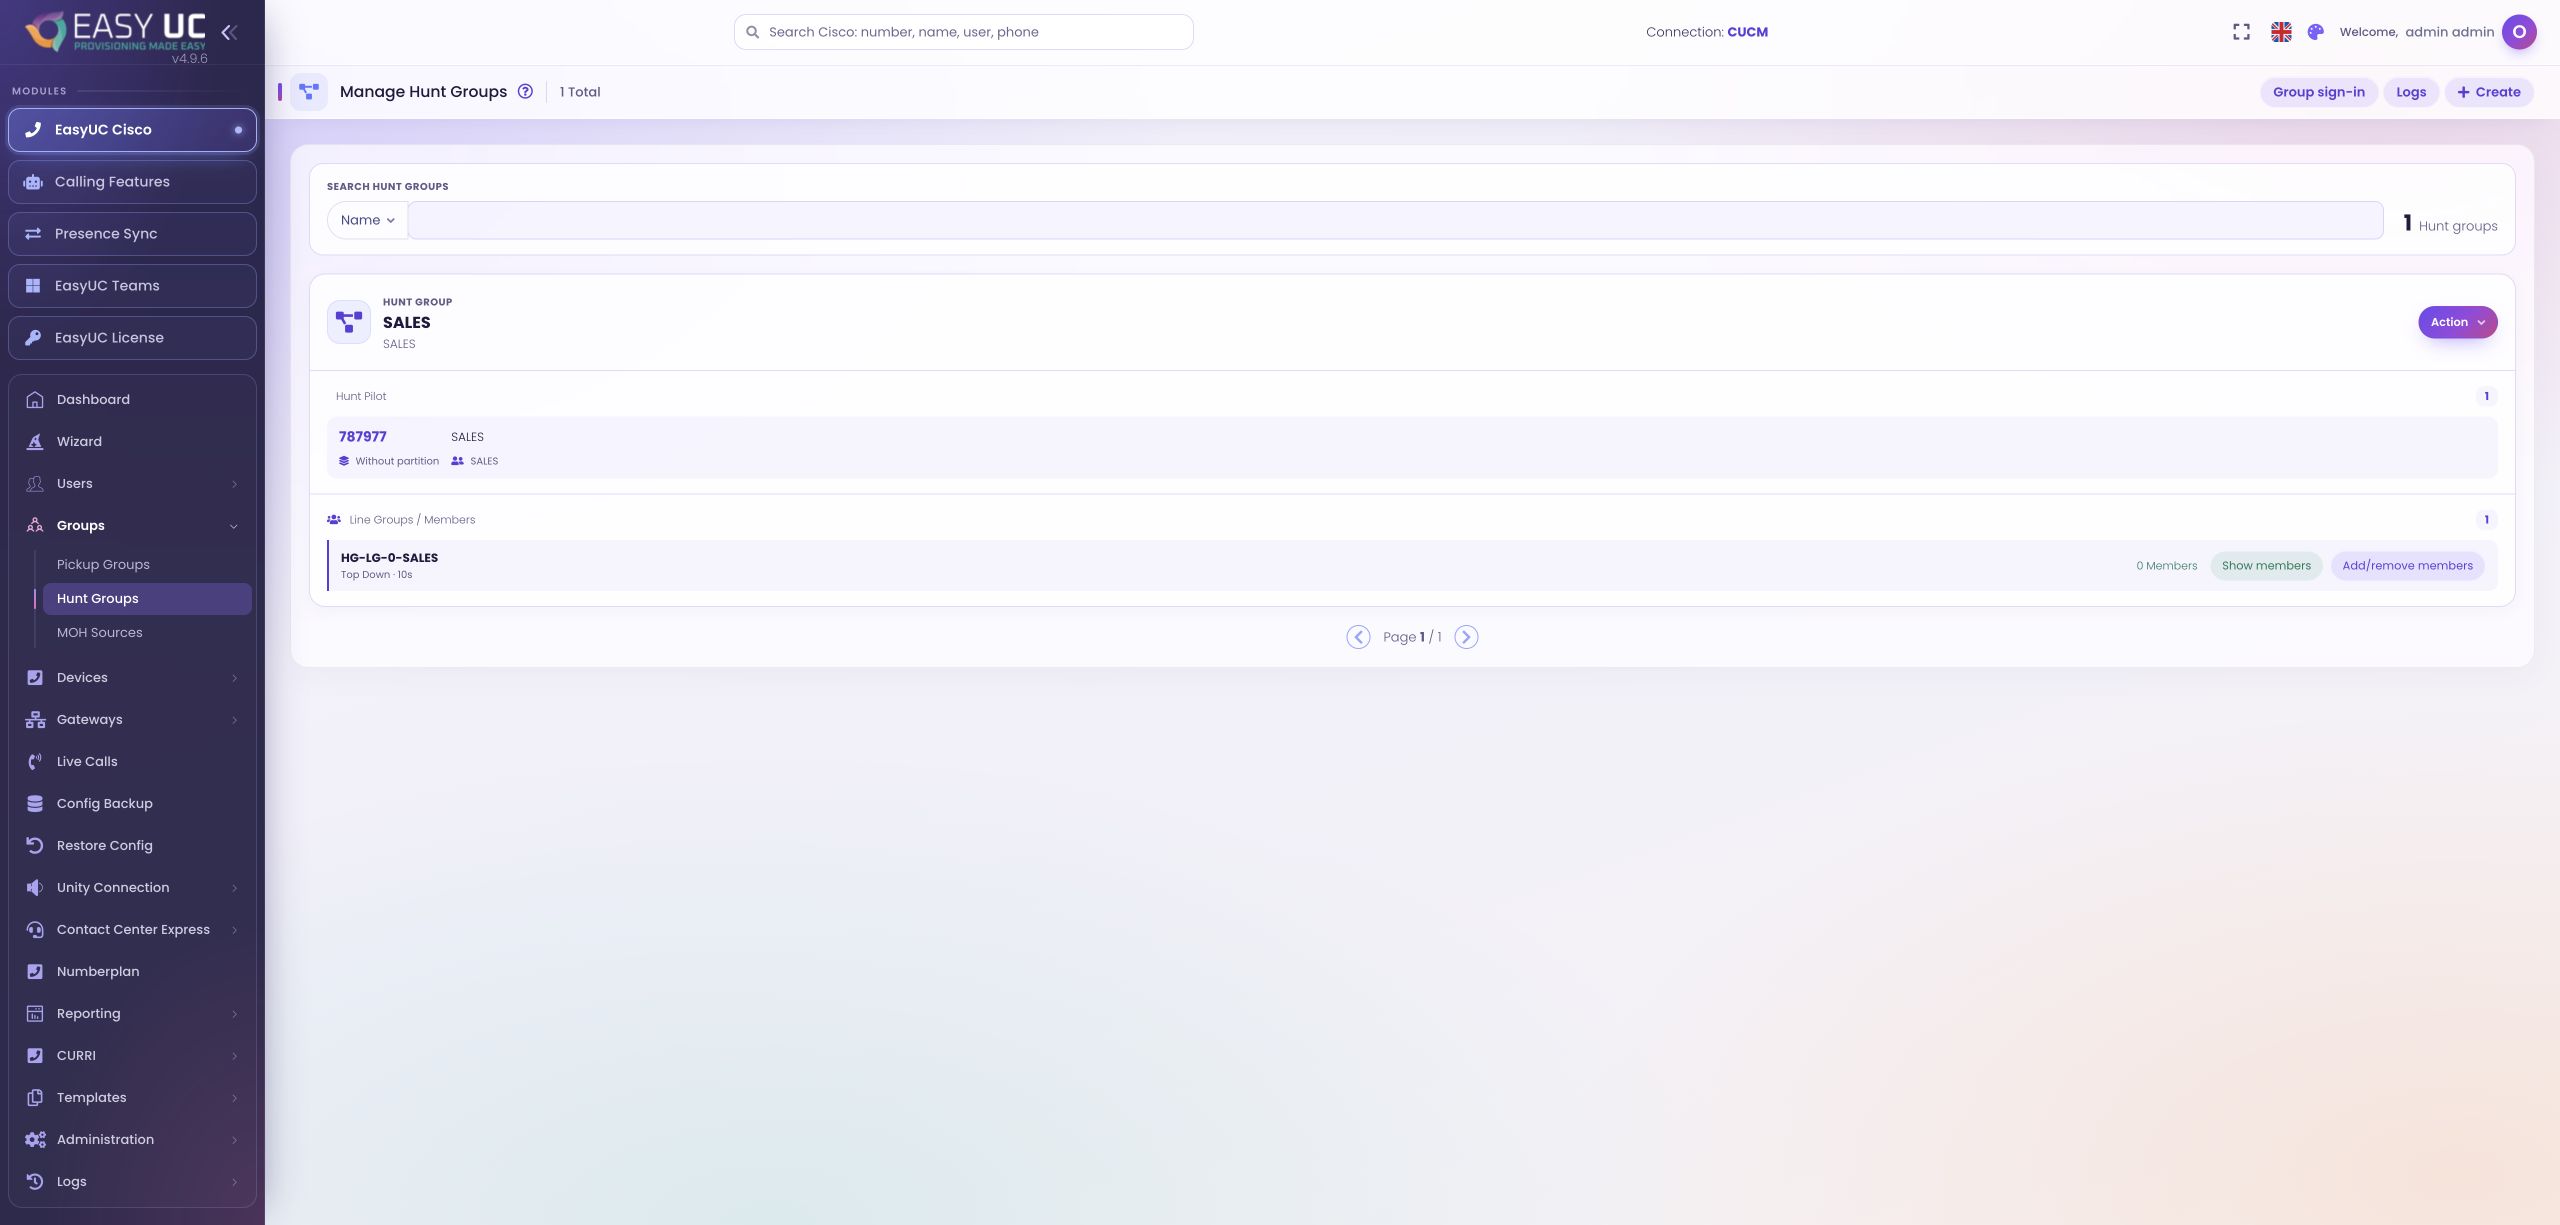
The hunt group overview shows the pilot number with its partition and alerting name, alongside the associated line groups. Their cards include call distribution, ring time and member count. This makes the structure of a hunt group visible directly in the overview.
Use “Manage Members” to edit each line group’s membership. Search for lines, move them into or out of the group, change their order and save the changes. Distribution and ring time are edited in the group settings; the overview reflects the actual configuration.
Find the hunt group and review its pilot number, partition and associated line groups. Read the configured distribution and ring time on the cards.
Open “Manage Members” from the action menu. When there is more than one line group, use the tabs to switch to the group you need.
Search for the required line and move it into the member list. Move it back to remove it, or change its position within the list to adjust the order.
Save the membership changes. To change distribution or ring time as well, open the hunt group editor and update the line group settings there.
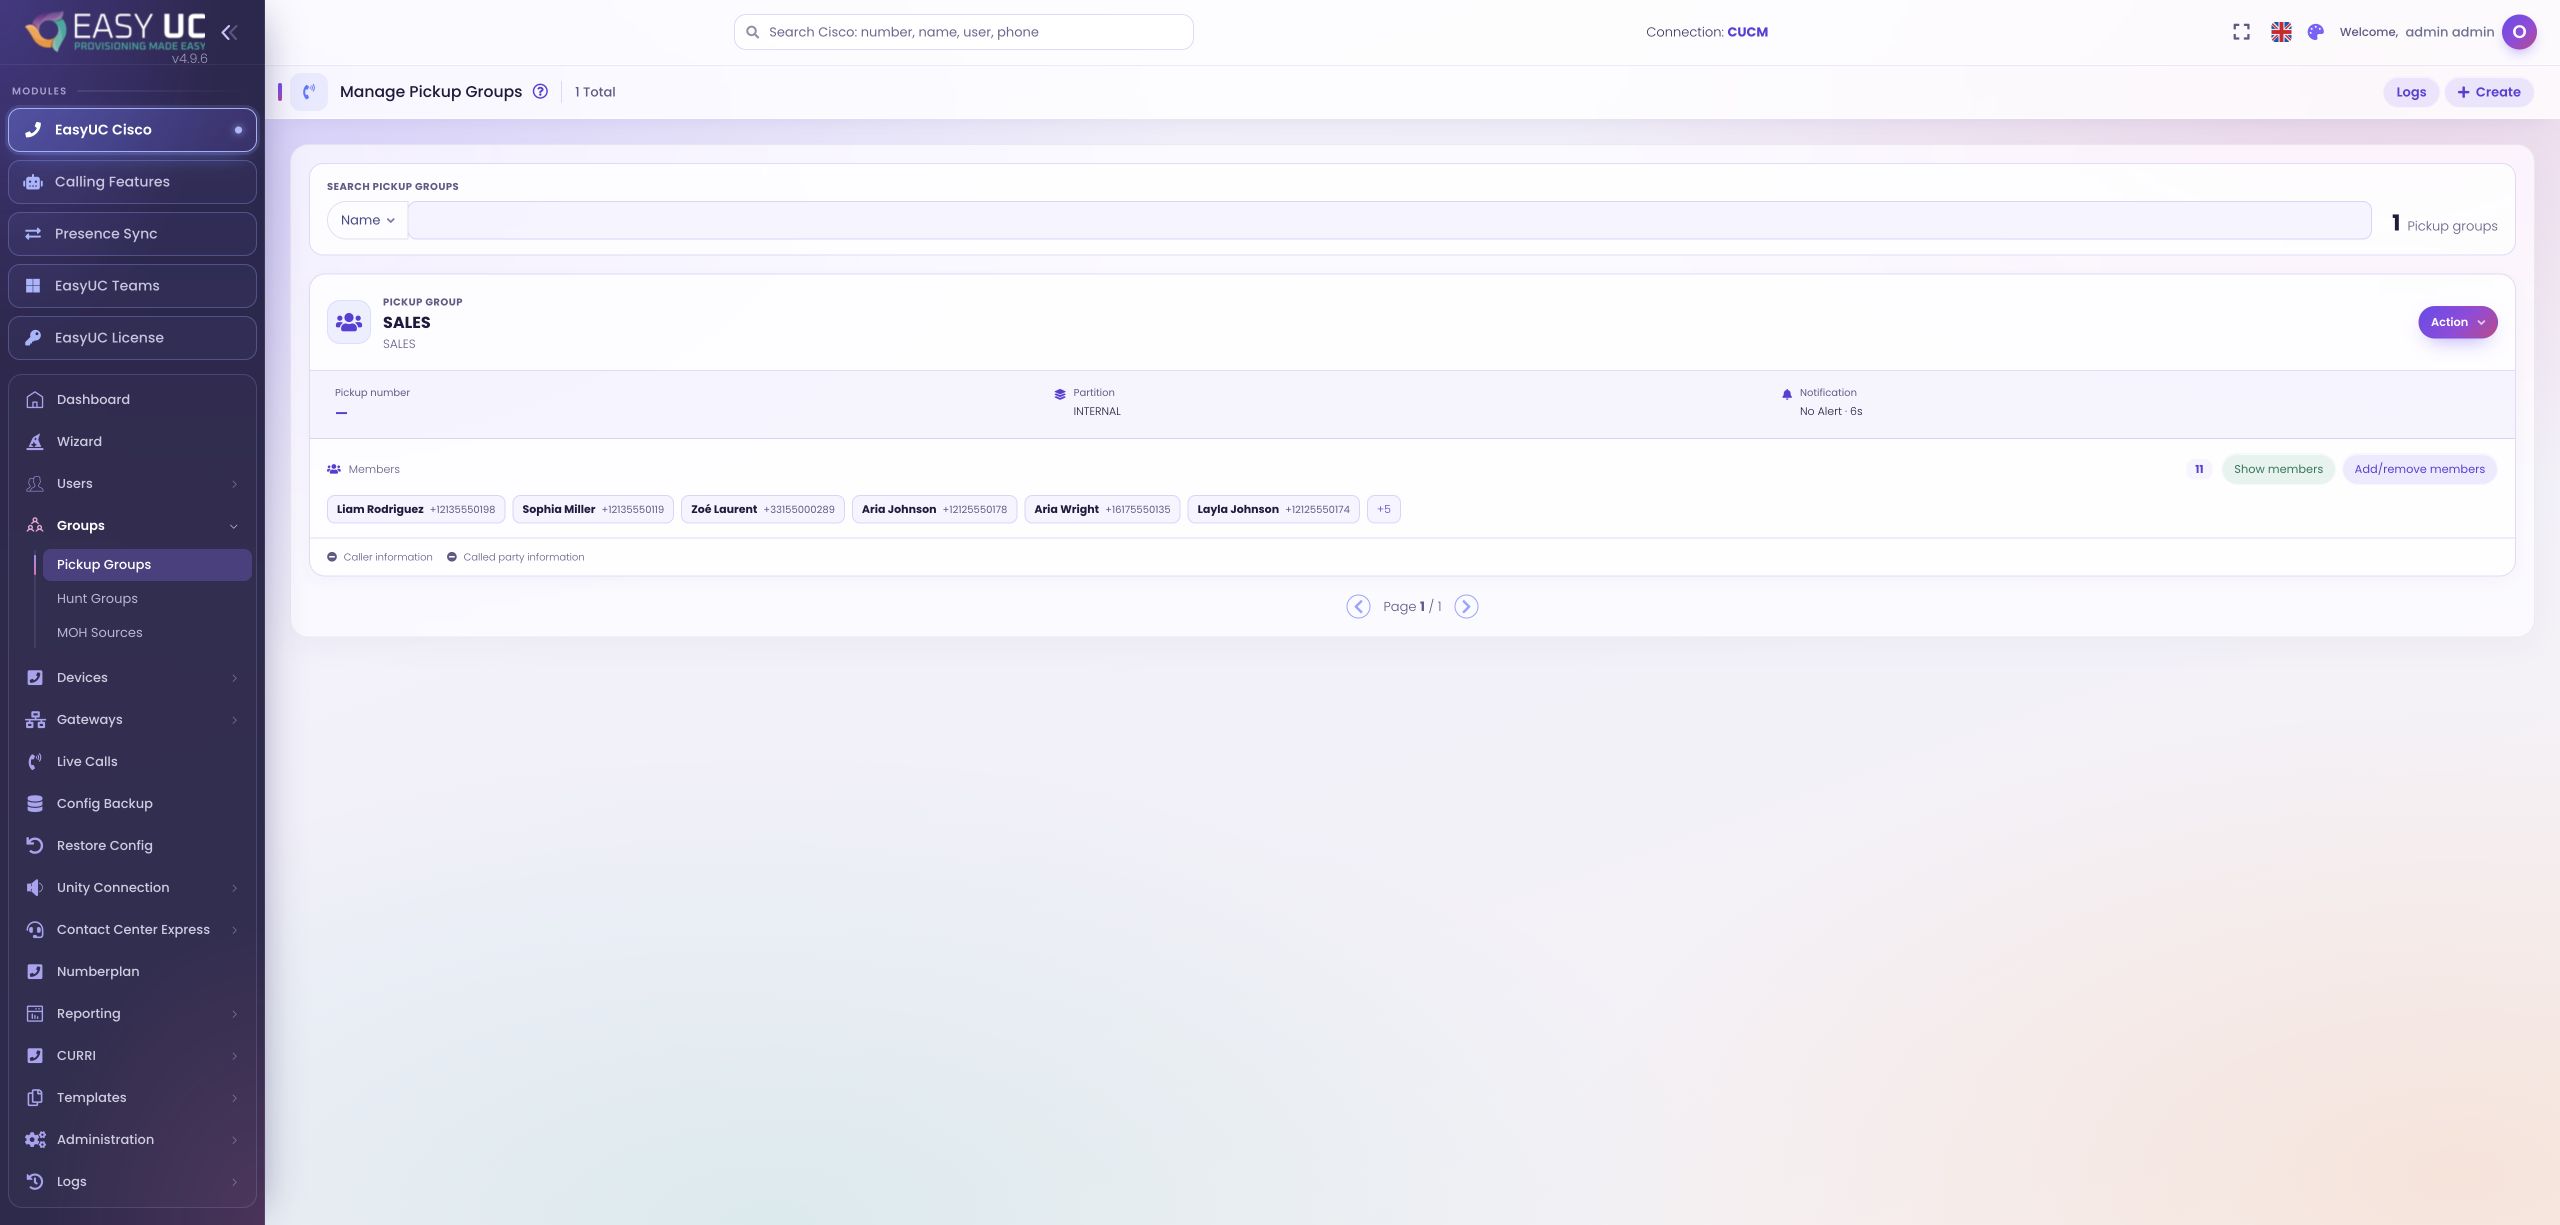
Each pickup group shows its name, number, partition and member count. The notification type and timer appear on the card. You can also see whether calling-party and called-party information is enabled for notifications.
Membership management brings current members and the search for additional users or lines into one view. Assignments are changed directly in CUCM. A separate editor handles the name, description, notification type and timer; for visual notifications, you choose which party information to display.
Locate the pickup group and review its number, partition, member count, notification type and timer on the card.
Open the member overview or “Manage Members”. The list shows the lines together with their associated users and devices.
Search for users or lines in membership management and use the relevant add or remove action. The change takes effect directly in CUCM.
Open the pickup group editor, choose the notification type and timer, then save. For visual alerts, you can enable or disable calling-party and called-party information.
EasyUC supports templates based on a suitably configured reference device and Template 2.0 with settings maintained directly. In Template 2.0, choose the location and base configuration or package, then maintain the device and line defaults. These include device pool, CUCM location, partition, calling permissions, naming formats, busy trigger and no-answer timer.
Enable the required Jabber device types and select the location’s IP phone models. Assign suitable button templates to Jabber and the selected models for their line configuration. These defaults are used when creating new phones; saving template settings does not automatically change existing devices.
Open template settings and choose reference-device templates or Template 2.0. To maintain defaults directly, then select the location and the base configuration or the required package.
Set the location’s device and line defaults. Define device-description and line-naming formats, together with the busy trigger and no-answer timer.
Select the allowed Jabber types and IP phone models. Assign the required button templates, review the locations’ completion status and save the settings.
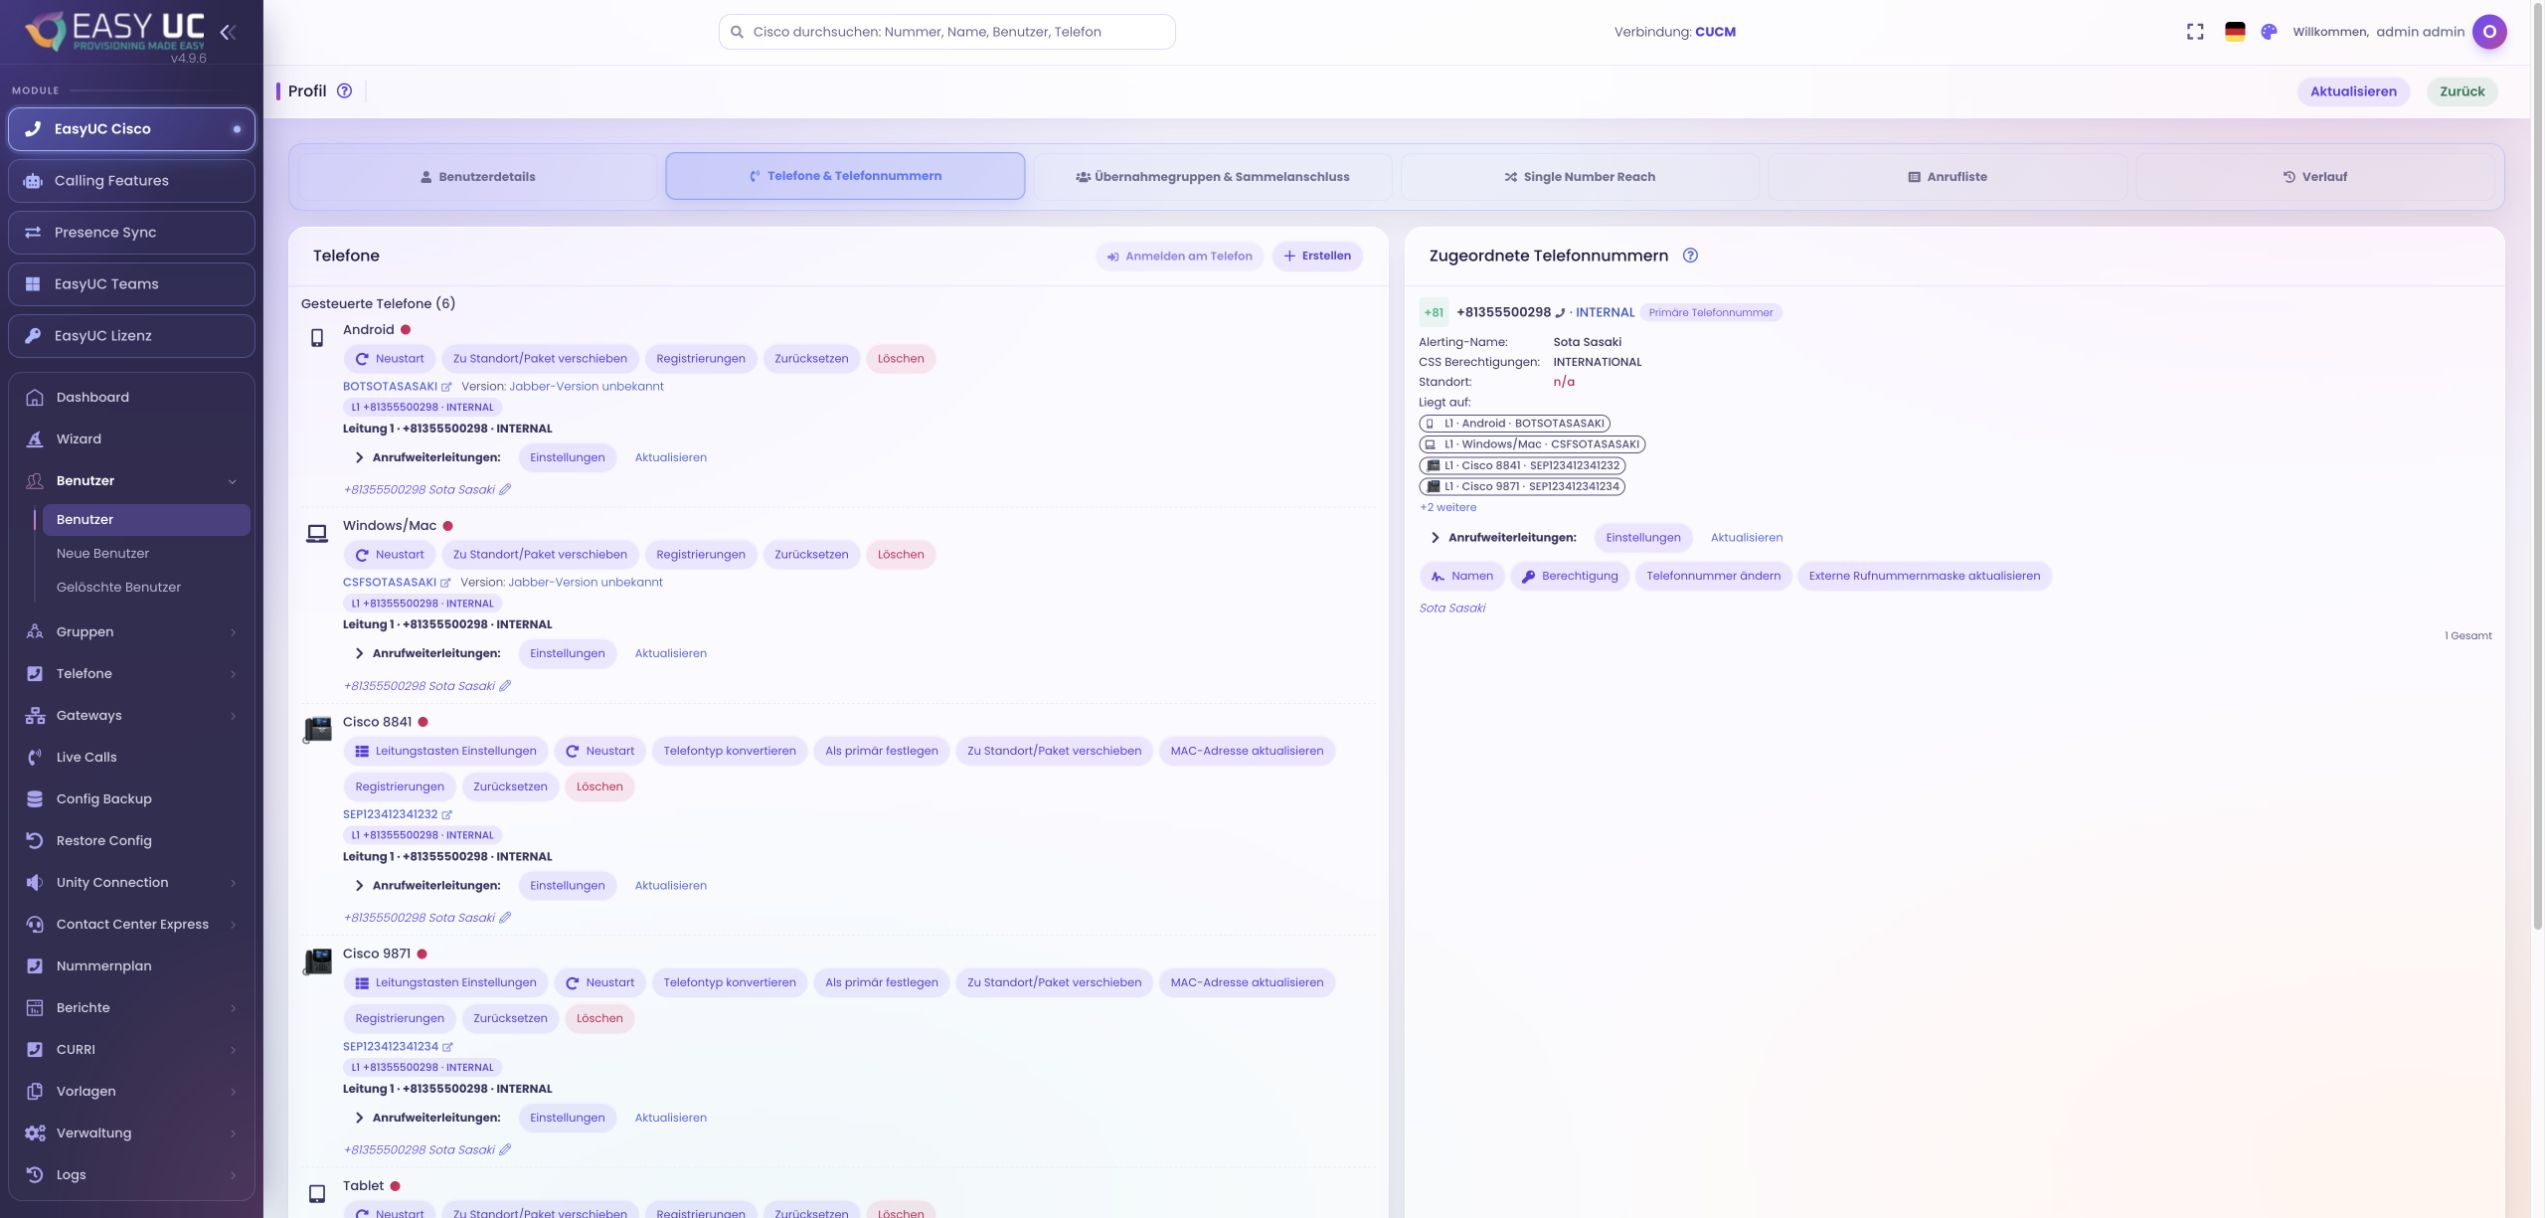
The Phones & Phone numbers tab brings devices and assigned lines together. Phone entries show each line’s number and partition, busy trigger and maximum number of calls. The number view adds details such as alerting name, calling search space permissions and location.
The view distinguishes controlled phones from other devices that carry the user’s numbers or shared lines. Device links open the relevant profile, and call forwarding details can be expanded for inspection. This helps you check the affected line and its assignment before changing a setting.
Select the user and open Phones & Phone numbers. Refresh the view when you need the latest data.
Check the number, partition and line position. Note whether the user controls the device or the device carries a shared line.
Review the busy trigger and maximum call count for the relevant line. Expand call forwarding to inspect existing forwarding destinations.
Use the available line actions or open the device profile through its link. In the relevant dialog, check which object the change applies to.
Single Number Reach can also ring external destinations when someone calls the business number. In the user profile’s Single Number Reach tab, Add reachability offers Remote Destination or Mobile Identity. Depending on the type, you assign directory numbers or a device, then define the destination’s ringing timers and schedule.
The screenshot shows a user with no additional reachability configured yet. Creation requires an available location and suitable template, and the destination number must be reachable through the telephony environment. The empty tab shows the starting point, not a tested call-delivery result.
Open Single Number Reach in the user profile and choose Remote Destination or Mobile Identity from Add reachability.
Check the location and available templates. Enter the external destination number and select the corresponding business numbers or device for the chosen type.
Set the delay before ringing and the timers for answering too soon or too late. Define when the destination should ring.
Save the configuration and review the assignment in the user profile. Call the business number to check that the additional destination is reached as intended.
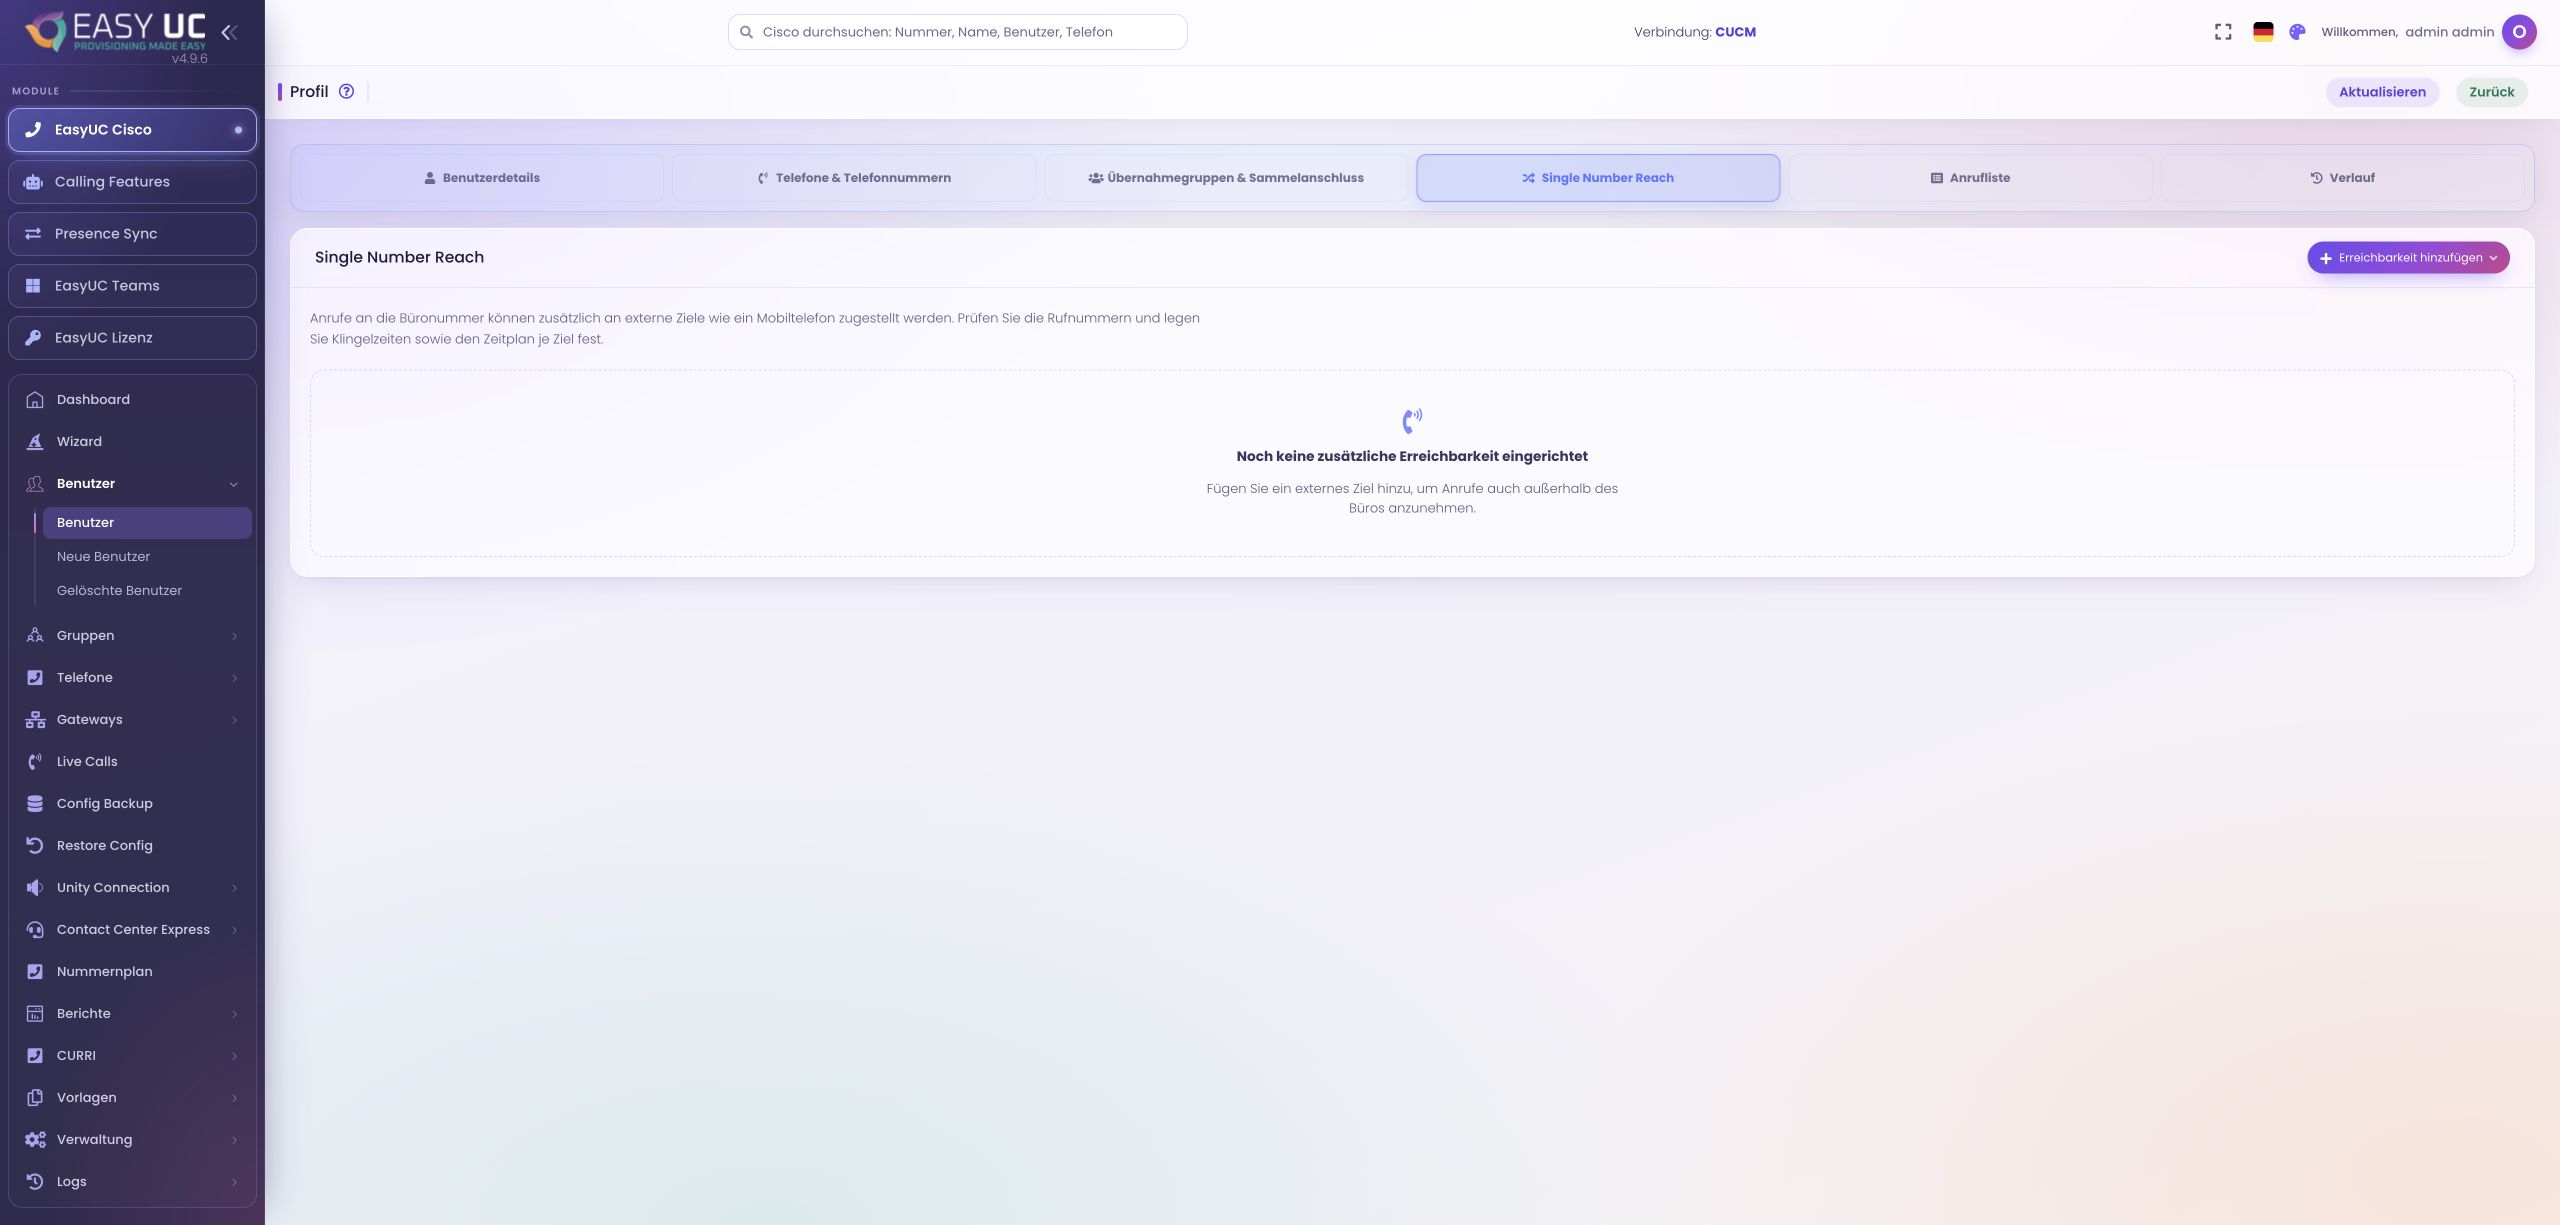
Configure additional ringing destinations and their schedules directly in the user profile. The capture shows the section before the first additional reachability destination is added. Location, template and number routing must be prepared for setup.
How does this become a working process? Our use cases show each step directly in the EasyUC interface.
Explore practical examples